Protein Expression and Purification Series - Bio-Rad
Protein Expression and Purification Series - Bio-Rad
Protein Expression and Purification Series - Bio-Rad

Create successful ePaper yourself
Turn your PDF publications into a flip-book with our unique Google optimized e-Paper software.
CHAPTER 6<br />
HANDPACKING<br />
COLUMNs<br />
<strong>Protein</strong> <strong>Expression</strong> <strong>and</strong> <strong>Purification</strong> <strong>Series</strong><br />
2.<br />
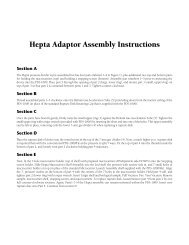
Attaching the flow adaptor to the column.<br />
A. Pull the flow adaptor bed support all the way up into the flow adaptor body (see Figure 6.3).<br />
B. Attach the flow adaptor body to the top of the column by gently sliding the flow adaptor body<br />
over the yellow flange of the column top. Be careful since the glass column can break (see Figure<br />
6.4).<br />
C. Place the flow adaptor over a beaker or the sink <strong>and</strong> open the two way stopcock on the bottom<br />
of the column (Figure 6.11).<br />
Figure 6.11. Inserting the flow adaptor<br />
into the column packed with resin.<br />
The cam latch is in position 1 <strong>and</strong> the flow<br />
adaptor has been inserted into the column<br />
to the top of the water above the resin. The<br />
two-way stopcock at the bottom of the<br />
column is open to allow buffer to drain out<br />
as the flow adaptor is lowered. The syringe<br />
is still attached to the tubing since this<br />
prevents water from flowing back up into<br />
the syringe at this time.<br />
Figure 6.12. Adjusting the flow adaptor<br />
height to the resin bed. The cam lock<br />
is moved to position 2. The syringe is<br />
removed from the tubing <strong>and</strong> the tubing<br />
is placed into the beaker. The twoway<br />
stopcock is moved to the closed<br />
position. The flow adaptor has been fully<br />
lowered to just above the resin bed. The<br />
lowering of the flow adaptor body should<br />
force the excess buffer out of the flexible<br />
tubing into the beaker.<br />
D. Make sure the cam lock is in position 1. Carefully insert the flow adaptor into the column until it<br />
touches the top of the water above the settled resin bed.<br />
F. Move the cam latch to position 2 (Figure 6.12). Remove the syringe from the flexible tubing at<br />
the top of the flow adaptor. Close the two-way stopcock.<br />
G. Slowly lower the flow adaptor until it touches the top of the packed gel bed. The O-ring seal<br />
should be tight enough so that water should now be flowing out of the top of the flexible tubing.<br />
Make sure the tubing is over a beaker or paper towel, not your lap!<br />
H. Move the cam latch to position 3 (Figure 6.13).<br />
I. Secure the flow adaptor by turning the black locking ring clockwise.<br />
Figure 6.13. Closing the cam latch,<br />
position 3.<br />
J. Your column is now ready to be washed to remove the remaining storage buffer <strong>and</strong> to be used<br />
for purifying proteins.<br />
138 Chapter 6: H<strong>and</strong>packing a Glass Econo-Column<br />
Column Attached to a Flow Adaptor