Protein Expression and Purification Series - Bio-Rad
Protein Expression and Purification Series - Bio-Rad
Protein Expression and Purification Series - Bio-Rad

Create successful ePaper yourself
Turn your PDF publications into a flip-book with our unique Google optimized e-Paper software.
<strong>Protein</strong> <strong>Expression</strong> <strong>and</strong> <strong>Purification</strong> <strong>Series</strong><br />
1.5 Flush the system through with water to the fraction collector<br />
Up to this point, the inlet tubing for Pump A <strong>and</strong> Pump B,<br />
as well as all the tubing up to the AVR7-3 valve, have been<br />
flushed with water. Now it is time to flush the entire system<br />
beyond the AVR7-3 valve (the column, UV <strong>and</strong> conductivity<br />
detectors <strong>and</strong> fraction collector <strong>and</strong> all associated tubing)<br />
with water as well.<br />
1.<br />
2.<br />
3.<br />
On the Manual screen, move the AVR7-3 valve back<br />
to position L (Load) by clicking “L” (Figure 8.4A). Verify<br />
that L is now displayed on the AVR7-3 valve.<br />
From the gradient pump control panel on the Manual<br />
screen, set the pump flow rate to 2.0 ml/min, set the<br />
composition to 50% Buffer B <strong>and</strong> start the pump<br />
(Figure 8.6). Make sure that you have at least 200 ml of<br />
water remaining in your beaker <strong>and</strong> that both the inlet<br />
lines are at the bottom of the beaker.<br />
In the Fraction Collector window on the Manual screen<br />
ensure that the System button is selected (Figure 8.7).<br />
1.6 Turn on the UV lamp<br />
Check that the lamp is on by looking at the UV Detector<br />
panel (Figure 8.8); if it is not, press the ON button. The light bulb icon should be yellow when the UV lamp<br />
is on.<br />
1.7 Manual screen chromatogram window<br />
A feature of the Manual screen is its ability to display up to eight traces on a chromatogram—including<br />
UV/Vis, pH, conductivity, % Buffer B <strong>and</strong> pressure traces—over a 10-minute interval. This is useful during<br />
column equilibration. The chromatogram window is displayed at the bottom of the screen under the valve<br />
control panel (Figure 8.9).<br />
3<br />
Chapter 8: <strong>Purification</strong> Protocol for <strong>Bio</strong>Logic DuoFlow System<br />
171<br />
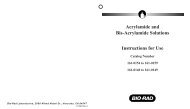
Figure 8.7. Manual DuoFlow system operation fraction<br />
collector control. The <strong>Bio</strong>Frac fraction collector has two<br />
operating modes: System—controlled by the DuoFlow<br />
system <strong>and</strong> Local—controlled from its own faceplate in<br />
st<strong>and</strong>-alone mode. When in System mode, the fraction<br />
collector control panel will show fields for Rack type,<br />
Start tube, End tube, Fraction size, Tube number, Volume<br />
left, as well as a toggle button for Start <strong>and</strong> Stop, <strong>and</strong> a<br />
button for Advance.<br />
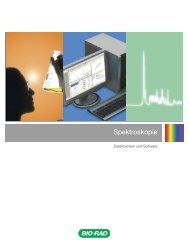
Figure 8.8. Manual control of the UV detector. The UV lamp automatically turns on<br />
when you turn on power to the workstation. The UV lamp can be turned on <strong>and</strong> off<br />
by clicking the On <strong>and</strong> Off buttons from the UV detector control panel on the Manual<br />
screen.<br />
4 4<br />
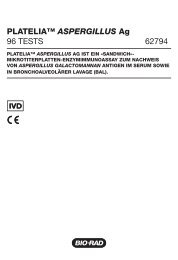
Figure 8.9. Manual screen chromatogram. Features of the chromatogram window include: 1. The time axis is reset automatically<br />
at the end of 10 minutes or reset manually by clicking the Clear Traces button. 2. The chromatogram window can be enlarged by<br />
pressing the Resize button. 3. Which chromatogram trace is to be displayed can be selected by using the drop-down menus on the<br />
upper right <strong>and</strong> left of the display 4. The Y-axis scale can be changed using the scroll bars on the right or left of the display 5. The<br />
maximum <strong>and</strong> minimum axis settings can be changed by pressing Settings on the Manual screen toolbar (see Figure 8.2).<br />
1<br />
3<br />
2<br />
1<br />
CHAPTER 8<br />
BIOLOGIC DUOFLOW<br />
PROTOCOL