Stand-Alone Punch machine user manual - Finn-Power International ...
Stand-Alone Punch machine user manual - Finn-Power International ...
Stand-Alone Punch machine user manual - Finn-Power International ...

Create successful ePaper yourself
Turn your PDF publications into a flip-book with our unique Google optimized e-Paper software.
o Allowed nest rotation: Part degree rotation allowed while<br />
nesting (0/180, 90/270).<br />
Information frame:<br />
Items listed in this frame are displayed after the part has been tooled and<br />
saved.<br />
o Turret: Shows the current turret information.<br />
o Sorting device: Shows the sorting device information.<br />
Material frame:<br />
o Code: Allows you to select the material type for the part.<br />
o Thickness: Allows you to select the material thickness for<br />
the part.<br />
o Die clearance: Lower and Upper limit of die clearance of<br />
punching tools that can be used for the selected material. NC<br />
Express uses and shows only tools that have a die clearance<br />
that falls between the lower and upper die limits set here.<br />
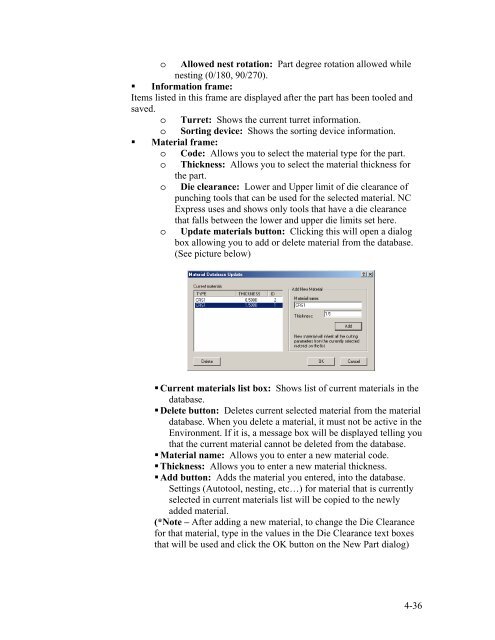
o Update materials button: Clicking this will open a dialog<br />
box allowing you to add or delete material from the database.<br />
(See picture below)<br />
Current materials list box: Shows list of current materials in the<br />
database.<br />
Delete button: Deletes current selected material from the material<br />
database. When you delete a material, it must not be active in the<br />
Environment. If it is, a message box will be displayed telling you<br />
that the current material cannot be deleted from the database.<br />
Material name: Allows you to enter a new material code.<br />
Thickness: Allows you to enter a new material thickness.<br />
Add button: Adds the material you entered, into the database.<br />
Settings (Autotool, nesting, etc…) for material that is currently<br />
selected in current materials list will be copied to the newly<br />
added material.<br />
(*Note – After adding a new material, to change the Die Clearance<br />
for that material, type in the values in the Die Clearance text boxes<br />
that will be used and click the OK button on the New Part dialog)<br />
4-36