LaCie 2big Network 2 Hard Disk Manual - Tape Resources
LaCie 2big Network 2 Hard Disk Manual - Tape Resources
LaCie 2big Network 2 Hard Disk Manual - Tape Resources

You also want an ePaper? Increase the reach of your titles
YUMPU automatically turns print PDFs into web optimized ePapers that Google loves.
<strong>LaCie</strong> <strong>2big</strong> <strong>Network</strong> 2 • DESIGN BY NEIL POULTON<br />
Connecting to a <strong>Network</strong><br />
User <strong>Manual</strong> page 17<br />
2.4. STEP 4: Completing the Setup<br />
Wizard<br />
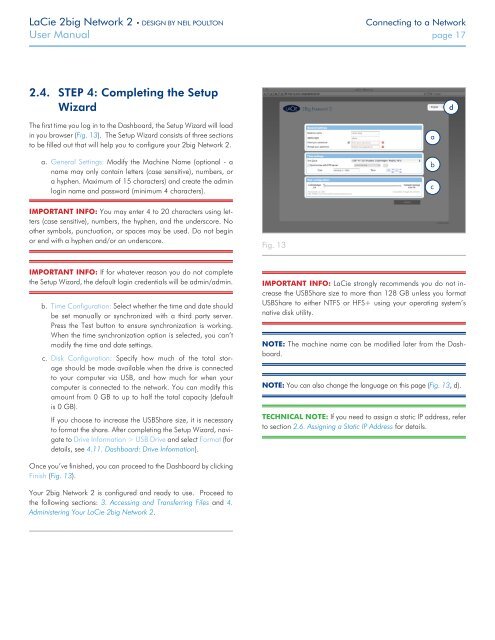
The first time you log in to the Dashboard, the Setup Wizard will load<br />
in you browser (Fig. 13). The Setup Wizard consists of three sections<br />
to be filled out that will help you to configure your <strong>2big</strong> <strong>Network</strong> 2.<br />
a. General Settings: Modify the Machine Name (optional - a<br />
name may only contain letters (case sensitive), numbers, or<br />
a hyphen. Maximum of 15 characters) and create the admin<br />
login name and password (minimum 4 characters).<br />
IMPORTANT INFO: You may enter 4 to 20 characters using letters<br />
(case sensitive), numbers, the hyphen, and the underscore. No<br />
other symbols, punctuation, or spaces may be used. Do not begin<br />
or end with a hyphen and/or an underscore.<br />
Fig. 13<br />
IMPORTANT INFO: If for whatever reason you do not complete<br />
the Setup Wizard, the default login credentials will be admin/admin.<br />
b. Time Configuration: Select whether the time and date should<br />
be set manually or synchronized with a third party server.<br />
Press the Test button to ensure synchronization is working.<br />
When the time synchronization option is selected, you can’t<br />
modify the time and date settings.<br />
c. <strong>Disk</strong> Configuration: Specify how much of the total storage<br />
should be made available when the drive is connected<br />
to your computer via USB, and how much for when your<br />
computer is connected to the network. You can modify this<br />
amount from 0 GB to up to half the total capacity (default<br />
is 0 GB).<br />
If you choose to increase the USBShare size, it is necessary<br />
to format the share. After completing the Setup Wizard, navigate<br />
to Drive Information > USB Drive and select Format (for<br />
details, see 4.11. Dashboard: Drive Information).<br />
IMPORTANT INFO: <strong>LaCie</strong> strongly recommends you do not increase<br />
the USBShare size to more than 128 GB unless you format<br />
USBShare to either NTFS or HFS+ using your operating system’s<br />
native disk utility.<br />
NOTE: The machine name can be modified later from the Dashboard.<br />
NOTE: You can also change the language on this page (Fig. 13, d).<br />
TECHNICAL NOTE: If you need to assign a static IP address, refer<br />
to section 2.6. Assigning a Static IP Address for details.<br />
Once you’ve finished, you can proceed to the Dashboard by clicking<br />
Finish (Fig. 13).<br />
Your <strong>2big</strong> <strong>Network</strong> 2 is configured and ready to use. Proceed to<br />
the following sections: 3. Accessing and Transferring Files and 4.<br />
Administering Your <strong>LaCie</strong> <strong>2big</strong> <strong>Network</strong> 2.