LaCie 2big Network 2 Hard Disk Manual - Tape Resources
LaCie 2big Network 2 Hard Disk Manual - Tape Resources
LaCie 2big Network 2 Hard Disk Manual - Tape Resources

Create successful ePaper yourself
Turn your PDF publications into a flip-book with our unique Google optimized e-Paper software.
<strong>LaCie</strong> <strong>2big</strong> <strong>Network</strong> 2 • DESIGN BY NEIL POULTON Administering Your <strong>LaCie</strong> <strong>2big</strong> <strong>Network</strong> 2<br />
User <strong>Manual</strong> page 44<br />
4.9.4. Setting/Modifying Access Rights for<br />
Users/Groups<br />
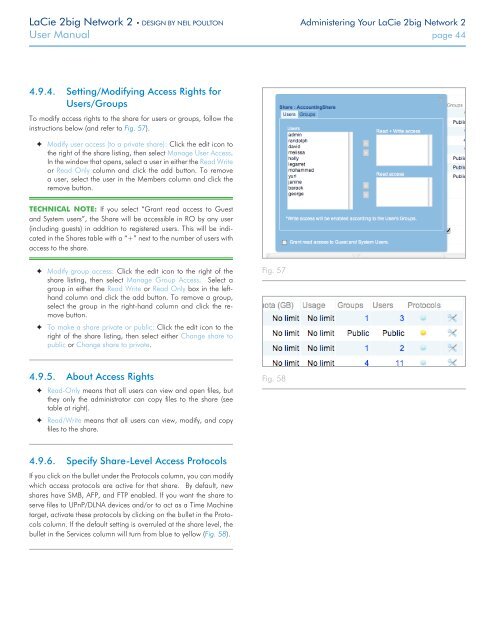
To modify access rights to the share for users or groups, follow the<br />
instructions below (and refer to Fig. 57).<br />
✦✦<br />
Modify user access (to a private share): Click the edit icon to<br />
the right of the share listing, then select Manage User Access.<br />
In the window that opens, select a user in either the Read Write<br />
or Read Only column and click the add button. To remove<br />
a user, select the user in the Members column and click the<br />
remove button.<br />
TECHNICAL NOTE: If you select “Grant read access to Guest<br />
and System users”, the Share will be accessible in RO by any user<br />
(including guests) in addition to registered users. This will be indicated<br />
in the Shares table with a “+” next to the number of users with<br />
access to the share.<br />
✦✦<br />
Modify group access: Click the edit icon to the right of the<br />
share listing, then select Manage Group Access. Select a<br />
group in either the Read Write or Read Only box in the lefthand<br />
column and click the add button. To remove a group,<br />
select the group in the right-hand column and click the remove<br />
button.<br />
✦✦<br />
To make a share private or public: Click the edit icon to the<br />
right of the share listing, then select either Change share to<br />
public or Change share to private.<br />
Fig. 57<br />
4.9.5. About Access Rights<br />
✦✦<br />
Read-Only means that all users can view and open files, but<br />
they only the administrator can copy files to the share (see<br />
table at right).<br />
✦✦<br />
Read/Write means that all users can view, modify, and copy<br />
files to the share.<br />
Fig. 58<br />
4.9.6. Specify Share-Level Access Protocols<br />
If you click on the bullet under the Protocols column, you can modify<br />
which access protocols are active for that share. By default, new<br />
shares have SMB, AFP, and FTP enabled. If you want the share to<br />
serve files to UPnP/DLNA devices and/or to act as a Time Machine<br />
target, activate these protocols by clicking on the bullet in the Protocols<br />
column. If the default setting is overruled at the share level, the<br />
bullet in the Services column will turn from blue to yellow (Fig. 58).