LaCie 2big Network 2 Hard Disk Manual - Tape Resources
LaCie 2big Network 2 Hard Disk Manual - Tape Resources
LaCie 2big Network 2 Hard Disk Manual - Tape Resources

You also want an ePaper? Increase the reach of your titles
YUMPU automatically turns print PDFs into web optimized ePapers that Google loves.
<strong>LaCie</strong> <strong>2big</strong> <strong>Network</strong> 2 • DESIGN BY NEIL POULTON Administering Your <strong>LaCie</strong> <strong>2big</strong> <strong>Network</strong> 2<br />
User <strong>Manual</strong> page 43<br />
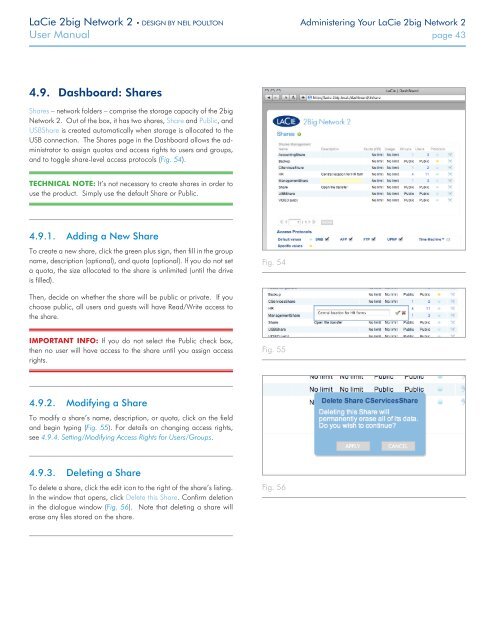
4.9. Dashboard: Shares<br />
Shares – network folders – comprise the storage capacity of the <strong>2big</strong><br />
<strong>Network</strong> 2. Out of the box, it has two shares, Share and Public, and<br />
USBShare is created automatically when storage is allocated to the<br />
USB connection. The Shares page in the Dashboard allows the administrator<br />
to assign quotas and access rights to users and groups,<br />
and to toggle share-level access protocols (Fig. 54).<br />
TECHNICAL NOTE: It’s not necessary to create shares in order to<br />
use the product. Simply use the default Share or Public.<br />
4.9.1. Adding a New Share<br />
To create a new share, click the green plus sign, then fill in the group<br />
name, description (optional), and quota (optional). If you do not set<br />
a quota, the size allocated to the share is unlimited (until the drive<br />
is filled).<br />
Fig. 54<br />
Then, decide on whether the share will be public or private. If you<br />
choose public, all users and guests will have Read/Write access to<br />
the share.<br />
IMPORTANT INFO: If you do not select the Public check box,<br />
then no user will have access to the share until you assign access<br />
rights.<br />
Fig. 55<br />
4.9.2. Modifying a Share<br />
To modify a share’s name, description, or quota, click on the field<br />
and begin typing (Fig. 55). For details on changing access rights,<br />
see 4.9.4. Setting/Modifying Access Rights for Users/Groups.<br />
4.9.3. Deleting a Share<br />
To delete a share, click the edit icon to the right of the share’s listing.<br />
In the window that opens, click Delete this Share. Confirm deletion<br />
in the dialogue window (Fig. 56). Note that deleting a share will<br />
erase any files stored on the share.<br />
Fig. 56