LaCie 2big Network 2 Hard Disk Manual - Tape Resources
LaCie 2big Network 2 Hard Disk Manual - Tape Resources
LaCie 2big Network 2 Hard Disk Manual - Tape Resources

Create successful ePaper yourself
Turn your PDF publications into a flip-book with our unique Google optimized e-Paper software.
<strong>LaCie</strong> <strong>2big</strong> <strong>Network</strong> 2 • DESIGN BY NEIL POULTON Administering Your <strong>LaCie</strong> <strong>2big</strong> <strong>Network</strong> 2<br />
User <strong>Manual</strong> page 38<br />
✦✦<br />
UPnP: This feature allows your <strong>2big</strong> <strong>Network</strong> 2 to act as a<br />
UPnP multimedia server. Files stored in shares where UPnP<br />
service is active will be available to play on UPnP-enabled<br />
players (such as cell phones, computers, and game consoles).<br />
For information on using your <strong>2big</strong> <strong>Network</strong> 2 to stream files<br />
to your UPnP devices, see 3.7. Multimedia Server. For information<br />
on using the <strong>2big</strong> <strong>Network</strong> 2 as an iTunes music<br />
server, see section 3.8. iTunes Music Server.<br />
✦✦<br />
Time Machine: The <strong>2big</strong> <strong>Network</strong> 2 is compatible with Apple’s<br />
Time Machine, which backs up your Macintosh onto an external<br />
volume at regular intervals.<br />
TECHNICAL NOTE: If you’ve just added new content to the <strong>2big</strong><br />
<strong>Network</strong> 2, it could take a few minutes before they are available to<br />
UPnP/DLNA-certified players/adapters.<br />
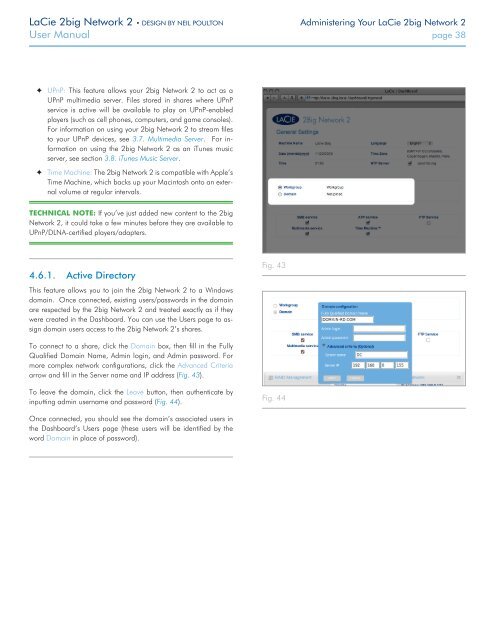
4.6.1. Active Directory<br />
This feature allows you to join the <strong>2big</strong> <strong>Network</strong> 2 to a Windows<br />
domain. Once connected, existing users/passwords in the domain<br />
are respected by the <strong>2big</strong> <strong>Network</strong> 2 and treated exactly as if they<br />
were created in the Dashboard. You can use the Users page to assign<br />
domain users access to the <strong>2big</strong> <strong>Network</strong> 2’s shares.<br />
Fig. 43<br />
To connect to a share, click the Domain box, then fill in the Fully<br />
Qualified Domain Name, Admin login, and Admin password. For<br />
more complex network configurations, click the Advanced Criteria<br />
arrow and fill in the Server name and IP address (Fig. 43).<br />
To leave the domain, click the Leave button, then authenticate by<br />
inputting admin username and password (Fig. 44).<br />
Fig. 44<br />
Once connected, you should see the domain’s associated users in<br />
the Dashboard’s Users page (these users will be identified by the<br />
word Domain in place of password).