Broadband Setup & Troubleshooting Guide - XLN Telecom
Broadband Setup & Troubleshooting Guide - XLN Telecom
Broadband Setup & Troubleshooting Guide - XLN Telecom

Create successful ePaper yourself
Turn your PDF publications into a flip-book with our unique Google optimized e-Paper software.
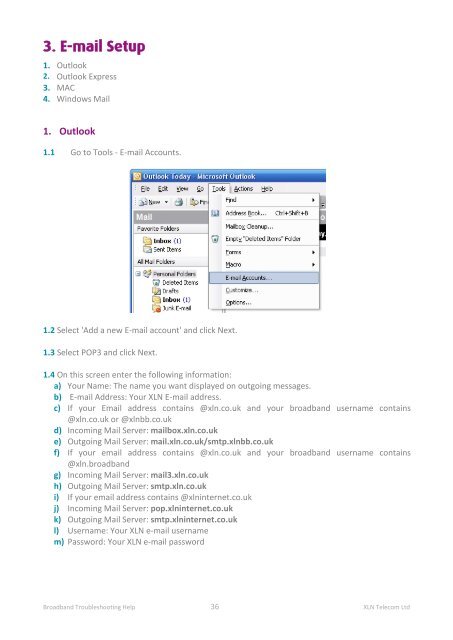
3. E-mail <strong>Setup</strong><br />
1. Outlook<br />
2. Outlook Express<br />
3. MAC<br />
4. Windows Mail<br />
1. Outlook<br />
1.1 Go to Tools - E-mail Accounts.<br />
1.2 Select 'Add a new E-mail account' and click Next.<br />
1.3 Select POP3 and click Next.<br />
1.4 On this screen enter the following information:<br />
a) Your Name: The name you want displayed on outgoing messages.<br />
b) E-mail Address: Your <strong>XLN</strong> E-mail address.<br />
c) If your Email address contains @xln.co.uk and your broadband username contains<br />
@xln.co.uk or @xlnbb.co.uk<br />
d) Incoming Mail Server: mailbox.xln.co.uk<br />
e) Outgoing Mail Server: mail.xln.co.uk/smtp.xlnbb.co.uk<br />
f) If your email address contains @xln.co.uk and your broadband username contains<br />
@xln.broadband<br />
g) Incoming Mail Server: mail3.xln.co.uk<br />
h) Outgoing Mail Server: smtp.xln.co.uk<br />
i) If your email address contains @xlninternet.co.uk<br />
j) Incoming Mail Server: pop.xlninternet.co.uk<br />
k) Outgoing Mail Server: smtp.xlninternet.co.uk<br />
l) Username: Your <strong>XLN</strong> e-mail username<br />
m) Password: Your <strong>XLN</strong> e-mail password<br />
<strong>Broadband</strong> <strong>Troubleshooting</strong> Help 36 <strong>XLN</strong> <strong>Telecom</strong> Ltd