ER-A440 Operation-Manual GB - Sharp
ER-A440 Operation-Manual GB - Sharp
ER-A440 Operation-Manual GB - Sharp

You also want an ePaper? Increase the reach of your titles
YUMPU automatically turns print PDFs into web optimized ePapers that Google loves.
4<br />
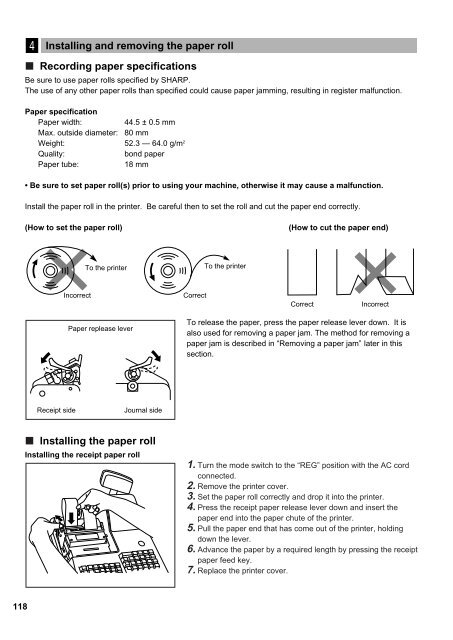
Installing and removing the paper roll<br />
Recording paper specifications<br />
Be sure to use paper rolls specified by SHARP.<br />
The use of any other paper rolls than specified could cause paper jamming, resulting in register malfunction.<br />
Paper specification<br />
Paper width:<br />
44.5 ± 0.5 mm<br />
Max. outside diameter: 80 mm<br />
Weight: 52.3 — 64.0 g/m 2<br />
Quality:<br />
bond paper<br />
Paper tube:<br />
18 mm<br />
• Be sure to set paper roll(s) prior to using your machine, otherwise it may cause a malfunction.<br />
Install the paper roll in the printer. Be careful then to set the roll and cut the paper end correctly.<br />
(How to set the paper roll)<br />
(How to cut the paper end)<br />
To the printer<br />
To the printer<br />
Incorrect<br />
Correct<br />
Correct<br />
Incorrect<br />
Paper replease lever<br />
To release the paper, press the paper release lever down. It is<br />
also used for removing a paper jam. The method for removing a<br />
paper jam is described in “Removing a paper jam” later in this<br />
section.<br />
Receipt side<br />
Journal side<br />
Installing the paper roll<br />
Installing the receipt paper roll<br />
1. Turn the mode switch to the “REG” position with the AC cord<br />
connected.<br />
2. Remove the printer cover.<br />
3. Set the paper roll correctly and drop it into the printer.<br />
4. Press the receipt paper release lever down and insert the<br />
paper end into the paper chute of the printer.<br />
5. Pull the paper end that has come out of the printer, holding<br />
down the lever.<br />
6. Advance the paper by a required length by pressing the receipt<br />
paper feed key.<br />
7. Replace the printer cover.<br />
118