ER-A440 Operation-Manual GB - Sharp
ER-A440 Operation-Manual GB - Sharp
ER-A440 Operation-Manual GB - Sharp

You also want an ePaper? Increase the reach of your titles
YUMPU automatically turns print PDFs into web optimized ePapers that Google loves.
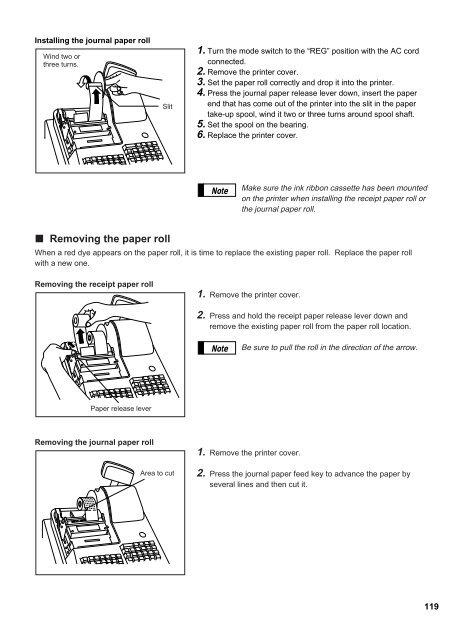
Installing the journal paper roll<br />
Wind two or<br />
three turns.<br />
Slit<br />
1. Turn the mode switch to the “REG” position with the AC cord<br />
connected.<br />
2. Remove the printer cover.<br />
3. Set the paper roll correctly and drop it into the printer.<br />
4. Press the journal paper release lever down, insert the paper<br />
end that has come out of the printer into the slit in the paper<br />
take-up spool, wind it two or three turns around spool shaft.<br />
5. Set the spool on the bearing.<br />
6. Replace the printer cover.<br />
Note<br />
Make sure the ink ribbon cassette has been mounted<br />
on the printer when installing the receipt paper roll or<br />
the journal paper roll.<br />
Removing the paper roll<br />
When a red dye appears on the paper roll, it is time to replace the existing paper roll. Replace the paper roll<br />
with a new one.<br />
Removing the receipt paper roll<br />
1. Remove the printer cover.<br />
2. Press and hold the receipt paper release lever down and<br />
remove the existing paper roll from the paper roll location.<br />
Note<br />
Be sure to pull the roll in the direction of the arrow.<br />
Paper release lever<br />
Removing the journal paper roll<br />
Area to cut<br />
1. Remove the printer cover.<br />
2. Press the journal paper feed key to advance the paper by<br />
several lines and then cut it.<br />
119