ER-A440 Operation-Manual GB - Sharp
ER-A440 Operation-Manual GB - Sharp
ER-A440 Operation-Manual GB - Sharp

Create successful ePaper yourself
Turn your PDF publications into a flip-book with our unique Google optimized e-Paper software.
FOR THE OP<strong>ER</strong>ATOR<br />
PRIOR TO ENTRIES<br />
1<br />
Preparations for entries<br />
Before registrations, insert the operator key into the mode switch and turn it to the REG position and check the<br />
following items:<br />
Receipt and journal paper rolls<br />
If the receipt and journal paper rolls are not set in the machine or there are low rolls, install new ones according<br />
to section “4. Installing and removing the paper rolls” under “OP<strong>ER</strong>ATOR MAINTENANCE.”<br />
Receipt ON/OFF function<br />
You can disable receipt printing in the REG mode to save paper using the receipt function. To disable receipt<br />
printing, press the q key in the OP X/Z position. This key toggles the receipt printing status ON and OFF.<br />
To check the receipt printing status, turn the mode switch to the OP X/Z position or press the c key in the REG<br />
mode. When the function is in the OFF status, the receipt off indicator “_” illuminates.<br />
Note<br />
Your register will print reports regardless of the receipt state. This means that the receipt roll must<br />
be installed even when the receipt state is “OFF”.<br />
Cashier and clerk assignment<br />
Prior to any item entries, cashiers must enter their cashier codes into the register, and may also be required to<br />
enter a clerk code. However, these code entries may not be necessary when the same cashier or clerk code is<br />
used in the next transaction.<br />
Cashier codes and clerk codes are available in two variants: Variant 1, in which they are displayed (“-00-” to<br />
“-99-”), and Variant 2, in which they are not displayed (always “-00-”).<br />
When the cashier or clerk code is assigned by the following procedure, the register prints the two-digit cashier<br />
code or clerk code (variant 2: “<br />
transaction.<br />
✱<br />
✱<br />
”) and the cashier or clerk name both on the receipt and journal for every<br />
Note<br />
All of these settings depend on how the register has been programmed. For the selection of these<br />
settings, consult your local dealer.<br />
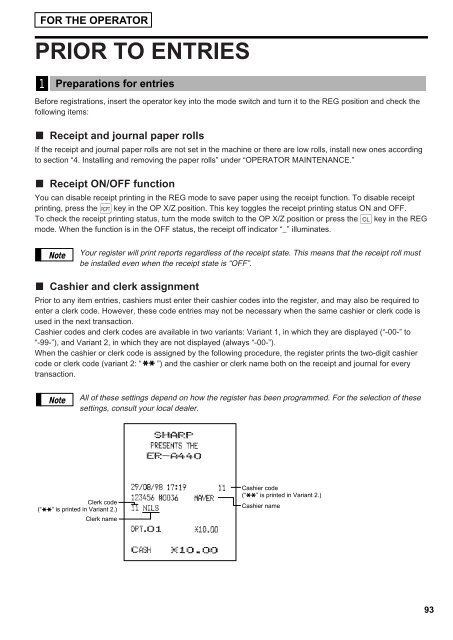
Clerk code<br />
(“ ” is printed in Variant 2.)<br />
Clerk name<br />
✱<br />
✱<br />
Cashier code<br />
(“ ” is printed in Variant 2.)<br />
Cashier name<br />
✱<br />
✱<br />
93