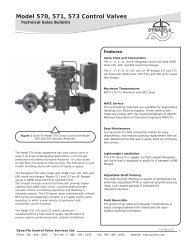
view user manual (pdf) - dyna-flo control valves
view user manual (pdf) - dyna-flo control valves
view user manual (pdf) - dyna-flo control valves

Create successful ePaper yourself
Turn your PDF publications into a flip-book with our unique Google optimized e-Paper software.
Preparing for Operation<br />
Assembly of the screw--type gland with plastic hose<br />
S<br />
S<br />
S<br />
S<br />
S<br />
Unscrew the sinter bronze silencer from the exhaust air opening on<br />
the underside of the housing.<br />
Screw the screw--type gland mentioned above into the exhaust air<br />
opening.<br />
Mount the above mentioned plastic hose on the screw--type gland<br />
and check the good fit.<br />
Fix the plastic hose with a cable strap to the fitting so that the<br />
opening faces downwards.<br />
Make sure that the hose has no kinks and the exhaust air can <strong>flo</strong>w<br />
out unhindered.<br />
3.3.2 Instructions for using positioners which are exposed to strong<br />
accelerations or vibrations<br />
Fittings under heavy mechanical stresses such as from breakaway<br />
flaps, violently shaking or vibrating <strong>valves</strong>, or steam jets can be<br />
exposed to strong acceleration forces far above those specified. This<br />
can result, in extreme cases, to a shifting of the friction clutch.<br />
For such cases the position <strong>control</strong>ler equipped with a fixing device for<br />
the slip clutch with which adjustment due to the above mentioned<br />
influences can be prevented. The setting possibility is accessible below<br />
the black knurled wheel and is recognizable from slots on the yellow<br />
wheel. The zero point adjustment and the setting possibility of the slip<br />
clutch are identified by symbols on an additional plate (see figure 3-6,<br />
page 41).<br />
Procedure<br />
After you have mounted the position <strong>control</strong>ler and commissioned it<br />
completely, you can set the slip clutch torque as follows:<br />
S<br />
S<br />
S<br />
S<br />
Plug a conventional 4 mm wide screwdriver into a slot in the yellow<br />
wheel.<br />
Then turn the yellow wheel to the left with the screwdriver until it<br />
snaps in audibly. This increases the torque of the slip clutch.<br />
A fixed slip clutch is recognizable from an approx. 1 mm wide gap<br />
between the yellow and black wheel.<br />
If you have to make a zero point setting, e.g. after changing the<br />
drive, please reduce the torque first by turning the yellow wheel to<br />
the right stop. After the zero point setting, you can fix the slip clutch<br />
as described above.<br />
40<br />
SIPART PS2 Manual<br />
A5E00074631-03