

SERVICE MANUAL - Alarko Carrier
SERVICE MANUAL - Alarko Carrier
SERVICE MANUAL - Alarko Carrier

You also want an ePaper? Increase the reach of your titles
YUMPU automatically turns print PDFs into web optimized ePapers that Google loves.
No.<br />
Part name<br />
Procedures<br />
Remarks<br />
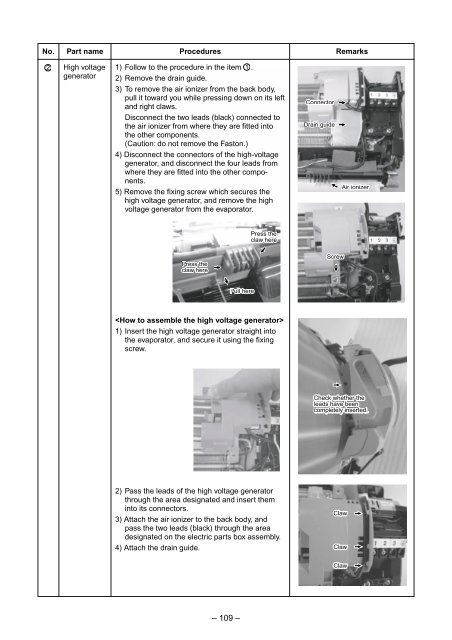
2<br />
High voltage<br />
generator<br />
1) Follow to the procedure in the item 1 .<br />
2) Remove the drain guide.<br />
3) To remove the air ionizer from the back body,<br />
pull it toward you while pressing down on its left<br />
and right claws.<br />
Disconnect the two leads (black) connected to<br />
the air ionizer from where they are fitted into<br />
the other components.<br />
(Caution: do not remove the Faston.)<br />
4) Disconnect the connectors of the high-voltage<br />
generator, and disconnect the four leads from<br />
where they are fitted into the other components.<br />
5) Remove the fixing screw which secures the<br />
high voltage generator, and remove the high<br />
voltage generator from the evaporator.<br />
Connector<br />
Drain guide<br />
Air ionizer<br />
Press the<br />
claw here<br />
Press the<br />
claw here<br />
Screw<br />
Pull here<br />
<br />
1) Insert the high voltage generator straight into<br />
the evaporator, and secure it using the fixing<br />
screw.<br />
Check whether the<br />
leads have been<br />
completely inserted.<br />
2) Pass the leads of the high voltage generator<br />
through the area designated and insert them<br />
into its connectors.<br />
3) Attach the air ionizer to the back body, and<br />
pass the two leads (black) through the area<br />
designated on the electric parts box assembly.<br />
4) Attach the drain guide.<br />
Claw<br />
Claw<br />
Claw<br />
– 109 –


