

SERVICE MANUAL - Alarko Carrier
SERVICE MANUAL - Alarko Carrier
SERVICE MANUAL - Alarko Carrier

Create successful ePaper yourself
Turn your PDF publications into a flip-book with our unique Google optimized e-Paper software.
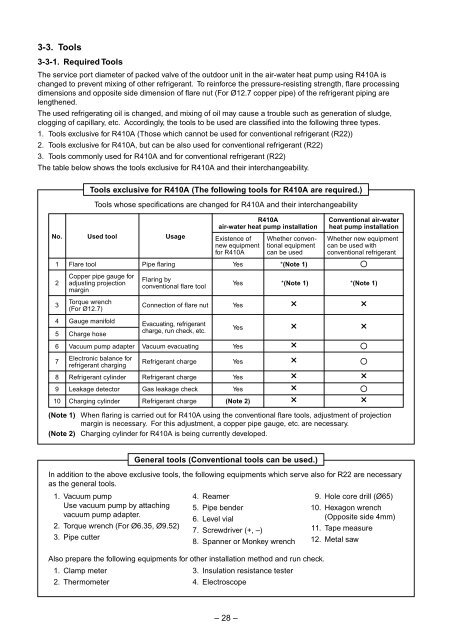
3-3. Tools<br />
3-3-1. Required Tools<br />
The service port diameter of packed valve of the outdoor unit in the air-water heat pump using R410A is<br />
changed to prevent mixing of other refrigerant. To reinforce the pressure-resisting strength, flare processing<br />
dimensions and opposite side dimension of flare nut (For Ø12.7 copper pipe) of the refrigerant piping are<br />
lengthened.<br />
The used refrigerating oil is changed, and mixing of oil may cause a trouble such as generation of sludge,<br />
clogging of capillary, etc. Accordingly, the tools to be used are classified into the following three types.<br />
1. Tools exclusive for R410A (Those which cannot be used for conventional refrigerant (R22))<br />
2. Tools exclusive for R410A, but can be also used for conventional refrigerant (R22)<br />
3. Tools commonly used for R410A and for conventional refrigerant (R22)<br />
The table below shows the tools exclusive for R410A and their interchangeability.<br />
Tools exclusive for R410A (The following tools for R410A are required.)<br />
Tools whose specifications are changed for R410A and their interchangeability<br />
R410A<br />
air-water heat pump installation<br />
Conventional air-water<br />
heat pump installation<br />
No.<br />
Used tool<br />
Usage<br />
Existence of<br />
new equipment<br />
for R410A<br />
Whether conventional<br />
equipment<br />
can be used<br />
Whether new equipment<br />
can be used with<br />
conventional refrigerant<br />
1<br />
Flare tool<br />
Pipe flaring<br />
Yes<br />
*(Note 1)<br />
¡<br />
2<br />
Copper pipe gauge for<br />
adjusting projection<br />
margin<br />
Flaring by<br />
conventional flare tool<br />
Yes<br />
*(Note 1)<br />
*(Note 1)<br />
3<br />
Torque wrench<br />
(For Ø12.7)<br />
Connection of flare nut<br />
Yes<br />
×<br />
×<br />
4<br />
5<br />
6<br />
7<br />
8<br />
9<br />
10<br />
Gauge manifold<br />
Charge hose<br />
Vacuum pump adapter<br />
Electronic balance for<br />
refrigerant charging<br />
Refrigerant cylinder<br />
Leakage detector<br />
Charging cylinder<br />
Evacuating, refrigerant<br />
charge, run check, etc.<br />
Vacuum evacuating<br />
Refrigerant charge<br />
Refrigerant charge<br />
Gas leakage check<br />
Refrigerant charge<br />
Yes<br />
Yes<br />
Yes<br />
Yes<br />
Yes<br />
(Note 2)<br />
(Note 1) When flaring is carried out for R410A using the conventional flare tools, adjustment of projection<br />
margin is necessary. For this adjustment, a copper pipe gauge, etc. are necessary.<br />
(Note 2) Charging cylinder for R410A is being currently developed.<br />
×<br />
×<br />
×<br />
×<br />
×<br />
×<br />
×<br />
¡<br />
¡<br />
×<br />
¡<br />
×<br />
General tools (Conventional tools can be used.)<br />
In addition to the above exclusive tools, the following equipments which serve also for R22 are necessary<br />
as the general tools.<br />
1. Vacuum pump<br />
Use vacuum pump by attaching<br />
vacuum pump adapter.<br />
2. Torque wrench (For Ø6.35, Ø9.52)<br />
3. Pipe cutter<br />
4. Reamer<br />
5. Pipe bender<br />
6. Level vial<br />
7. Screwdriver (+, –)<br />
8. Spanner or Monkey wrench<br />
9. Hole core drill (Ø65)<br />
10. Hexagon wrench<br />
(Opposite side 4mm)<br />
11. Tape measure<br />
12. Metal saw<br />
Also prepare the following equipments for other installation method and run check.<br />
1. Clamp meter<br />
3. Insulation resistance tester<br />
2. Thermometer<br />
4. Electroscope<br />
– 28 –


