

SERVICE MANUAL - Alarko Carrier
SERVICE MANUAL - Alarko Carrier
SERVICE MANUAL - Alarko Carrier

You also want an ePaper? Increase the reach of your titles
YUMPU automatically turns print PDFs into web optimized ePapers that Google loves.
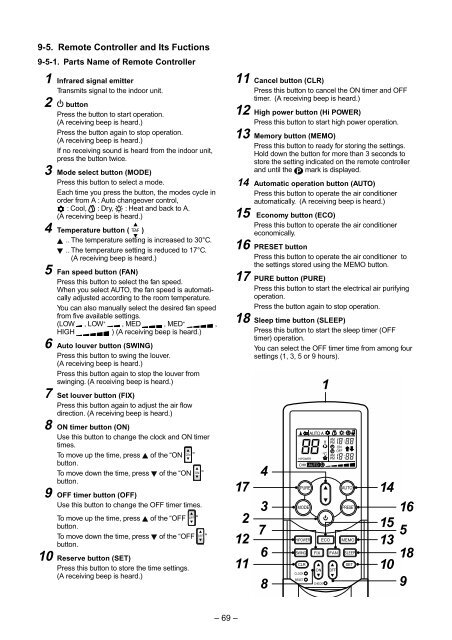
9-5. Remote Controller and Its Fuctions<br />
9-5-1. Parts Name of Remote Controller<br />
1 Infrared signal emitter<br />
Transmits signal to the indoor unit.<br />
2 button<br />
Press the button to start operation.<br />
(A receiving beep is heard.)<br />
Press the button again to stop operation.<br />
(A receiving beep is heard.)<br />
If no receiving sound is heard from the indoor unit,<br />
press the button twice.<br />
3 Mode select button (MODE)<br />
Press this button to select a mode.<br />
Each time you press the button, the modes cycle in<br />
order from A : Auto changeover control,<br />
: Cool, : Dry, : Heat and back to A.<br />
(A receiving beep is heard.)<br />
4 Temperature button ( TEMP )<br />
.. The temperature setting is increased to 30°C.<br />
.. The temperature setting is reduced to 17°C.<br />
(A receiving beep is heard.)<br />
5 Fan speed button (FAN)<br />
Press this button to select the fan speed.<br />
When you select AUTO, the fan speed is automatically<br />
adjusted according to the room temperature.<br />
You can also manually select the desired fan speed<br />
from five available settings.<br />
(LOW , LOW + , MED , MED + ,<br />
HIGH<br />
) (A receiving beep is heard.)<br />
6 Auto louver button (SWING)<br />
Press this button to swing the louver.<br />
(A receiving beep is heard.)<br />
Press this button again to stop the louver from<br />
swinging. (A receiving beep is heard.)<br />
7 Set louver button (FIX)<br />
Press this button again to adjust the air flow<br />
direction. (A receiving beep is heard.)<br />
8 ON timer button (ON)<br />
Use this button to change the clock and ON timer<br />
times.<br />
To move up the time, press of the “ON ON ”<br />
button.<br />
To move down the time, press of the “ON ON ”<br />
button.<br />
9 OFF timer button (OFF)<br />
Use this button to change the OFF timer times.<br />
To move up the time, press of the “OFF OFF ”<br />
button.<br />
To move down the time, press of the “OFF OFF ”<br />
button.<br />
10 Reserve button (SET)<br />
Press this button to store the time settings.<br />
(A receiving beep is heard.)<br />
11 Cancel button (CLR)<br />
Press this button to cancel the ON timer and OFF<br />
timer. (A receiving beep is heard.)<br />
12 High power button (Hi POWER)<br />
Press this button to start high power operation.<br />
13 Memory button (MEMO)<br />
Press this button to ready for storing the settings.<br />
Hold down the button for more than 3 seconds to<br />
store the setting indicated on the remote controller<br />
and until the mark is displayed.<br />
14 Automatic operation button (AUTO)<br />
Press this button to operate the air conditioner<br />
automatically. (A receiving beep is heard.)<br />
15 Economy button (ECO)<br />
Press this button to operate the air conditioner<br />
economically.<br />
16 PRESET button<br />
Press this button to operate the air conditioner to<br />
the settings stored using the MEMO button.<br />
17 PURE button (PURE)<br />
Press this button to start the electrical air purifying<br />
operation.<br />
Press the button again to stop operation.<br />
18 Sleep time button (SLEEP)<br />
Press this button to start the sleep timer (OFF<br />
timer) operation.<br />
You can select the OFF timer time from among four<br />
settings (1, 3, 5 or 9 hours).<br />
17<br />
2<br />
12<br />
11<br />
4<br />
3<br />
7<br />
6<br />
8<br />
PURE<br />
MODE<br />
CLOCK<br />
RESET<br />
CHECK<br />
TEMP<br />
AUTO<br />
PRESET<br />
HiPOWER ECO MEMO<br />
CLR<br />
1 . 3 . 5 . 9H<br />
SWING FIX FAN SLEEP<br />
ON<br />
1<br />
OFF<br />
SET<br />
14<br />
16<br />
15<br />
13 5<br />
18<br />
10<br />
9<br />
– 69 –


