SERVICE MANUAL - Alarko Carrier
SERVICE MANUAL - Alarko Carrier
SERVICE MANUAL - Alarko Carrier
Create successful ePaper yourself
Turn your PDF publications into a flip-book with our unique Google optimized e-Paper software.
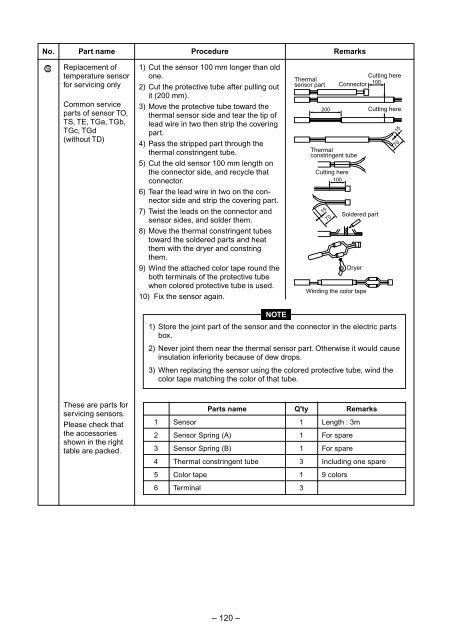
No.<br />
Part name<br />
Procedure<br />
Remarks<br />
9<br />
Replacement of<br />
temperature sensor<br />
for servicing only<br />
Common service<br />
parts of sensor TO,<br />
TS, TE, TGa, TGb,<br />
TGc, TGd<br />
(without TD)<br />
1) Cut the sensor 100 mm longer than old<br />
one.<br />
2) Cut the protective tube after pulling out<br />
it (200 mm).<br />
3) Move the protective tube toward the<br />
thermal sensor side and tear the tip of<br />
lead wire in two then strip the covering<br />
part.<br />
4) Pass the stripped part through the<br />
thermal constringent tube.<br />
5) Cut the old sensor 100 mm length on<br />
the connector side, and recycle that<br />
connector.<br />
6) Tear the lead wire in two on the connector<br />
side and strip the covering part.<br />
7) Twist the leads on the connector and<br />
sensor sides, and solder them.<br />
8) Move the thermal constringent tubes<br />
toward the soldered parts and heat<br />
them with the dryer and constring<br />
them.<br />
9) Wind the attached color tape round the<br />
both terminals of the protective tube<br />
when colored protective tube is used.<br />
10) Fix the sensor again.<br />
Thermal<br />
sensor part<br />
200<br />
Thermal<br />
constringent tube<br />
Cutting here<br />
100<br />
15<br />
70<br />
Cutting here<br />
Connector 100<br />
Soldered part<br />
Dryer<br />
Winding the color tape<br />
Cutting here<br />
15<br />
70<br />
NOTE<br />
1) Store the joint part of the sensor and the connector in the electric parts<br />
box.<br />
2) Never joint them near the thermal sensor part. Otherwise it would cause<br />
insulation inferiority because of dew drops.<br />
3) When replacing the sensor using the colored protective tube, wind the<br />
color tape matching the color of that tube.<br />
These are parts for<br />
servicing sensors.<br />
Please check that<br />
the accessories<br />
shown in the right<br />
table are packed.<br />
1<br />
2<br />
3<br />
4<br />
Parts name<br />
Sensor<br />
Sensor Spring (A)<br />
Sensor Spring (B)<br />
Thermal constringent tube<br />
Q'ty<br />
1<br />
1<br />
1<br />
3<br />
Remarks<br />
Length : 3m<br />
For spare<br />
For spare<br />
Including one spare<br />
5<br />
Color tape<br />
1<br />
9 colors<br />
6<br />
Terminal<br />
3<br />
– 120 –


