

SERVICE MANUAL - Alarko Carrier
SERVICE MANUAL - Alarko Carrier
SERVICE MANUAL - Alarko Carrier

Create successful ePaper yourself
Turn your PDF publications into a flip-book with our unique Google optimized e-Paper software.
Item<br />
17. Select switch on<br />
remote controller<br />
Operation flow and applicable data, etc.<br />
Description<br />
1. Purpose<br />
This operation is to operate only one<br />
indoor unit using one remote controller.<br />
Press the operation button<br />
on the remote controller.<br />
Both indoor units<br />
start operation.<br />
NO<br />
Unnecessary set<br />
[Remote controller select]<br />
YES<br />
Select “B” as the setting for<br />
one of the two indoor units and<br />
for the remote controller.<br />
(See below for details.)<br />
2. Description<br />
When operating one indoor unit in a<br />
situation where two indoor units have<br />
been installed in the same room or<br />
nearby rooms, this operation prevents the<br />
remote controller signal from being<br />
received simultaneously by both units,<br />
thus preventing both units from operating.<br />
3. Operation<br />
The indoor unit on which the remote<br />
controller selection has been set to B<br />
receives the signal of the remote controller<br />
also set to B.<br />
(At the factory the remote controller<br />
selection is set to A on all the indoor<br />
units. There is no A setting display.)<br />
HiPOWER ECO MEMO<br />
1 . 3 . 5 . 9H<br />
SWING FIX FAN SLEEP<br />
CLR<br />
SET<br />
ON OFF<br />
CLOCK<br />
RESET<br />
CHECK<br />
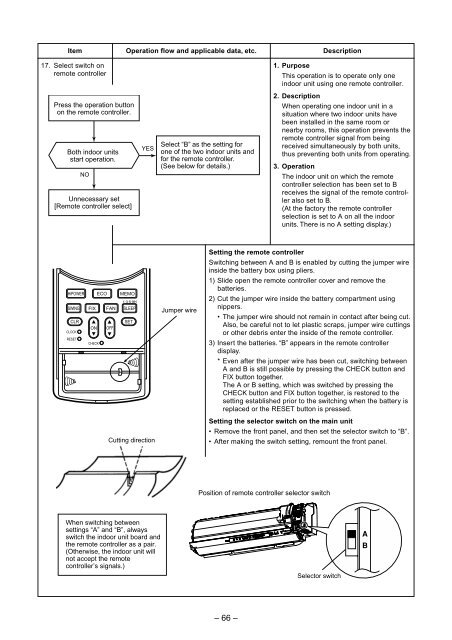
Cutting direction<br />
Jumper wire<br />
Setting the remote controller<br />
Switching between A and B is enabled by cutting the jumper wire<br />
inside the battery box using pliers.<br />
1) Slide open the remote controller cover and remove the<br />
batteries.<br />
2) Cut the jumper wire inside the battery compartment using<br />
nippers.<br />
• The jumper wire should not remain in contact after being cut.<br />
Also, be careful not to let plastic scraps, jumper wire cuttings<br />
or other debris enter the inside of the remote controller.<br />
3) Insert the batteries. “B” appears in the remote controller<br />
display.<br />
* Even after the jumper wire has been cut, switching between<br />
A and B is still possible by pressing the CHECK button and<br />
FIX button together.<br />
The A or B setting, which was switched by pressing the<br />
CHECK button and FIX button together, is restored to the<br />
setting established prior to the switching when the battery is<br />
replaced or the RESET button is pressed.<br />
Setting the selector switch on the main unit<br />
• Remove the front panel, and then set the selector switch to “B”.<br />
• After making the switch setting, remount the front panel.<br />
Position of remote controller selector switch<br />
When switching between<br />
settings “A” and “B”, always<br />
switch the indoor unit board and<br />
the remote controller as a pair.<br />
(Otherwise, the indoor unit will<br />
not accept the remote<br />
controller’s signals.)<br />
Selector switch<br />
– 66 –


