SERVICE MANUAL - Alarko Carrier
SERVICE MANUAL - Alarko Carrier
SERVICE MANUAL - Alarko Carrier
Create successful ePaper yourself
Turn your PDF publications into a flip-book with our unique Google optimized e-Paper software.
No.<br />
Part name<br />
Procedure<br />
Remarks<br />
4<br />
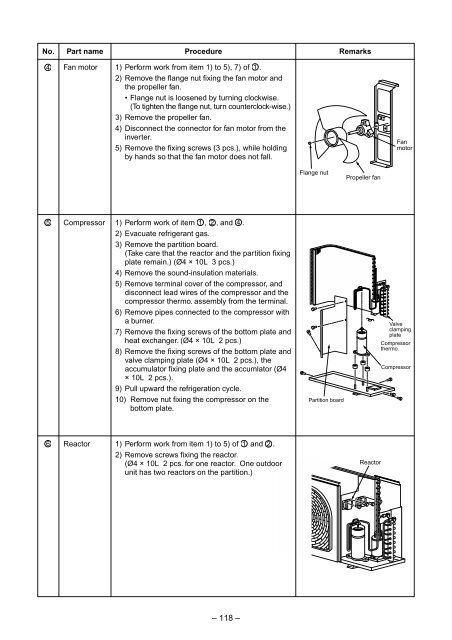
Fan motor<br />
1) Perform work from item 1) to 5), 7) of 1 .<br />
2) Remove the flange nut fixing the fan motor and<br />
the propeller fan.<br />
• Flange nut is loosened by turning clockwise.<br />
(To tighten the flange nut, turn counterclock-wise.)<br />
3) Remove the propeller fan.<br />
4) Disconnect the connector for fan motor from the<br />
inverter.<br />
5) Remove the fixing screws (3 pcs.), while holding<br />
by hands so that the fan motor does not fall.<br />
Fan<br />
motor<br />
Flange nut<br />
Propeller fan<br />
5<br />
Compressor<br />
1) Perform work of item 1 , 2 ‚ and 4 .<br />
2) Evacuate refrigerant gas.<br />
3) Remove the partition board.<br />
(Take care that the reactor and the partition fixing<br />
plate remain.) (Ø4 × 10L 3 pcs.)<br />
4) Remove the sound-insulation materials.<br />
5) Remove terminal cover of the compressor, and<br />
disconnect lead wires of the compressor and the<br />
compressor thermo. assembly from the terminal.<br />
6) Remove pipes connected to the compressor with<br />
a burner.<br />
7) Remove the fixing screws of the bottom plate and<br />
heat exchanger. (Ø4 × 10L 2 pcs.)<br />
8) Remove the fixing screws of the bottom plate and<br />
valve clamping plate (Ø4 × 10L 2 pcs.), the<br />
accumulator fixing plate and the accumlator (Ø4<br />
× 10L 2 pcs.).<br />
9) Pull upward the refrigeration cycle.<br />
10) Remove nut fixing the compressor on the<br />
bottom plate.<br />
Partition board<br />
Valve<br />
clamping<br />
plate<br />
Compressor<br />
thermo.<br />
Compressor<br />
6<br />
Reactor<br />
1) Perform work from item 1) to 5) of 1 and 2 .<br />
2) Remove screws fixing the reactor.<br />
(Ø4 × 10L 2 pcs. for one reactor. One outdoor<br />
unit has two reactors on the partition.)<br />
Reactor<br />
– 118 –


