

SERVICE MANUAL - Alarko Carrier
SERVICE MANUAL - Alarko Carrier
SERVICE MANUAL - Alarko Carrier

You also want an ePaper? Increase the reach of your titles
YUMPU automatically turns print PDFs into web optimized ePapers that Google loves.
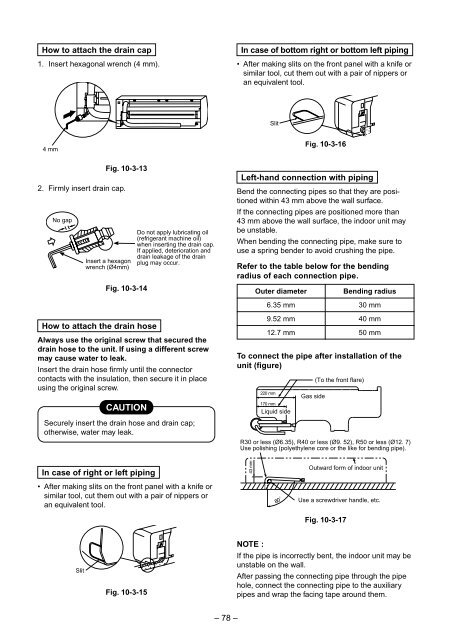
How to attach the drain cap<br />
1. Insert hexagonal wrench (4 mm).<br />
In case of bottom right or bottom left piping<br />
• After making slits on the front panel with a knife or<br />
similar tool, cut them out with a pair of nippers or<br />
an equivalent tool.<br />
Slit<br />
4 mm<br />
Fig. 10-3-16<br />
2. Firmly insert drain cap.<br />
No gap<br />
Fig. 10-3-13<br />
Insert a hexagon<br />
wrench (Ø4mm)<br />
Fig. 10-3-14<br />
How to attach the drain hose<br />
Do not apply lubricating oil<br />
(refrigerant machine oil)<br />
when inserting the drain cap.<br />
If applied, deterioration and<br />
drain leakage of the drain<br />
plug may occur.<br />
Always use the original screw that secured the<br />
drain hose to the unit. If using a different screw<br />
may cause water to leak.<br />
Insert the drain hose firmly until the connector<br />
contacts with the insulation, then secure it in place<br />
using the original screw.<br />
CAUTION<br />
Securely insert the drain hose and drain cap;<br />
otherwise, water may leak.<br />
Left-hand connection with piping<br />
Bend the connecting pipes so that they are positioned<br />
within 43 mm above the wall surface.<br />
If the connecting pipes are positioned more than<br />
43 mm above the wall surface, the indoor unit may<br />
be unstable.<br />
When bending the connecting pipe, make sure to<br />
use a spring bender to avoid crushing the pipe.<br />
Refer to the table below for the bending<br />
radius of each connection pipe.<br />
Outer diameter<br />
6.35 mm<br />
9.52 mm<br />
12.7 mm<br />
To connect the pipe after installation of the<br />
unit (figure)<br />
220 mm<br />
170 mm<br />
Liquid side<br />
Gas side<br />
(To the front flare)<br />
Bending radius<br />
30 mm<br />
40 mm<br />
50 mm<br />
R30 or less (Ø6.35), R40 or less (Ø9. 52), R50 or less (Ø12. 7)<br />
Use polishing (polyethylene core or the like for bending pipe).<br />
In case of right or left piping<br />
• After making slits on the front panel with a knife or<br />
similar tool, cut them out with a pair of nippers or<br />
an equivalent tool.<br />
43 mm<br />
Outward form of indoor unit<br />
Use a screwdriver handle, etc.<br />
Fig. 10-3-17<br />
Slit<br />
Fig. 10-3-15<br />
NOTE :<br />
If the pipe is incorrectly bent, the indoor unit may be<br />
unstable on the wall.<br />
After passing the connecting pipe through the pipe<br />
hole, connect the connecting pipe to the auxiliary<br />
pipes and wrap the facing tape around them.<br />
– 78 –


