

SERVICE MANUAL - Alarko Carrier
SERVICE MANUAL - Alarko Carrier
SERVICE MANUAL - Alarko Carrier

Create successful ePaper yourself
Turn your PDF publications into a flip-book with our unique Google optimized e-Paper software.
No.<br />
Part name<br />
Procedures<br />
Remarks<br />
8<br />
Cross flow fan<br />
<br />
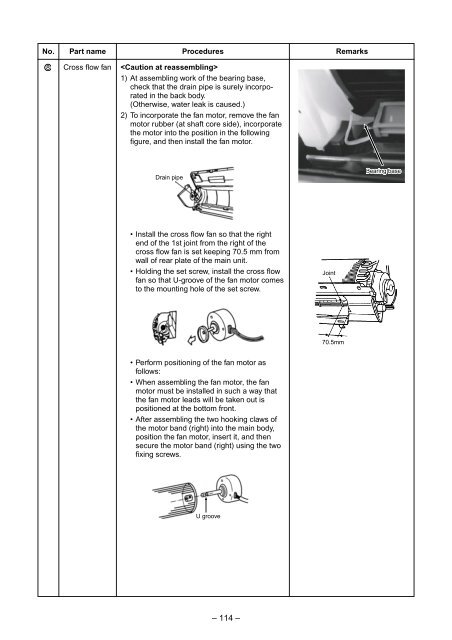
1) At assembling work of the bearing base,<br />
check that the drain pipe is surely incorporated<br />
in the back body.<br />
(Otherwise, water leak is caused.)<br />
2) To incorporate the fan motor, remove the fan<br />
motor rubber (at shaft core side), incorporate<br />
the motor into the position in the following<br />
figure, and then install the fan motor.<br />
Drain pipe<br />
Bearing base<br />
• Install the cross flow fan so that the right<br />
end of the 1st joint from the right of the<br />
cross flow fan is set keeping 70.5 mm from<br />
wall of rear plate of the main unit.<br />
• Holding the set screw, install the cross flow<br />
fan so that U-groove of the fan motor comes<br />
to the mounting hole of the set screw.<br />
Joint<br />
70.5mm<br />
• Perform positioning of the fan motor as<br />
follows:<br />
• When assembling the fan motor, the fan<br />
motor must be installed in such a way that<br />
the fan motor leads will be taken out is<br />
positioned at the bottom front.<br />
• After assembling the two hooking claws of<br />
the motor band (right) into the main body,<br />
position the fan motor, insert it, and then<br />
secure the motor band (right) using the two<br />
fixing screws.<br />
U groove<br />
– 114 –


