

SERVICE MANUAL - Alarko Carrier
SERVICE MANUAL - Alarko Carrier
SERVICE MANUAL - Alarko Carrier

Create successful ePaper yourself
Turn your PDF publications into a flip-book with our unique Google optimized e-Paper software.
CAUTION<br />
• Bind the auxiliary pipes (two) and connecting<br />
cable with facing tape tightly.<br />
In case of leftward piping and rear-leftward<br />
piping, bind the auxiliary pipes (two) only with<br />
facing tape.<br />
Auxiliary pipes<br />
Installation<br />
plate<br />
Indoor unit<br />
Connecting<br />
cable<br />
Fig. 10-3-18<br />
• Carefully arrange the pipes so that none of the<br />
pipes stick out of the rear plate of the indoor unit.<br />
• Carefully connect the auxiliary pipes and<br />
connecting pipes to each other and cut off the<br />
insulating tape wound on the connecting pipe<br />
to avoid double-taping at the joint, moreover,<br />
seal the joint with the vinyl tape, etc.<br />
• Since condensation can result in machine<br />
performance trouble, be sure to insulate both<br />
connecting pipes. (Use polyethylene foam as<br />
insulating material.)<br />
• When bending a pipe, be careful not to crush it.<br />
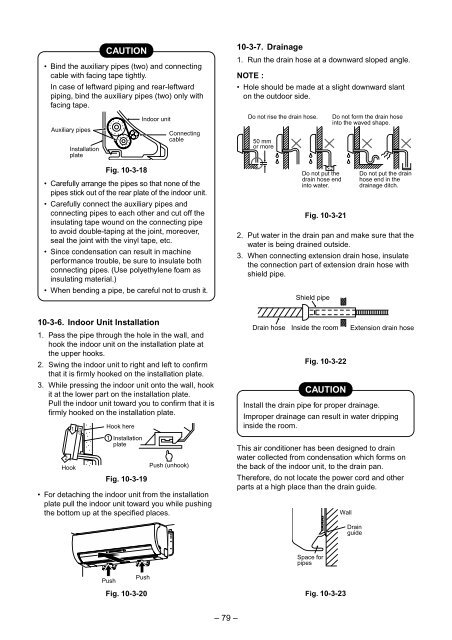
10-3-7. Drainage<br />
1. Run the drain hose at a downward sloped angle.<br />
NOTE :<br />
• Hole should be made at a slight downward slant<br />
on the outdoor side.<br />
Do not rise the drain hose.<br />
50 mm<br />
or more<br />
Do not put the<br />
drain hose end<br />
into water.<br />
Fig. 10-3-21<br />
2. Put water in the drain pan and make sure that the<br />
water is being drained outside.<br />
3. When connecting extension drain hose, insulate<br />
the connection part of extension drain hose with<br />
shield pipe.<br />
Shield pipe<br />
Do not form the drain hose<br />
into the waved shape.<br />
Do not put the drain<br />
hose end in the<br />
drainage ditch.<br />
10-3-6. Indoor Unit Installation<br />
1. Pass the pipe through the hole in the wall, and<br />
hook the indoor unit on the installation plate at<br />
the upper hooks.<br />
2. Swing the indoor unit to right and left to confirm<br />
that it is firmly hooked on the installation plate.<br />
3. While pressing the indoor unit onto the wall, hook<br />
it at the lower part on the installation plate.<br />
Pull the indoor unit toward you to confirm that it is<br />
firmly hooked on the installation plate.<br />
2<br />
1<br />
Hook<br />
Hook here<br />
1 Installation<br />
plate<br />
Fig. 10-3-19<br />
Push (unhook)<br />
• For detaching the indoor unit from the installation<br />
plate pull the indoor unit toward you while pushing<br />
the bottom up at the specified places.<br />
Drain hose<br />
Inside the room<br />
Fig. 10-3-22<br />
CAUTION<br />
Install the drain pipe for proper drainage.<br />
Improper drainage can result in water dripping<br />
inside the room.<br />
This air conditioner has been designed to drain<br />
water collected from condensation which forms on<br />
the back of the indoor unit, to the drain pan.<br />
Therefore, do not locate the power cord and other<br />
parts at a high place than the drain guide.<br />
Wall<br />
Extension drain hose<br />
Drain<br />
guide<br />
Space for<br />
pipes<br />
Push<br />
Push<br />
Fig. 10-3-20<br />
Fig. 10-3-23<br />
– 79 –


