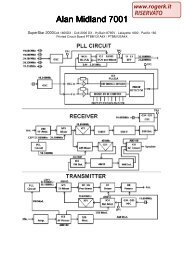
Modifications for the ICOM - RogerK
Modifications for the ICOM - RogerK
Modifications for the ICOM - RogerK
- No tags were found...

Create successful ePaper yourself
Turn your PDF publications into a flip-book with our unique Google optimized e-Paper software.
. .not used.Now <strong>the</strong> fun really begins! The diode that you received in <strong>the</strong> mail, and <strong>the</strong> one that you have to remove, are very small. Theyare also quite rugged, so don't let <strong>the</strong> size intimidate you. You do need to be clever about it though, and <strong>the</strong>re is certainly morethan one right way to go about it. You need a magnifying glass of some sort, and a fine tipped soldering iron. I wrapped a pieceof solid No. 12 copper wire tightly around <strong>the</strong> tip of my 25 watt Weller. I brought a one inch lead straight out from <strong>the</strong> tip, andfiled <strong>the</strong> end smooth. Ready <strong>for</strong> pin point soldering, start by removing diode D22. I put a knife blade under one end and appliedlight pressure while touching my No. 12 tip to <strong>the</strong> diode lead closest to <strong>the</strong> knife. Then <strong>the</strong> next lead, and <strong>the</strong> last one.Pops right off with no problem. You're not going to reuse it (unless restoring to original configuration), so it doesn't matter if itdoes get dinged up a bit. With D22 out, all that's left is installing D19.I used a pair of tweezers to place <strong>the</strong> diode in position, with <strong>the</strong> three leads sitting on top of <strong>the</strong> little blobs of solder already on<strong>the</strong> board.Then gently holding <strong>the</strong> diode in place with a toothpick, I tacked each lead in place. Don't add any solder, <strong>the</strong>re's enough on <strong>the</strong>board already to do <strong>the</strong> job. After one lead is tacked down, <strong>the</strong> diode will stay in place without <strong>the</strong> toothpick. As I said, <strong>the</strong>re areo<strong>the</strong>r ways to go about installing this very tiny diode (actually <strong>the</strong>re are two diodes in <strong>the</strong> little chip), so do what makes youcom<strong>for</strong>table. Or find a friend with a steadier hand to do it <strong>for</strong> you!Now you just put it all back toge<strong>the</strong>r again, starting with <strong>the</strong> CPU shield. If you have trouble sliding it into place, you might betrying to put it between <strong>the</strong> wiring harness and it's plastic backing.After <strong>the</strong> extended transmit mod <strong>the</strong> CPU resets itself (at least it did <strong>for</strong> me), but now you have <strong>the</strong> same features provided by<strong>the</strong> extended receive mod, without having to repeat <strong>the</strong> mod. You also can transmit 136-174 MHZ. As to be expected with a unitdesigned with 145 MHZ as <strong>the</strong> center frequency, per<strong>for</strong>mance varies. At 145 MHZ my handheld put out 7 watts into a dummyload. It does that throughout <strong>the</strong> 2 meter amateur band. At <strong>the</strong> ends of <strong>the</strong> "designed" transmit range, 140 and 150 MHZ, <strong>the</strong>power is down to 6.8 watts. Dropping down from 140 to 136 MHZ, <strong>the</strong> power is down to 6.2 watts. Going up from 150 MHZ, Igot readings of 5.75 at 155, 4.25 at 160, 3.2 at 165, 2.2 at 170, and 1.75 watts at 174 MHZ. These readings are with a RadioShack meter, so your mileage may vary. Never<strong>the</strong>less, a remarkable radio!Enjoy, and please don't transmit on frequencies you're not licensed <strong>for</strong>!Tim KA3YYP TPDugan@dockmaster.ncsc.milThis modification is read 536 times.top of page19-07-1998(IC-3) Low audio speaker mike on IC2A, 3A, 4A OR 02ATIf you own one of <strong>the</strong> IC2A, 3A, or O2AT series Hand-helds, you may be interested in reading on. I know my hearing is prettygood, but have you ever tried to listen to <strong>the</strong> audio coming out of your speaker mike on <strong>the</strong> above <strong>ICOM</strong>'s? For <strong>the</strong> most part,it's pretty low. I may be <strong>the</strong> last guy to figure out a cure <strong>for</strong> this, but here it is anyway. On <strong>the</strong> O2AT, etc., <strong>the</strong>re is a groove on<strong>the</strong> back near <strong>the</strong> top of <strong>the</strong> rig that is just <strong>the</strong> right size to accept <strong>the</strong> HM9 speaker mike turned 90 degrees so that <strong>the</strong> mikeplug fits in that groove in <strong>the</strong> rear of <strong>the</strong> rig. Thus alllowing all <strong>the</strong> audio to be heard from <strong>the</strong> internal speaker of <strong>the</strong> rig, usuallymuch better than <strong>the</strong> speaker mike.Now, in <strong>the</strong> case of <strong>the</strong> 2A series, etc., <strong>the</strong> fix is more complex. These rigs don't have that handy groove built in, so I decided agroove had to be made to accept this configuration. I thought long and hard about a minute, be<strong>for</strong>e getting <strong>the</strong> "Dremel" out andmaking my own slot or groove. It works well on both hand-helds I have. In fact, you can hook up an external speaker <strong>for</strong> evenmore loudness in <strong>the</strong> auto. So, give it a try or see me <strong>for</strong> a demo.This modification is read 367 times.top of page19-07-1998(IC-32) Out of band mod <strong>for</strong> <strong>the</strong> IC-32ATThis mod allows <strong>the</strong> unit to RX-TX outside both ham bands, plus function as a crossband repeater! BE CAREFUL THAT YOU DON'TINADVERTENTLY TRANSMIT!DISASSEMBLY1. Remove <strong>the</strong> battery.2. Loosen but do not remove <strong>the</strong> two screws holding <strong>the</strong> PTT switch plate.3. Remove <strong>the</strong> 4 screws on <strong>the</strong> back of <strong>the</strong> radio.4. Now remove <strong>the</strong> front of <strong>the</strong> HT by carefully lifting <strong>the</strong> bottom edge and <strong>the</strong>n pulling it down so it clears <strong>the</strong> top of <strong>the</strong> HT.Be carefull as <strong>the</strong>re is a ribbon cable attached.5. Unplug <strong>the</strong> Speaker/Mic plug from <strong>the</strong> main chassis to allow <strong>the</strong> front conver to be fully opened.