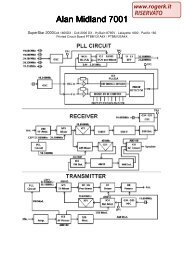
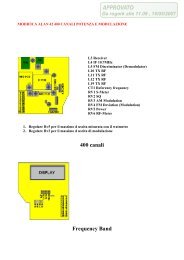
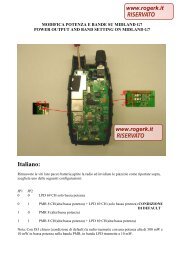
Modifications for the ICOM - RogerK
Modifications for the ICOM - RogerK
Modifications for the ICOM - RogerK
- No tags were found...

You also want an ePaper? Increase the reach of your titles
YUMPU automatically turns print PDFs into web optimized ePapers that Google loves.
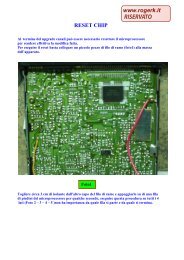
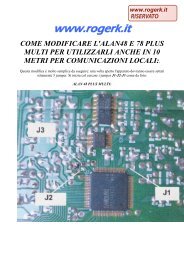
1. You're completely successful.2. You screw up a surface mount pad, but <strong>the</strong> radio still works when you're done.3. You're a total hack using <strong>the</strong> wrong tools, and you send <strong>the</strong> radio back to Icom <strong>for</strong> repair.Hopefully, you're a result 1 type person. At worst, you're a result 2. If you think your going to be a result 3 type, don't evenstart. Call a friend.We've done this mod on 2 radios with complete success. We can't guarantee that in later radios this mod will still work. It worksat least with serial numbers up to 1111 in <strong>the</strong> last 4 digits.Let's get started!Remove <strong>the</strong> 8 screws that attach <strong>the</strong> cover, and remove <strong>the</strong> top cover of <strong>the</strong> radio.Orient <strong>the</strong> radio so that serial, power and RF connector are closest to you, and <strong>the</strong> power switch faces away from you.On <strong>the</strong> PC board closest to you, in <strong>the</strong> upper left hand corner you should see a 80 pin surface mount chip. It has a number suchas 64F3334 stamped on it. This is <strong>the</strong> processor.Near <strong>the</strong> upper left hand corner of <strong>the</strong> chip, you should see 2 small green 0-ohm resistors. To <strong>the</strong> left of <strong>the</strong> two resistors youshould see an unpopulated pair of pads. These are <strong>the</strong> 3 "R"s below, on <strong>the</strong> left. The 4th "R" is used <strong>for</strong> location reference below.| RRR R| o ooo| o -----------------| o | || o | | D| | | D| r | || -------------------|| --| | || | || | || -----------------------(Picture courtesy of Alan Adamson, NE1H)Using <strong>the</strong> soldering iron and knife, *carefully* remove <strong>the</strong> right hand resistor. You'll need to alternately heat <strong>the</strong> two ends, whileapply a *light* pressure with <strong>the</strong> knife. Once it's hot enough, it will left off. It's very easy to destroy <strong>the</strong> pads <strong>the</strong> resistor issoldered to, so be *careful*.You'll now need to short <strong>the</strong> pads of <strong>the</strong> left resistor (this is <strong>the</strong> unpopulated one). You can ei<strong>the</strong>r try and re-use <strong>the</strong> resistor youjust lifted (least good idea), short <strong>the</strong>m with a short piece of wire wrap wire (OK idea), or use a real 0-ohm resistor (best idea).For <strong>the</strong> next step you have two options. One option is easy and does not require removing <strong>the</strong> board from <strong>the</strong> radio(recommended). The o<strong>the</strong>r option is "more correct", but will require disconnecting all <strong>the</strong> cables, removing <strong>the</strong> 5 screws thathold <strong>the</strong> board down, etc (purist method). We'll presume you're more likely to want easy, so here are <strong>the</strong> steps <strong>for</strong> it.Keeping <strong>the</strong> radio oriented as described above, look below <strong>the</strong> right hand resistor (<strong>the</strong> one we removed). You should see 3 vias(holes) (see picture above). Follow <strong>the</strong> left most via, and it should go to <strong>the</strong> left most pin of <strong>the</strong> processor. The second via shouldgo to <strong>the</strong> next pin to right, and third via should go to <strong>the</strong> pin to right. At this point, you should see two pins that don't appear tobe connected to anything, <strong>the</strong>n a pin that connects to a small black resistor marked 201 (this is <strong>the</strong> 4th "R" in <strong>the</strong> picture).If you've sucessfully located <strong>the</strong> 6 pins above, we want to short <strong>the</strong> pin that is <strong>the</strong> 4th from <strong>the</strong> left to ground. Above <strong>the</strong>se 6pins, you should see a small black rectangle, with 8 pins. I believe it is marked 220. On <strong>the</strong> side of this part (it's a resistor pack),<strong>the</strong>re is a pin that is soldered to <strong>the</strong> ground plane.To short <strong>the</strong> 4th pin from <strong>the</strong> left to ground, tack a wire to <strong>the</strong> pin. Be *very* careful not to short <strong>the</strong> adjacent pins to <strong>the</strong> 4thpin. It's very easy to do. It you do, use a piece of Solderwick or coax braid to remove <strong>the</strong> solder. Better yet, don't short <strong>the</strong> pins.Tack <strong>the</strong> o<strong>the</strong>r end of <strong>the</strong> wire to <strong>the</strong> pin on <strong>the</strong> resistor pack described above.OK, you'd ra<strong>the</strong>r do it <strong>the</strong> "more correct" way. Disconnect all <strong>the</strong> cables from <strong>the</strong> board. You'll need to remove <strong>the</strong> shield from<strong>the</strong> RF section to remove <strong>the</strong> white ribbon cables. Disconnect <strong>the</strong> power and speaker cable. Remove <strong>the</strong> 5 screws that hold <strong>the</strong>PC card down. Remove <strong>the</strong> card from <strong>the</strong> radio.Orient <strong>the</strong> board as described above. Look <strong>for</strong> <strong>the</strong> white connector above <strong>the</strong> packet connector (lower left). It's marked J12. Justabove that are a pair of solder pads <strong>for</strong> a resistor. One side goes to ground, <strong>the</strong> o<strong>the</strong>r goes to a via. Follow <strong>the</strong> trace on <strong>the</strong>bottom side of <strong>the</strong> board. You should see that it goes to a via, but that <strong>the</strong> trace has been cut right next to <strong>the</strong> via.