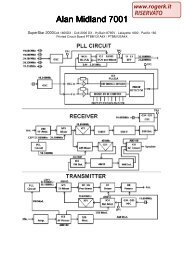
Modifications for the ICOM - RogerK
Modifications for the ICOM - RogerK
Modifications for the ICOM - RogerK
- No tags were found...

You also want an ePaper? Increase the reach of your titles
YUMPU automatically turns print PDFs into web optimized ePapers that Google loves.
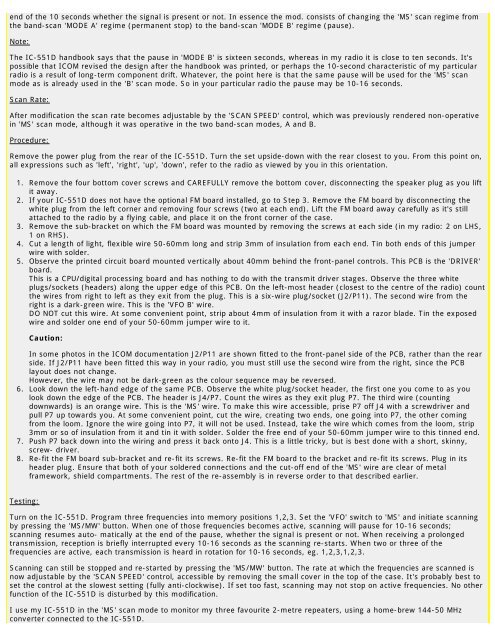
end of <strong>the</strong> 10 seconds whe<strong>the</strong>r <strong>the</strong> signal is present or not. In essence <strong>the</strong> mod. consists of changing <strong>the</strong> 'MS' scan regime from<strong>the</strong> band-scan 'MODE A' regime (permanent stop) to <strong>the</strong> band-scan 'MODE B' regime (pause).Note:The IC-551D handbook says that <strong>the</strong> pause in 'MODE B' is sixteen seconds, whereas in my radio it is close to ten seconds. It'spossible that <strong>ICOM</strong> revised <strong>the</strong> design after <strong>the</strong> handbook was printed, or perhaps <strong>the</strong> 10-second characteristic of my particularradio is a result of long-term component drift. Whatever, <strong>the</strong> point here is that <strong>the</strong> same pause will be used <strong>for</strong> <strong>the</strong> 'MS' scanmode as is already used in <strong>the</strong> 'B' scan mode. So in your particular radio <strong>the</strong> pause may be 10-16 seconds.Scan Rate:After modification <strong>the</strong> scan rate becomes adjustable by <strong>the</strong> 'SCAN SPEED' control, which was previously rendered non-operativein 'MS' scan mode, although it was operative in <strong>the</strong> two band-scan modes, A and B.Procedure:Remove <strong>the</strong> power plug from <strong>the</strong> rear of <strong>the</strong> IC-551D. Turn <strong>the</strong> set upside-down with <strong>the</strong> rear closest to you. From this point on,all expressions such as 'left', 'right', 'up', 'down', refer to <strong>the</strong> radio as viewed by you in this orientation.1. Remove <strong>the</strong> four bottom cover screws and CAREFULLY remove <strong>the</strong> bottom cover, disconnecting <strong>the</strong> speaker plug as you liftit away.2. If your IC-551D does not have <strong>the</strong> optional FM board installed, go to Step 3. Remove <strong>the</strong> FM board by disconnecting <strong>the</strong>white plug from <strong>the</strong> left corner and removing four screws (two at each end). Lift <strong>the</strong> FM board away carefully as it's stillattached to <strong>the</strong> radio by a flying cable, and place it on <strong>the</strong> front corner of <strong>the</strong> case.3. Remove <strong>the</strong> sub-bracket on which <strong>the</strong> FM board was mounted by removing <strong>the</strong> screws at each side (in my radio: 2 on LHS,1 on RHS).4. Cut a length of light, flexible wire 50-60mm long and strip 3mm of insulation from each end. Tin both ends of this jumperwire with solder.5. Observe <strong>the</strong> printed circuit board mounted vertically about 40mm behind <strong>the</strong> front-panel controls. This PCB is <strong>the</strong> 'DRIVER'board.This is a CPU/digital processing board and has nothing to do with <strong>the</strong> transmit driver stages. Observe <strong>the</strong> three whiteplugs/sockets (headers) along <strong>the</strong> upper edge of this PCB. On <strong>the</strong> left-most header (closest to <strong>the</strong> centre of <strong>the</strong> radio) count<strong>the</strong> wires from right to left as <strong>the</strong>y exit from <strong>the</strong> plug. This is a six-wire plug/socket (J2/P11). The second wire from <strong>the</strong>right is a dark-green wire. This is <strong>the</strong> 'VFO B' wire.DO NOT cut this wire. At some convenient point, strip about 4mm of insulation from it with a razor blade. Tin <strong>the</strong> exposedwire and solder one end of your 50-60mm jumper wire to it.Caution:In some photos in <strong>the</strong> <strong>ICOM</strong> documentation J2/P11 are shown fitted to <strong>the</strong> front-panel side of <strong>the</strong> PCB, ra<strong>the</strong>r than <strong>the</strong> rearside. If J2/P11 have been fitted this way in your radio, you must still use <strong>the</strong> second wire from <strong>the</strong> right, since <strong>the</strong> PCBlayout does not change.However, <strong>the</strong> wire may not be dark-green as <strong>the</strong> colour sequence may be reversed.6. Look down <strong>the</strong> left-hand edge of <strong>the</strong> same PCB. Observe <strong>the</strong> white plug/socket header, <strong>the</strong> first one you come to as youlook down <strong>the</strong> edge of <strong>the</strong> PCB. The header is J4/P7. Count <strong>the</strong> wires as <strong>the</strong>y exit plug P7. The third wire (countingdownwards) is an orange wire. This is <strong>the</strong> 'MS' wire. To make this wire accessible, prise P7 off J4 with a screwdriver andpull P7 up towards you. At some convenient point, cut <strong>the</strong> wire, creating two ends, one going into P7, <strong>the</strong> o<strong>the</strong>r comingfrom <strong>the</strong> loom. Ignore <strong>the</strong> wire going into P7, it will not be used. Instead, take <strong>the</strong> wire which comes from <strong>the</strong> loom, strip3mm or so of insulation from it and tin it with solder. Solder <strong>the</strong> free end of your 50-60mm jumper wire to this tinned end.7. Push P7 back down into <strong>the</strong> wiring and press it back onto J4. This is a little tricky, but is best done with a short, skinny,screw- driver.8. Re-fit <strong>the</strong> FM board sub-bracket and re-fit its screws. Re-fit <strong>the</strong> FM board to <strong>the</strong> bracket and re-fit its screws. Plug in itsheader plug. Ensure that both of your soldered connections and <strong>the</strong> cut-off end of <strong>the</strong> 'MS' wire are clear of metalframework, shield compartments. The rest of <strong>the</strong> re-assembly is in reverse order to that described earlier.Testing:Turn on <strong>the</strong> IC-551D. Program three frequencies into memory positions 1,2,3. Set <strong>the</strong> 'VFO' switch to 'MS' and initiate scanningby pressing <strong>the</strong> 'MS/MW' button. When one of those frequencies becomes active, scanning will pause <strong>for</strong> 10-16 seconds;scanning resumes auto- matically at <strong>the</strong> end of <strong>the</strong> pause, whe<strong>the</strong>r <strong>the</strong> signal is present or not. When receiving a prolongedtransmission, reception is briefly interrupted every 10-16 seconds as <strong>the</strong> scanning re-starts. When two or three of <strong>the</strong>frequencies are active, each transmission is heard in rotation <strong>for</strong> 10-16 seconds, eg. 1,2,3,1,2,3.Scanning can still be stopped and re-started by pressing <strong>the</strong> 'MS/MW' button. The rate at which <strong>the</strong> frequencies are scanned isnow adjustable by <strong>the</strong> 'SCAN SPEED' control, accessible by removing <strong>the</strong> small cover in <strong>the</strong> top of <strong>the</strong> case. It's probably best toset <strong>the</strong> control at <strong>the</strong> slowest setting (fully anti-clockwise). If set too fast, scanning may not stop on active frequencies. No o<strong>the</strong>rfunction of <strong>the</strong> IC-551D is disturbed by this modification.I use my IC-551D in <strong>the</strong> 'MS' scan mode to monitor my three favourite 2-metre repeaters, using a home-brew 144-50 MHzconverter connected to <strong>the</strong> IC-551D.