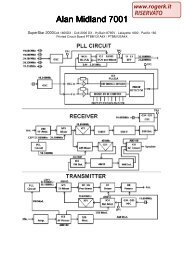
Modifications for the ICOM - RogerK
Modifications for the ICOM - RogerK
Modifications for the ICOM - RogerK
- No tags were found...

Create successful ePaper yourself
Turn your PDF publications into a flip-book with our unique Google optimized e-Paper software.
●●●●●●●●●Für Handbetrieb auf Relais-Frequenzen sind meiner Meinung nach die 300mW Sendeleistung völlig ausreichend.Der RX ist in den AFU-Bereichen ausreichend empfindlich, vergleichbar mit anderen Handfunkgeräten. Außerhalb der AFU-Bänder ist die Empfindlichkeit aufgrund der Gummiantenne sehr unterschiedlich. An einer Discone-Antenne sieht das dannganz anders aus. Da ich nicht in der Stadt wohne, habe ich fast keine Großsignalstörungen, nur im 4m-Band sind aufeinigen Frequenzen Durchschläge von Rundfunksendern zu hören.Für mich interessant: AM-Empfang in den Flugfunkbändern hervorragend!Ein kleines Manko ist die fehlende Stromversorgungsbuchse, man kann nur mit Batterien oder Akkus (2 mal Mignon)arbeiten.Die Buchse für externes Micro/Lautsprecher ist etwas ungewöhnlich.Die Bedienung über die Menü's ist unkompliziert und leicht zu merken.Die NF-Wiedergabe ist ausreichend laut und für ein Gerät dieser Größe recht ordentlich.Was mich persönlich etwas stört ist folgender Effekt: Die Rauschsperre öff- net bei schnellem Durchdrehen desAbstimmknopfes nicht. Man muß mit etwas Gefühl langsam drehen, damit belegte Frequenzen auch erkannt werden. Beimautomatischen scannen passiert das nicht.Die 200 Speicherplätze sind meiner Meinung nach völlig ausreichend.So, das war erstmal alles, was mir zu dem Gerät einfällt. Für meine Begriffe ist das Gerät zu dem momentanen Preisunschlagbar, zumal man einen RX von 30Mhz bis 1300Mhz durchgehend in FM, FM-breit und AM hat. Ein vergleichbarer Scannerkostet schon mehr. Falls weitere Fragen auftauchen, bin ich gerne bereit, diese zu beantworten.73 de Fred, DL6BAW @ DB0AHODate: 02-02-2002 User comment From: db 5 otSubject: bereichserweiterungDurch das Einsetzen der geeigneten Software und einem Kabelmodem an der Kopfhörerbuchse, läßt sich der Empfangsbereichwie bei dem äußerlich fast baugleichen Scanner von Icom nach unten auf 500khz Startfrequenz erweiternThis modification is read 2257 times.top of page19-07-1998(IC-Q7) Extending fq-tx coverage on IC-Q7EWell at last guys I have sat down to work it out its just a matter of removing all of <strong>the</strong> possible 7 programming diodes soundssimple well its not read on.Well every one this is a really scary mod to do to <strong>the</strong> Q7. It is really not <strong>for</strong> <strong>the</strong> faint hearted or any one that doesnÆt have asoldering iron tip less than 0.9mm. I take no responsibility <strong>for</strong> <strong>the</strong>se mods and am warning you that it does void warranty! It isextremely easy do destroy something so be CAREFUL !!!! This is only a description of what I found. Use this in<strong>for</strong>mation at youown risk! OK now!With <strong>the</strong> radio face down antenna pointing away (this is <strong>the</strong> orientation <strong>the</strong> unit will always be in when I refer to part location)remove <strong>the</strong> antenna and pull <strong>the</strong> knob off.Unscrew <strong>the</strong> switch and SMA ferruls. Cation <strong>the</strong> SMA ferrul is sealed with a thread sealing compound.Open <strong>the</strong> battery compartment and remove <strong>the</strong> batteries.This will remove two screws. Remove <strong>the</strong>m. Then <strong>the</strong> back can be lifted up and towards you.This will reveal a main board and a sub(RF) board mounted on top of it. Remove <strong>the</strong> single visible screw on <strong>the</strong> RF board on <strong>the</strong>right hand side.There are two points where <strong>the</strong> shielding has been soldered to <strong>the</strong> lower board. On in <strong>the</strong> lower left corner above a ferriteinductor, <strong>the</strong> o<strong>the</strong>r in <strong>the</strong> upper left near <strong>the</strong> blue assembly of <strong>the</strong> switch. Carefully desolder <strong>the</strong>se with desolder braid. (carefulnot to melt anything!)carefully hinge <strong>the</strong> bottom of <strong>the</strong> RF board up till <strong>the</strong> connector in <strong>the</strong> middle of <strong>the</strong> board disengages. Then push gently on <strong>the</strong>SMA connector and pull <strong>the</strong> RF Board out.Half way now.Remove <strong>the</strong> screw on <strong>the</strong> right hand side central to <strong>the</strong> PTT and FUNC button. And <strong>the</strong> one on <strong>the</strong> left just bellow <strong>the</strong> little shield.DO NOT REMOVE <strong>the</strong> two top corner ones <strong>the</strong>y hold <strong>the</strong> LCD assembly!!!Desolder <strong>the</strong> two speaker wires from <strong>the</strong> speaker.Lift <strong>the</strong> bottom of <strong>the</strong> board out till <strong>the</strong> LCD clears its mounts in <strong>the</strong> case and pull <strong>the</strong> board out GENTLY so <strong>the</strong> rubber seal is notdislodged.