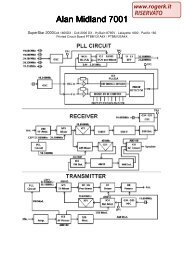
Modifications for the ICOM - RogerK
Modifications for the ICOM - RogerK
Modifications for the ICOM - RogerK
- No tags were found...

You also want an ePaper? Increase the reach of your titles
YUMPU automatically turns print PDFs into web optimized ePapers that Google loves.
28-03-1999(IC-Q7) Modifying <strong>the</strong> <strong>ICOM</strong> IC-Q7A <strong>for</strong> RX/TXI have discoverd by <strong>the</strong> process of exploration ,how to modify <strong>the</strong> IC-Q7A <strong>for</strong> out of band and <strong>the</strong> rest of <strong>the</strong> 440MHZ amateurband transmission. This is a timely task to do. Here is <strong>the</strong> process.1. Remove battery,antenna,and tuning knob.2. Remove <strong>the</strong> two screws in <strong>the</strong> battery housing,and <strong>the</strong> screws on <strong>the</strong> SMA jack,and tuning knob.3. Prycover open near bottom of radio with fingers.4. Unsolder speaker leads, and solder joints along <strong>the</strong> top of radio, including SMA jack, and <strong>the</strong> one joint connecting <strong>the</strong> sheildby <strong>the</strong> coil and speaker connection.5. Remove to screws connecting RF board.6. Gently remove <strong>the</strong> RF board!7. Remove screw next to function and PTT switch.8. Gently lift <strong>the</strong> main board out using a angle technique.9. On front of main board <strong>the</strong>re will be a bank of silver color diodes located by <strong>the</strong> bottom right hand corner of LCD.10. Remove <strong>the</strong> first diode in <strong>the</strong> bank.11. Reassemble radio go from step 8 to step 1.After you have assembled radio, insert battery and radio will automatticly turn on, and <strong>the</strong> display should say "CLEAR".The proccess is now complete. FREQUENCY RANGES:RX:30-1310MHZ,cellular blockedTX:136-174VHF,400-470UHF73,from KB8WNA ELYRIA,OHIO 44035This modification is read 2946 times.top of page26-07-1999(IC-Q7) Expand transmit from 136-174 and 400-470 <strong>for</strong> IC-Q7E. (Australian version)Hi once again, well I have carried out <strong>the</strong> mod to expand my IC-Q7E <strong>ICOM</strong> HANDHELD and it was not as bad as I thought it wasgoing to be.The most important thing about this mod is to do it slowly and carefully, do not use <strong>for</strong>ce and if you are unsure stopand study it <strong>for</strong> a while and <strong>the</strong>n proceed.You must have a good quality Soldering Station such as HAKKO, WELLER, etc with a 0.5mm conical tip, a very small jewelersscrewdriver and some good quality de-soldering braid, If you do not have <strong>the</strong> above tools <strong>the</strong>n I suggest that you leave <strong>the</strong>screws in <strong>the</strong> radio.Remove <strong>the</strong> batteries and <strong>the</strong> two screws under <strong>the</strong>m, remove <strong>the</strong> antenna and dial knob, remove <strong>the</strong> slotted retaining nutsbelow <strong>the</strong> knob and antenna, <strong>the</strong> back half of <strong>the</strong> case can now be removed which will expose <strong>the</strong> top board and next stage.There are three solder points and one screw to be removed on <strong>the</strong> AUSTRALIAN E MODEL at <strong>the</strong> top board shielding, two at <strong>the</strong>top, one next to <strong>the</strong> blue channel switch and on <strong>the</strong> o<strong>the</strong>r side next to <strong>the</strong> antenna connector, <strong>the</strong> third is above <strong>the</strong> speaker to<strong>the</strong> left with <strong>the</strong> speaker closest to you, <strong>the</strong> screw is at <strong>the</strong> right bottom corner of <strong>the</strong> big shield, very slowly lift this board until itclears <strong>the</strong> multi pin white connector in <strong>the</strong> centre of both boards and with pressure applied to <strong>the</strong> end of <strong>the</strong> antenna connectorwith <strong>the</strong> thumb cautiously remove <strong>the</strong> top board.The rest is pretty easy, remove <strong>the</strong> two screws from <strong>the</strong> bottom main board, one close to <strong>the</strong> speaker at <strong>the</strong> bottom of <strong>the</strong> smalltin shield and <strong>the</strong> o<strong>the</strong>r between <strong>the</strong> PPT and FUNCTION switch, DO NOT TOUCH THE TWO AT THE TOP OF THE BOARD, desolder<strong>the</strong> two speaker wires at <strong>the</strong> speaker and being very careful of <strong>the</strong> rubber seals lift <strong>the</strong> board out and turn over and carryout <strong>the</strong> mod as per my jpeg pictures.Re-assemble in <strong>the</strong> opposite manner USING EXTREME CARE my radio will now transmit from, 136 - 174 and 400 - 470.I have not checked to see if <strong>the</strong>re is any drop off in per<strong>for</strong>mance specs now, <strong>the</strong> mod works and seems to work well so I guessthat is <strong>the</strong> most important thing.