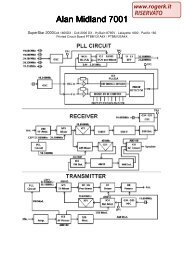
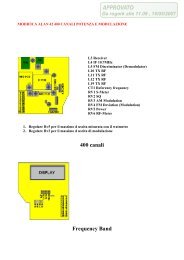
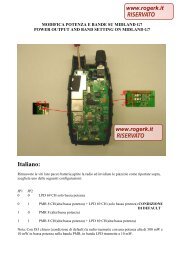
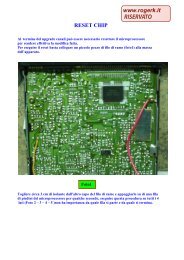
Modifications for the ICOM - RogerK
Modifications for the ICOM - RogerK
Modifications for the ICOM - RogerK
- No tags were found...

Create successful ePaper yourself
Turn your PDF publications into a flip-book with our unique Google optimized e-Paper software.
08-11-1998(R-7100) Modify your Icom R7100 to provide an output directly from <strong>the</strong> discriminatorThis is an involved operation and should NOT be attempted by anyone who does not feel at home with fine electronics work. It isvery easy to do serious damage to your radio if you don't know what you're doing.Please read through this document in its entirety be<strong>for</strong>e attempting to carry out <strong>the</strong> modification.It is almost essential that you print this out in order to have it handy while carrying out <strong>the</strong> modification. The diagram at <strong>the</strong> endof <strong>the</strong> article will be of great use.Right, let's get down to <strong>the</strong> nitty gritty.You are going to need just one electronic component - a capacitor of a value of between 220n and 10u. It can be ei<strong>the</strong>r polar ornon-polar. In addition, you will need a length of screened audio cable, any type should work but <strong>the</strong> smaller it is <strong>the</strong> better. Youwill need some <strong>for</strong>m of connector to put on <strong>the</strong> one end of <strong>the</strong> screened lead - a minijack socket or phono connector would begood.Of course you'll also need a few basic electronics tools such as a screwdriver, soldering iron, sidecutters etc.With <strong>the</strong> front panel of <strong>the</strong> radio towards you, as you would have it <strong>for</strong> normal use, locate <strong>the</strong> four retaining screws on top of <strong>the</strong>top cover. These are located near each corner. Remove <strong>the</strong>se four screws.Do not remove <strong>the</strong> three screws located around <strong>the</strong> speaker grille.On each side of <strong>the</strong> radio are two fur<strong>the</strong>r retaining screws (a total of four). Remove <strong>the</strong>se.The top cover may now be lifted off <strong>the</strong> radio taking care to observe <strong>the</strong> speaker cable. The speaker is fixed to <strong>the</strong> inside of <strong>the</strong>top cover.There is a connector in <strong>the</strong> speaker cable which should be unplugged to free <strong>the</strong> top cover completely.Looking down on <strong>the</strong> receiver, locate <strong>the</strong> converter unit. This is <strong>the</strong> PCB closest to <strong>the</strong> external antenna connector at <strong>the</strong> left rearof <strong>the</strong> receiver.Now locate <strong>the</strong> coaxial connecter at <strong>the</strong> extreme left rear of <strong>the</strong> converter unit PCB (see diagram). The cable connected at thispoint bends over and travels downwards into <strong>the</strong> bottom half of <strong>the</strong> receiver.Disconnect this cable by pulling directly upwards. The connector is farily delicate so do not use too much <strong>for</strong>ce.Now comes <strong>the</strong> part that requires great care. Take it slowly and do it properly.The entire top chassis has to be detached in order to reach <strong>the</strong> main unit PCB beneath.There are four screws that need to be removed to accomplish this. Two of <strong>the</strong>se are located on <strong>the</strong> rear panel of <strong>the</strong> receiver.Looking at <strong>the</strong> radio from <strong>the</strong> rear now, you will see a row of connectors <strong>for</strong> such things as external speaker etc. Just next toeach end of this row of connectors are <strong>the</strong> two screws you need to remove. Remove <strong>the</strong>m.The remaining two screws are on <strong>the</strong> top of <strong>the</strong> unit. Position <strong>the</strong> radio as you had it be<strong>for</strong>e (normal operating position).Looking down on <strong>the</strong> radio, you should see four screws near <strong>the</strong> front. Two of <strong>the</strong>se go through <strong>the</strong> top of <strong>the</strong> plasic front paneland two of <strong>the</strong>m go through <strong>the</strong> metal chassis (see diagram). Remove <strong>the</strong> two screws that go through <strong>the</strong> metal chassis.Now CAREFULLY lift <strong>the</strong> top chassis and swing it clear of <strong>the</strong> radio. Note that <strong>the</strong>re are many wires linking <strong>the</strong> top chassis to <strong>the</strong>bottom. Take care not to strain <strong>the</strong>se. <strong>the</strong>re should be enough slack (just) to allow you to swing <strong>the</strong> top part out and away from<strong>the</strong> bottom and lower it onto <strong>the</strong> surface you're working on.Now you should have a clear view of <strong>the</strong> main unit PCB. This is where you will be making a connection.In order to locate <strong>the</strong> point on <strong>the</strong> PCB where you will connect <strong>the</strong> screened cable you will need a ruler or tape measure.The connection point is approximately half way from <strong>the</strong> back to <strong>the</strong> front and approximately one quarter of <strong>the</strong> way from left toright. This is just to give you a general idea of where to look. (see diagram)Now, using your ruler, measure inwards 55mm (2 1/8") from <strong>the</strong> left edge of <strong>the</strong> radio towards <strong>the</strong> right. Imagine a line runningthrough this point from <strong>the</strong> front of <strong>the</strong> radio to <strong>the</strong> back.Now, measure 120mm (4 3/4") from <strong>the</strong> rear towards <strong>the</strong> front along <strong>the</strong> imaginery line.At this spot on <strong>the</strong> PCB (see diagram) you should see a wire link marked "W100". This point (<strong>the</strong> wire link) is output of <strong>the</strong>discriminator.Connect one side of <strong>the</strong> capacitor to this wire link. If <strong>the</strong> cap is a polar type <strong>the</strong>n <strong>the</strong> positive lead goes to <strong>the</strong> wire link.