GPT-3000 SERIES - FLT Geosystems
GPT-3000 SERIES - FLT Geosystems
GPT-3000 SERIES - FLT Geosystems

You also want an ePaper? Increase the reach of your titles
YUMPU automatically turns print PDFs into web optimized ePapers that Google loves.
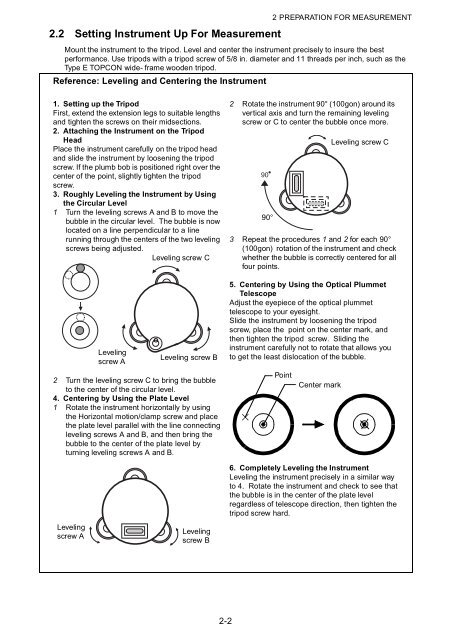
2.2 Setting Instrument Up For Measurement2 PREPARATION FOR MEASUREMENTMount the instrument to the tripod. Level and center the instrument precisely to insure the bestperformance. Use tripods with a tripod screw of 5/8 in. diameter and 11 threads per inch, such as theType E TOPCON wide- frame wooden tripod.Reference: Leveling and Centering the Instrument1. Setting up the TripodFirst, extend the extension legs to suitable lengthsand tighten the screws on their midsections.2. Attaching the Instrument on the TripodHeadPlace the instrument carefully on the tripod headand slide the instrument by loosening the tripodscrew. If the plumb bob is positioned right over thecenter of the point, slightly tighten the tripodscrew.3. Roughly Leveling the Instrument by Usingthe Circular Level1 Turn the leveling screws A and B to move thebubble in the circular level. The bubble is nowlocated on a line perpendicular to a linerunning through the centers of the two levelingscrews being adjusted.Leveling screw CLevelingscrew ALeveling screw B2 Turn the leveling screw C to bring the bubbleto the center of the circular level.4. Centering by Using the Plate Level1 Rotate the instrument horizontally by usingthe Horizontal motion/clamp screw and placethe plate level parallel with the line connectingleveling screws A and B, and then bring thebubble to the center of the plate level byturning leveling screws A and B.2 Rotate the instrument 90° (100gon) around itsvertical axis and turn the remaining levelingscrew or C to center the bubble once more.9090°3 Repeat the procedures 1 and 2 for each 90°(100gon) rotation of the instrument and checkwhether the bubble is correctly centered for allfour points.5. Centering by Using the Optical PlummetTelescopeAdjust the eyepiece of the optical plummettelescope to your eyesight.Slide the instrument by loosening the tripodscrew, place the point on the center mark, andthen tighten the tripod screw. Sliding theinstrument carefully not to rotate that allows youto get the least dislocation of the bubble.PointCenter markLeveling screw C6. Completely Leveling the InstrumentLeveling the instrument precisely in a similar wayto 4. Rotate the instrument and check to see thatthe bubble is in the center of the plate levelregardless of telescope direction, then tighten thetripod screw hard.Levelingscrew ALevelingscrew B2-2