- Page 3 and 4: FOREWORDThank you for purchasing th
- Page 5 and 6: Display for Safe UseIn order to enc
- Page 7 and 8: Laser Safety● Distance Measuremen
- Page 10 and 11: 9.3.3 Deleting a File . . . . . . .
- Page 12 and 13: 1 NOMENCLATURE AND FUNCTIONS1.1 Nom
- Page 14 and 15: 1.2 Display●●●1 NOMENCLATURE
- Page 16 and 17: 1.4 Function Key (Soft Key)1 NOMENC
- Page 18 and 19: 1 NOMENCLATURE AND FUNCTIONS1.5 Sta
- Page 20 and 21: 1 NOMENCLATURE AND FUNCTIONS●Tilt
- Page 22 and 23: 2 PREPARATION FOR MEASUREMENT2.1 Po
- Page 24 and 25: 2.3 Power Switch Key ON1 Confirm th
- Page 26 and 27: 2.5 Vertical and Horizontal Angle T
- Page 28 and 29: 2.6 How to Enter Alphanumeric chara
- Page 30 and 31: 2 PREPARATION FOR MEASUREMENT2.8 La
- Page 32 and 33: 3.2 Switching Horizontal Angle Righ
- Page 34 and 35: 3.5 Repetition Angle Measurement3 A
- Page 36 and 37: LOCK3.7 Compasses ( vertical angle)
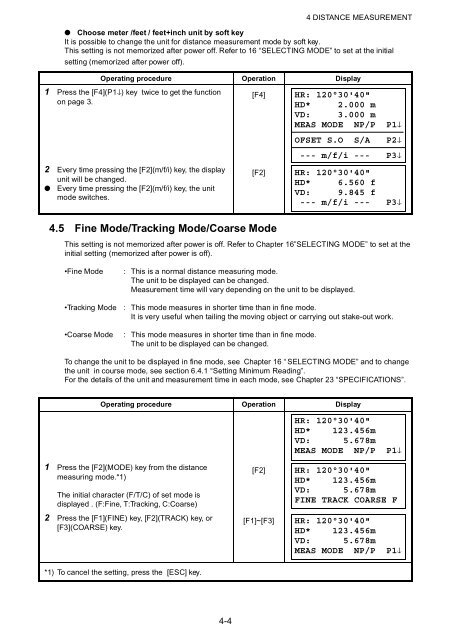
- Page 38 and 39: 4.3 Distance Measurement (Continuou
- Page 42 and 43: 4.7 Offset Measurement4 DISTANCE ME
- Page 44 and 45: 4 DISTANCE MEASUREMENTThe horizonta
- Page 46 and 47: 4 DISTANCE MEASUREMENTAfter measuri
- Page 48 and 49: 4 DISTANCE MEASUREMENT6 Measure the
- Page 50 and 51: 4 DISTANCE MEASUREMENT6 Collimate t
- Page 52 and 53: 5.2 Setting Height of the Instrumen
- Page 54 and 55: 6 SPECIAL MODE (Menu Mode)By pressi
- Page 56 and 57: 6 SPECIAL MODE (Menu Mode)Horizonta
- Page 58 and 59: 6 SPECIAL MODE (Menu Mode)6.1.2 Mis
- Page 60 and 61: 6 SPECIAL MODE (Menu Mode)The horiz
- Page 62 and 63: 2) Z Coordinate Calculation from Kn
- Page 64 and 65: 6 SPECIAL MODE (Menu Mode)6.1.4 Are
- Page 66 and 67: 6 SPECIAL MODE (Menu Mode)When 3 or
- Page 68 and 69: 6 SPECIAL MODE (Menu Mode)7 Collima
- Page 70 and 71: 6 SPECIAL MODE (Menu Mode)3 Press t
- Page 72 and 73: 6 SPECIAL MODE (Menu Mode)7 Press t
- Page 74 and 75: 6 SPECIAL MODE (Menu Mode)6.4.5 Sel
- Page 76 and 77: 6.5 Setting Contrast of DisplaySett
- Page 78 and 79: 7 DATA COLLECTION●Data collect me
- Page 80 and 81: 7 DATA COLLECTION7.1.2 Selecting a
- Page 82 and 83: 7 DATA COLLECTION●Example for set
- Page 84 and 85: 7 DATA COLLECTION*1) Refer to Secti
- Page 86 and 87: 7.3 Data Collect Offset Measurement
- Page 88 and 89: 7 DATA COLLECTION7.3.2 Distance Off
- Page 90 and 91:
7 DATA COLLECTION7.3.3 Plane Offset
- Page 92 and 93:
7 DATA COLLECTION7.3.4 Column Offse
- Page 94 and 95:
7.5 Point to Line MeasurementIn thi
- Page 96 and 97:
7 DATA COLLECTION7.6 Editing PCODE
- Page 98 and 99:
8 LAYOUTLAYOUT mode has two functio
- Page 100 and 101:
8.1 Preparation8 LAYOUT8.1.1 Settin
- Page 102 and 103:
8 LAYOUT8.1.3 Setting Occupied Poin
- Page 104 and 105:
8 LAYOUT8.1.4 Setting Backsight Poi
- Page 106 and 107:
8.2 Executing a LayoutThe following
- Page 108 and 109:
8 LAYOUT8.2.1 Layout of Coordinates
- Page 110 and 111:
8 LAYOUT6 Press the [F4](ENTER) key
- Page 112 and 113:
8 LAYOUT5 Enter instrument height i
- Page 114 and 115:
● Viewing PT# LIST8 LAYOUTYou can
- Page 116 and 117:
9.1 Display Internal Memory StatusT
- Page 118 and 119:
● To edit the data in searching m
- Page 120 and 121:
9 MEMORY MANAGER MODE9.2.3 PCODE LI
- Page 122 and 123:
9 MEMORY MANAGER MODE9.3.1 Rename a
- Page 124 and 125:
9.4 Coordinate Data Direct Key Inpu
- Page 126 and 127:
9.5 Delete a Coordinate Data from a
- Page 128 and 129:
9.7 Data Communications9 MEMORY MAN
- Page 130 and 131:
9 MEMORY MANAGER MODE9.7.3 Setting
- Page 132 and 133:
10 SET AUDIO MODE10 SET AUDIO MODET
- Page 134 and 135:
12 SETTING ATMOSPHERIC CORRECTION12
- Page 136 and 137:
12 SETTING ATMOSPHERIC CORRECTIONAt
- Page 138 and 139:
12-512 SETTING ATMOSPHERIC CORRECTI
- Page 140 and 141:
14 POWER SOURCE AND CHARGING14.1 On
- Page 142 and 143:
15 DETACH/ATTACH OF TRIBRACH15 DETA
- Page 144 and 145:
16 SELECTING MODE3:OTHERSSETEDM OFF
- Page 146 and 147:
16 SELECTING MODE7 Press [F3](OTHER
- Page 148 and 149:
17.2 Checking the Optical Axis17 CH
- Page 150 and 151:
17 CHECK AND ADJUSTMENT[Example]Low
- Page 152 and 153:
17 CHECK AND ADJUSTMENTAbout30°Abo
- Page 154 and 155:
17 CHECK AND ADJUSTMENT17.3.1Checki
- Page 156 and 157:
17 CHECK AND ADJUSTMENT17.3.4Collim
- Page 158 and 159:
17 CHECK AND ADJUSTMENT17.3.6Checki
- Page 160 and 161:
17.4 How to Set the Instrument Cons
- Page 162 and 163:
17 CHECK AND ADJUSTMENT14 Press the
- Page 164 and 165:
19 SPECIAL ACCESSORIES19 SPECIAL AC
- Page 166 and 167:
19 SPECIAL ACCESSORIESAluminum exte
- Page 168 and 169:
21 PRISM SYSTEM21 PRISM SYSTEMArran
- Page 170 and 171:
CIRCULARERRORPT# EXISTPT# DOESNOT E
- Page 172 and 173:
23 SPECIFICATIONSAtmospheric Correc
- Page 174 and 175:
APPENDIX1 Dual Axis CompensationInc
- Page 176 and 177:
2 Precaution when Charging or Stori
- Page 178:
EMC NOTICEIn industrial locations o