Operating Instructions - Panasonic Business
Operating Instructions - Panasonic Business
Operating Instructions - Panasonic Business

Create successful ePaper yourself
Turn your PDF publications into a flip-book with our unique Google optimized e-Paper software.
1. Introduction and Installation<br />
Installation<br />
1.4 Toner cartridge and drum<br />
cartridge<br />
Caution:<br />
L Read the following instructions before you begin<br />
installation. After you have read them, open the<br />
drum cartridge protection bag. The drum<br />
cartridge contains a photosensitive drum.<br />
Exposing it to light may damage the drum. Once<br />
you have opened the protection bag:<br />
– Do not expose the drum cartridge to light for<br />
more than 3 minutes.<br />
– Do not touch or scratch the black drum<br />
surface inside of the drum cartridge.<br />
– Do not place the drum cartridge near dust or<br />
dirt, or in a high humidity area.<br />
– Do not expose the drum cartridge to direct<br />
sunlight.<br />
L Do not leave the toner cartridge out of the<br />
protection bag for a long time. It will decrease the<br />
toner life.<br />
L We cannot be responsible for any damage to the<br />
unit or degradation of print quality which may<br />
occur from the use of a non-<strong>Panasonic</strong> toner<br />
cartridge and drum cartridge.<br />
L Do not add toner to the toner cartridge.<br />
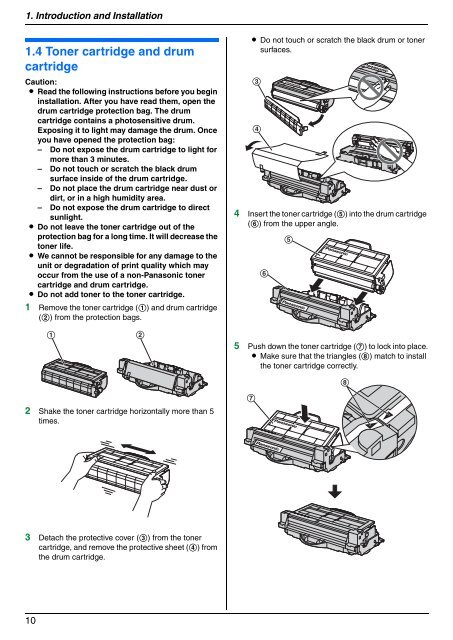
1 Remove the toner cartridge (1) and drum cartridge<br />
(2) from the protection bags.<br />
2 Shake the toner cartridge horizontally more than 5<br />
times.<br />
3 Detach the protective cover (3) from the toner<br />
cartridge, and remove the protective sheet (4) from<br />
the drum cartridge.<br />
10<br />
1 2<br />
L Do not touch or scratch the black drum or toner<br />
surfaces.<br />
3<br />
4<br />
4 Insert the toner cartridge (5) into the drum cartridge<br />
(6) from the upper angle.<br />
6<br />
5<br />
5 Push down the toner cartridge (7) to lock into place.<br />
L Make sure that the triangles (8) match to install<br />
the toner cartridge correctly.<br />
7<br />
8