Operating Instructions - Panasonic Business
Operating Instructions - Panasonic Business
Operating Instructions - Panasonic Business

You also want an ePaper? Increase the reach of your titles
YUMPU automatically turns print PDFs into web optimized ePapers that Google loves.
4. Printer<br />
4.1.2 Printing on special media<br />
You can print not only on plain paper but also on special<br />
media (transparencies / labels).<br />
L Please refer to page 99 for information on recording<br />
paper.<br />
L To load paper, see page 13.<br />
To print on transparencies<br />
Use transparencies designed for laser printing.<br />
We recommend the following:<br />
3M ® CG3300/CG5000<br />
L Do not stack more than 25 transparencies at a<br />
time.<br />
L After printing, place transparencies on a flat<br />
surface to cool and to prevent them from curling.<br />
L Do not re-use transparencies that have already been<br />
fed through the unit. This includes transparencies<br />
that have been fed through and ejected without being<br />
printed on.<br />
L Some types of transparencies have instructions<br />
recommending which side to print on. If the print<br />
quality is poor, try printing on the other side of a new<br />
transparency.<br />
To print on labels<br />
Use labels designed for laser printing. We recommend<br />
the following:<br />
Avery ®<br />
5160/5161/5162/5163/5164/5165/5167/5168<br />
XEROX ®<br />
LWH100/LWH110/LWH120/LWH130/LWH140<br />
L Make sure the print side is FACE UP when<br />
loading the labels.<br />
L Do not stack more than 25 labels at a time.<br />
L Do not use the following types of labels:<br />
– Labels that are wrinkled, damaged or separated<br />
from the backing sheet.<br />
– Any sheet of labels that has spaces in it where<br />
some of the labels have been removed.<br />
– Labels that do not completely cover the backing<br />
sheet as follows:<br />
30<br />
4.2 Printing a received email<br />
attachment automatically (LAN<br />
connection only)<br />
If you configure the POP server settings beforehand, the<br />
unit will automatically print files attached to an email that<br />
are sent from a compatible unit via the Internet (scan to<br />
email print). This is useful if you want to print only<br />
attached files, without checking your emails.<br />
Important:<br />
L The unit does not print email messages.<br />
L The unit will only print attached files sent from a<br />
compatible unit, which can send emails directly<br />
(without using a computer).<br />
L The attachment file formats that can be printed<br />
are as follows:<br />
– TIFF<br />
– JPEG<br />
– PDF (Image type only. Such as files scanned<br />
from the unit, or scanned from the computer<br />
using Multi-Function Viewer.)<br />
L Received emails and the attached files will be<br />
deleted automatically after printing.<br />
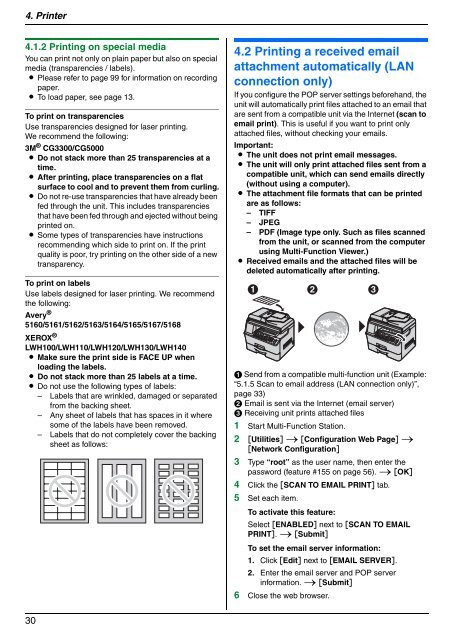
A B C<br />
A Send from a compatible multi-function unit (Example:<br />
“5.1.5 Scan to email address (LAN connection only)”,<br />
page 33)<br />
B Email is sent via the Internet (email server)<br />
C Receiving unit prints attached files<br />
1 Start Multi-Function Station.<br />
2 [Utilities] i [Configuration Web Page] i<br />
[Network Configuration]<br />
3 Type “root” as the user name, then enter the<br />
password (feature #155 on page 56). i [OK]<br />
4 Click the [SCAN TO EMAIL PRINT] tab.<br />
5 Set each item.<br />
To activate this feature:<br />
Select [ENABLED] next to [SCAN TO EMAIL<br />
PRINT]. i [Submit]<br />
To set the email server information:<br />
1. Click [Edit] next to [EMAIL SERVER].<br />
2. Enter the email server and POP server<br />
information. i [Submit]<br />
6 Close the web browser.