Operating Instructions - Panasonic Business
Operating Instructions - Panasonic Business
Operating Instructions - Panasonic Business
Create successful ePaper yourself
Turn your PDF publications into a flip-book with our unique Google optimized e-Paper software.
1.5 Recording paper<br />
The standard input tray unit can hold:<br />
– Up to 520 sheets of 75 g/m 2 paper.<br />
– Up to 470 sheets of 80 g/m2 paper.<br />
– Up to 410 sheets of 90 g/m 2 paper.<br />
– Up to 100 sheets of 105 g/m 2 paper.<br />
– Up to 25 transparencies. *1<br />
– Up to 25 labels. *1<br />
*1 Only when using the unit as a printer. See page 30<br />
for details.<br />
L Please refer to page 99 for information on recording<br />
paper.<br />
L The unit is set for printing A4-size plain paper by<br />
default.<br />
– To use other paper sizes, change the<br />
recording paper size setting (feature #380 on<br />
page 57).<br />
– To use thin or thick paper, change the<br />
recording paper type setting (feature #383 on<br />
page 57).<br />
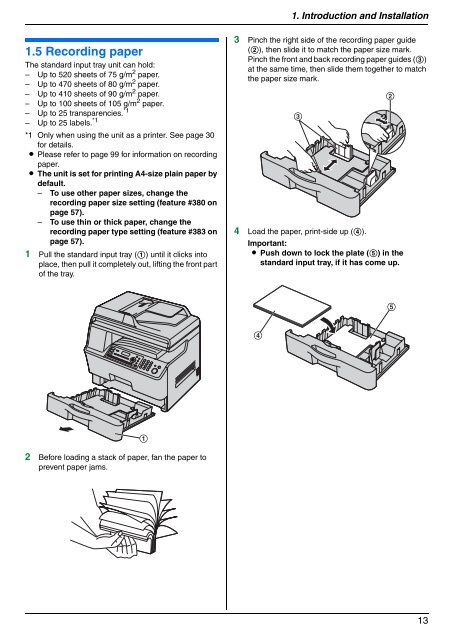
1 Pull the standard input tray (1) until it clicks into<br />
place, then pull it completely out, lifting the front part<br />
of the tray.<br />
2 Before loading a stack of paper, fan the paper to<br />
prevent paper jams.<br />
1<br />
1. Introduction and Installation<br />
3 Pinch the right side of the recording paper guide<br />
(2), then slide it to match the paper size mark.<br />
Pinch the front and back recording paper guides (3)<br />
at the same time, then slide them together to match<br />
the paper size mark.<br />
4 Load the paper, print-side up (4).<br />
Important:<br />
L Push down to lock the plate (5) in the<br />
standard input tray, if it has come up.<br />
4<br />
3<br />
2<br />
5<br />
13


