Operating Instructions - Panasonic Business
Operating Instructions - Panasonic Business
Operating Instructions - Panasonic Business

You also want an ePaper? Increase the reach of your titles
YUMPU automatically turns print PDFs into web optimized ePapers that Google loves.
5. Scanner<br />
5Scanner Scanner<br />
5.1 Scanning from the unit (Push<br />
Scan)<br />
You can easily scan the document by using the operation<br />
panel on the unit. You can select one of the following<br />
scanning modes depending on how you intend to use<br />
the scanned image.<br />
– Viewing using Multi-Function Viewer (Viewer)<br />
– Saving as a file to your computer (File)<br />
– Sending as an attached file to an email destination<br />
from your computer (Email)<br />
– Using OCR software (OCR)<br />
– Sending as an attached file to an email destination<br />
directly from this unit (Email address)<br />
– Sending to an FTP server (FTP)<br />
Note:<br />
L You can set the desired scan mode for push scan<br />
beforehand (feature #493 on page 66).<br />
L When scanning a document, we recommend using<br />
the scanner glass rather than the automatic<br />
document feeder for better results.<br />
L Do not open the document cover when scanning a<br />
document with the automatic document feeder.<br />
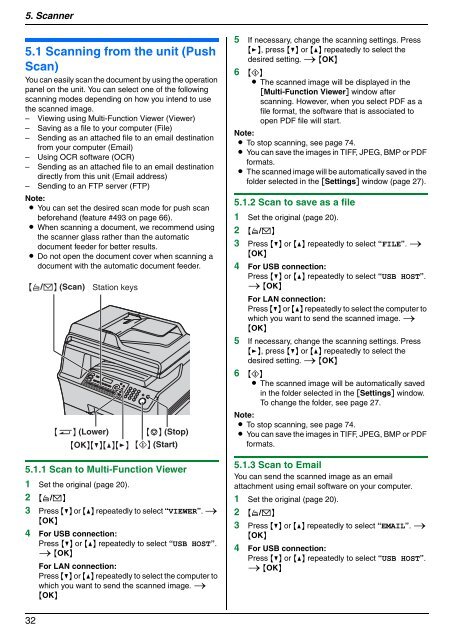
{A/B} (Scan)<br />
5.1.1 Scan to Multi-Function Viewer<br />
1 Set the original (page 20).<br />
2 {A/B}<br />
3 Press {V} or {^} repeatedly to select “VIEWER”. i<br />
{OK}<br />
4 For USB connection:<br />
Press {V} or {^} repeatedly to select “USB HOST”.<br />
i {OK}<br />
For LAN connection:<br />
Press {V} or {^} repeatedly to select the computer to<br />
which you want to send the scanned image. i<br />
{OK}<br />
32<br />
{S} (Lower)<br />
Station keys<br />
{OK}{V}{^}{>}<br />
{W} (Stop)<br />
{X} (Start)<br />
5 If necessary, change the scanning settings. Press<br />
{>}, press {V} or {^} repeatedly to select the<br />
desired setting. i {OK}<br />
6 {X}<br />
L The scanned image will be displayed in the<br />
[Multi-Function Viewer] window after<br />
scanning. However, when you select PDF as a<br />
file format, the software that is associated to<br />
open PDF file will start.<br />
Note:<br />
L To stop scanning, see page 74.<br />
L You can save the images in TIFF, JPEG, BMP or PDF<br />
formats.<br />
L The scanned image will be automatically saved in the<br />
folder selected in the [Settings] window (page 27).<br />
5.1.2 Scan to save as a file<br />
1 Set the original (page 20).<br />
2 {A/B}<br />
3 Press {V} or {^} repeatedly to select “FILE”. i<br />
{OK}<br />
4 For USB connection:<br />
Press {V} or {^} repeatedly to select “USB HOST”.<br />
i {OK}<br />
For LAN connection:<br />
Press {V} or {^} repeatedly to select the computer to<br />
which you want to send the scanned image. i<br />
{OK}<br />
5 If necessary, change the scanning settings. Press<br />
{>}, press {V} or {^} repeatedly to select the<br />
desired setting. i {OK}<br />
6 {X}<br />
L The scanned image will be automatically saved<br />
in the folder selected in the [Settings] window.<br />
To change the folder, see page 27.<br />
Note:<br />
L To stop scanning, see page 74.<br />
L You can save the images in TIFF, JPEG, BMP or PDF<br />
formats.<br />
5.1.3 Scan to Email<br />
You can send the scanned image as an email<br />
attachment using email software on your computer.<br />
1 Set the original (page 20).<br />
2 {A/B}<br />
3 Press {V} or {^} repeatedly to select “EMAIL”. i<br />
{OK}<br />
4 For USB connection:<br />
Press {V} or {^} repeatedly to select “USB HOST”.<br />
i {OK}