Operating Instructions - Panasonic Business
Operating Instructions - Panasonic Business
Operating Instructions - Panasonic Business
Create successful ePaper yourself
Turn your PDF publications into a flip-book with our unique Google optimized e-Paper software.
8. Programmable Features<br />
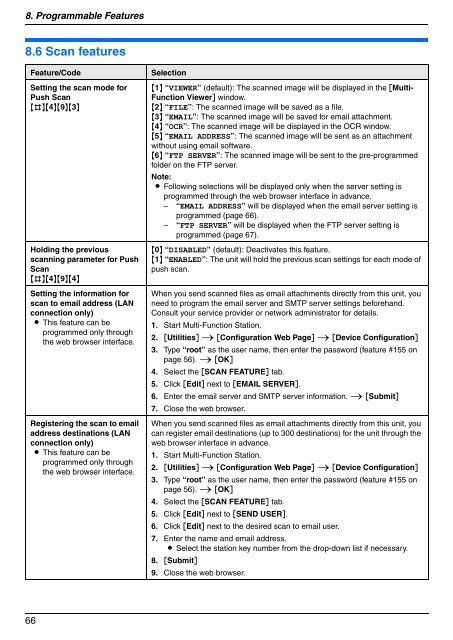
8.6 Scan features<br />
Feature/Code Selection<br />
Setting the scan mode for<br />
Push Scan<br />
{#}{4}{9}{3}<br />
Holding the previous<br />
scanning parameter for Push<br />
Scan<br />
{#}{4}{9}{4}<br />
Setting the information for<br />
scan to email address (LAN<br />
connection only)<br />
L This feature can be<br />
programmed only through<br />
the web browser interface.<br />
Registering the scan to email<br />
address destinations (LAN<br />
connection only)<br />
L This feature can be<br />
programmed only through<br />
the web browser interface.<br />
66<br />
{1} “VIEWER” (default): The scanned image will be displayed in the [Multi-<br />
Function Viewer] window.<br />
{2} “FILE”: The scanned image will be saved as a file.<br />
{3} “EMAIL”: The scanned image will be saved for email attachment.<br />
{4} “OCR”: The scanned image will be displayed in the OCR window.<br />
{5} “EMAIL ADDRESS”: The scanned image will be sent as an attachment<br />
without using email software.<br />
{6} “FTP SERVER”: The scanned image will be sent to the pre-programmed<br />
folder on the FTP server.<br />
Note:<br />
L Following selections will be displayed only when the server setting is<br />
programmed through the web browser interface in advance.<br />
– “EMAIL ADDRESS” will be displayed when the email server setting is<br />
programmed (page 66).<br />
– “FTP SERVER” will be displayed when the FTP server setting is<br />
programmed (page 67).<br />
{0} “DISABLED” (default): Deactivates this feature.<br />
{1} “ENABLED”: The unit will hold the previous scan settings for each mode of<br />
push scan.<br />
When you send scanned files as email attachments directly from this unit, you<br />
need to program the email server and SMTP server settings beforehand.<br />
Consult your service provider or network administrator for details.<br />
1. Start Multi-Function Station.<br />
2. [Utilities] i [Configuration Web Page] i [Device Configuration]<br />
3. Type “root” as the user name, then enter the password (feature #155 on<br />
page 56). i [OK]<br />
4. Select the [SCAN FEATURE] tab.<br />
5. Click [Edit] next to [EMAIL SERVER].<br />
6. Enter the email server and SMTP server information. i [Submit]<br />
7. Close the web browser.<br />
When you send scanned files as email attachments directly from this unit, you<br />
can register email destinations (up to 300 destinations) for the unit through the<br />
web browser interface in advance.<br />
1. Start Multi-Function Station.<br />
2. [Utilities] i [Configuration Web Page] i [Device Configuration]<br />
3. Type “root” as the user name, then enter the password (feature #155 on<br />
page 56). i [OK]<br />
4. Select the [SCAN FEATURE] tab.<br />
5. Click [Edit] next to [SEND USER].<br />
6. Click [Edit] next to the desired scan to email user.<br />
7. Enter the name and email address.<br />
L Select the station key number from the drop-down list if necessary.<br />
8. [Submit]<br />
9. Close the web browser.


