TO 1-1-700 - Robins Air Force Base
TO 1-1-700 - Robins Air Force Base
TO 1-1-700 - Robins Air Force Base

You also want an ePaper? Increase the reach of your titles
YUMPU automatically turns print PDFs into web optimized ePapers that Google loves.
<strong>TO</strong> 1-1-<strong>700</strong><br />
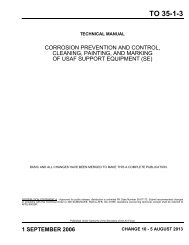
Table 11-2. Recommended Non-Powered Abrasives for Corrosion Removal - Continued<br />
Alloy<br />
Non-woven<br />
Abrasive<br />
Abrasive Cloth/<br />
Paper<br />
Metallic Wool Brushes Others<br />
Titanium alloys Abrasive Mat Aluminum oxide,<br />
Silicon carbide<br />
Stainless steel<br />
wool<br />
Stainless steel,<br />
Aluminum<br />
Pumice paste,<br />
Carbide-tipped<br />
scrapers<br />
Cadmium or Zinc<br />
plated surfaces<br />
Abrasive Mat<br />
Aluminum oxide,<br />
Silicon carbide<br />
None None None<br />
Chromium, Nickel,<br />
Tin, or copper plated<br />
surfaces<br />
Abrasive Mat<br />
Aluminum oxide,<br />
Silicon carbide<br />
None<br />
Stainless steel,<br />
Aluminum<br />
None<br />
Phosphate surfaces<br />
USE METHOD RECOMMENDED FOR BASE METAL<br />
• Power tool operations can often generate toxic airborne<br />
particles containing heavy metals, such as<br />
chromium (in the form of chromates), titanium,<br />
nickel, and beryllium, depending on the surface<br />
being treated. Eye protection, ventilation, and an<br />
adequate respirator for dust control are required.<br />
• Do not use hands to probe for air leaks in power<br />
tools and their hoses as injury may result.<br />
• Before using any powered equipment, remove any<br />
clothing such as ties and shirts with long loose<br />
sleeves as well as all rings and other jewelry which<br />
might become entangled in the equipment. Always<br />
wear proper personal protective equipment (PPE),<br />
such as goggles, face-shields, respirators, etc.<br />
• Ensure that all electrical equipment is grounded.<br />
Corrosion removal with power tools is a very aggressive<br />
method which shall only be used when<br />
and where the extent of corrosion makes non-powered<br />
corrosion removal impractical. The indiscriminate<br />
use of power tools for corrosion removal can<br />
result in damage to protective surface finishes.<br />
11.5.1 Pneumatic Drill Motors. Pneumatic drill motors are<br />
the preferred power tools for removing heavy corrosion or<br />
reworking large surface areas. The drill motor is normally<br />
used with wire brush wheels, rotary files, flap brushes, sanding<br />
pads, abrasive wheels, or buffing wheels. These drills are<br />
available in many shapes and sizes to satisfy almost any<br />
requirement. Check all pneumatic equipment air hoses for<br />
breaks or bulges in the coverings.<br />
11.5.1.1 Maximum chuck capacity of portable powered drills<br />
is usually 1/4 inch. Insert the tool shank into the drill and<br />
tighten chuck securely with the chuck key prior to use. When<br />
it is difficult or impossible to reach the work area with a<br />
straight drill, a flexible shaft or angle adapter can be used. The<br />
flexible shaft permits working around obstructions with a minimum<br />
of effort.<br />
11.5.1.2 To prevent the rotary file, abrasive wheel, flap<br />
brush, or sanding disc from digging into the metal, keep the<br />
tool off the metal when initially starting the drill motor. When<br />
the abrading stroke is finished, lift the tool from the metal<br />
before releasing the power to the motor.<br />
11.5.1.3 Holding the drill motor with both hands, apply moderate<br />
pressure while holding the rotary file, sanding disc, flap<br />
brush, or abrasive wheel against the work surface. When using<br />
the pneumatic tool as a sander, be sure to check the size and<br />
type of the abrasive disc. Ensure that the type of disc is compatible<br />
with the metal. Keep the sanding disc tilted to approximately<br />
a 10 degree angle so that only one side of the disc is in<br />
contact with the metal surface. If the entire disc surface is in<br />
contact with the surface, a “bucking” effect will occur. Excessive<br />
pressure will cause a “chattering” effect. Move the tool<br />
over the surface with slightly overlapping strokes. Do not<br />
grind, sand, or file in one area for any extended length of time<br />
without stopping and allowing the metal to cool. Excessive<br />
heating of the metal will alter its metallurgical structure.<br />
11.5.2 Pneumatic Sanders. To prevent pneumatic sanders<br />
with oscillating heads from digging into the metal, start the<br />
sander before it touches the metal. When the sanding stroke is<br />
finished, lift the sander from the metal before pressing the stop<br />
switch. Do not lay the unit down with the motor running. For<br />
best results, apply moderate pressure while holding the sander<br />
against the work. Move the sander over the surface with parallel<br />
and slightly overlapping strokes. Move it as slowly as possible<br />
without causing overheating of the metal. Generally, the<br />
coverage rate should be about two square feet per minute.<br />
11-5