

HQ Pro-Stitcher User Manual - Handi Quilter
HQ Pro-Stitcher User Manual - Handi Quilter
HQ Pro-Stitcher User Manual - Handi Quilter

Create successful ePaper yourself
Turn your PDF publications into a flip-book with our unique Google optimized e-Paper software.
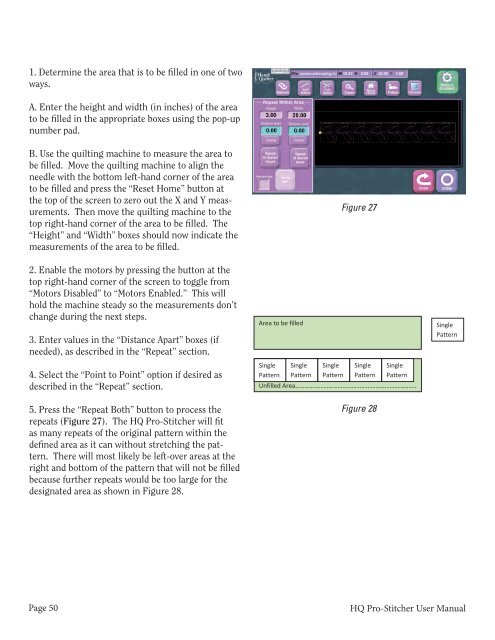
1. • Determine Determine the area the that area is that to be is to filled be filled in one in of one two<br />
ways. of two ways.<br />
o Enter the height and width (in inches) of the<br />
A. area Enter to be the filled height in the and appropriate width (in inches) boxes using of the the area<br />
to pop-up be filled number in the pad. appropriate boxes using the pop-up<br />
number o Use pad. the quilting machine to measure the<br />
area to be filled. Move the quilting machine to align<br />
B. the Use needle the quilting with the machine bottom left-hand to measure corner the area of the to<br />
be area filled. to be Move filled the and quilting press the machine reset home to align button the at<br />
needle the top with of the the screen bottom to zero left-hand out the corner X and of Y the measurements.<br />
be filled and Then press move the the “Reset quilting Home” machine button to at the<br />
area<br />
to<br />
the top right-hand top of the screen corner to of zero the out area the to be X and filled. Y measurements.<br />
“Height” and Then “Width” move boxes the quilting should machine now indicate to the the<br />
The<br />
top measurements right-hand corner of the area of the to area be filled. to be filled. The<br />
“Height” • Enable and “Width” the motors boxes by should pressing now the indicate button the<br />
measurements at the top right-hand of the corner area to of be the filled. screen to toggle<br />
from “Motors Disabled” to “Motors Enabled.” This<br />
2. will Enable hold the machine motors by steady pressing so the the measurements<br />
button at the<br />
top don’t right-hand change during corner the of next the screen steps. to toggle from<br />
“Motors • Enter Disabled” values to in “Motors the “Distance Enabled.” Apart” This boxes will (if<br />
hold needed), the machine as described steady in the so the “Repeat” measurements section. don’t<br />
change • Select during the “Point next steps. to Point” option if desired as<br />
described in the “Repeat” section.<br />
3. • Enter Press values the in “Repeat the “Distance Both” button Apart” to boxes process (if<br />
needed), the repeats as (Figure described 27). in the The “Repeat” <strong>HQ</strong> <strong>Pro</strong>-<strong>Stitcher</strong> section. will<br />
fit as many repeats of the original pattern within the<br />
4. defined Select area the as “Point it can to without Point” option stretching if desired the pattern.<br />
There in will the “Repeat” most likely section. be left-over areas at the<br />
as<br />
described<br />
right and bottom of the pattern that will not be filled<br />
5. because Press further “Repeat repeats Both” would button be too process large for the the<br />
repeats designated (Figure area 27). as shown The <strong>HQ</strong> in Figure <strong>Pro</strong>-<strong>Stitcher</strong> 28. will fit<br />
as many repeats of the original pattern within the<br />
defined area as it can without stretching the pattern.<br />
There will most likely be left-over areas at the<br />
right and bottom of the pattern that will not be filled<br />
because further repeats would be too large for the<br />
designated area as shown in Figure 28.<br />
• As with the previous “Repeat” function, the repeated pattern will now be treated by the<br />
<strong>HQ</strong> <strong>Pro</strong>-<strong>Stitcher</strong> as a single pattern.<br />
(Within Area.jpg) This function allows the user to define the width and height of an area to be<br />
filled and the <strong>Pro</strong>-<strong>Stitcher</strong> determines how many repeats of the pattern will fit within that area.<br />
The area must be larger than a single instance of the pattern. The pattern will not be skewed or<br />
cropped to fit within the area defined.<br />
• Determine the area that is to be filled in one of two ways.<br />
o Enter the height and width (in inches) of the area to be filled in the appropriate<br />
boxes using the pop-up number pad.<br />
o<br />
Use the quilting machine to measure the area to be filled. Move the quilting<br />
machine to align the needle with the bottom left-hand corner of the area to be<br />
filled and press the (Reset Home.jpg) button at the top of the screen to zero out<br />
the X and Y measurements. Then move the quilting machine to the top righthand<br />
corner of the area to be filled. The “Height” and “Width” boxes should<br />
now indicate the measurements of the area to be filled.<br />
Figure 27<br />
• Enable the motors by pressing the button at the top right-hand corner of the screen to<br />
toggle from “Motors Disabled” to “Motors Enabled.” This will hold the machine steady<br />
so the measurements don’t change during the next steps.<br />
• Enter values in the “Distance Apart” boxes, as described in the “Repeat” section.<br />
• Select the “Point to Point” option if desired<br />
Figure<br />
as<br />
27<br />
described in the “Repeat” section.<br />
• Press the “Repeat Both” button to process the repeats (figure 27). The <strong>HQ</strong> <strong>Pro</strong>-<strong>Stitcher</strong><br />
will fit as many repeats of the original pattern within the defined area as it can without<br />
stretching the pattern. There will most likely be left-over areas at the right and bottom<br />
of the pattern that will not be filled because further repeats would be too large for the<br />
designated area as shown in figure 28 (Luke, figure 28 is the drawing you see here<br />
below).<br />
Area to be filled<br />
Single<br />
Pattern<br />
Single<br />
Pattern<br />
Single<br />
Pattern<br />
Single<br />
Pattern<br />
Unfilled Area…………………………………………………………………..<br />
Figure 28<br />
Single<br />
Pattern<br />
Single<br />
Pattern<br />
• If the user only wishes to repeat in width, there is no need to enter anything in the<br />
“Height” box. Simply enter the desired width in the “Width” box and press the (Repeat<br />
Width.jpg) button (figure 29). The same can be done for repeating only height using the<br />
(Repeat Height.jpg) button.<br />
Page 50 54<br />
<strong>HQ</strong> <strong>Pro</strong>-<strong>Stitcher</strong> <strong>User</strong> <strong>Manual</strong>


