User Manual - Hasselblad.jp
User Manual - Hasselblad.jp
User Manual - Hasselblad.jp

You also want an ePaper? Increase the reach of your titles
YUMPU automatically turns print PDFs into web optimized ePapers that Google loves.
4<br />
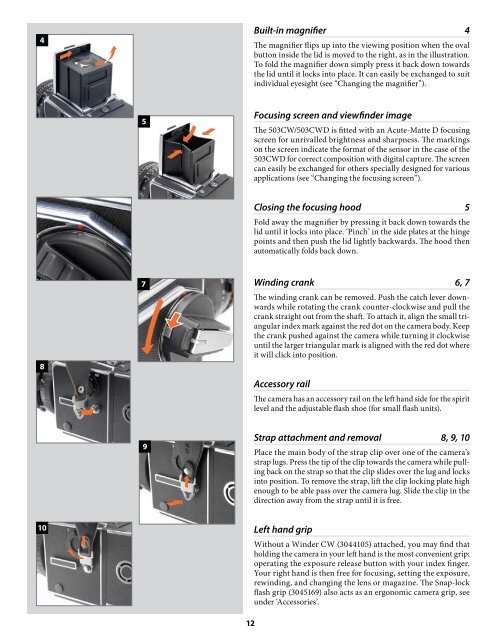
Built-in magnifier 4<br />
The magnifier flips up into the viewing position when the oval<br />
button inside the lid is moved to the right, as in the illustration.<br />
To fold the magnifier down simply press it back down towards<br />
the lid until it locks into place. It can easily be exchanged to suit<br />
individual eyesight (see “Changing the magnifier”).<br />
5<br />
Focusing screen and viewfinder image<br />
The 503CW/503CWD is fitted with an Acute-Matte D focusing<br />
screen for unrivalled brightness and sharpness. The markings<br />
on the screen indicate the format of the sensor in the case of the<br />
503CWD for correct composition with digital capture. The screen<br />
can easily be exchanged for others specially designed for various<br />
applications (see “Changing the focusing screen”).<br />
6<br />
Closing the focusing hood 5<br />
Fold away the magnifier by pressing it back down towards the<br />
lid until it locks into place. ‘Pinch’ in the side plates at the hinge<br />
points and then push the lid lightly backwards. The hood then<br />
automatically folds back down.<br />
8<br />
7<br />
Winding crank 6, 7<br />
The winding crank can be removed. Push the catch lever downwards<br />
while rotating the crank counter-clockwise and pull the<br />
crank straight out from the shaft. To attach it, align the small triangular<br />
index mark against the red dot on the camera body. Keep<br />
the crank pushed against the camera while turning it clockwise<br />
until the larger triangular mark is aligned with the red dot where<br />
it will click into position.<br />
Accessory rail<br />
The camera has an accessory rail on the left hand side for the spirit<br />
level and the adjustable flash shoe (for small flash units).<br />
9<br />
Strap attachment and removal 8, 9, 10<br />
Place the main body of the strap clip over one of the camera’s<br />
strap lugs. Press the tip of the clip towards the camera while pulling<br />
back on the strap so that the clip slides over the lug and locks<br />
into position. To remove the strap, lift the clip locking plate high<br />
enough to be able pass over the camera lug. Slide the clip in the<br />
direction away from the strap until it is free.<br />
10<br />
12<br />
Left hand grip<br />
Without a Winder CW (3044105) attached, you may find that<br />
holding the camera in your left hand is the most convenient grip;<br />
operating the exposure release button with your index finger.<br />
Your right hand is then free for focusing, setting the exposure,<br />
rewinding, and changing the lens or magazine. The Snap-lock<br />
flash grip (3045169) also acts as an ergonomic camera grip, see<br />
under ‘Accessories’.