User Manual - Hasselblad.jp
User Manual - Hasselblad.jp
User Manual - Hasselblad.jp

You also want an ePaper? Increase the reach of your titles
YUMPU automatically turns print PDFs into web optimized ePapers that Google loves.
1<br />
2<br />
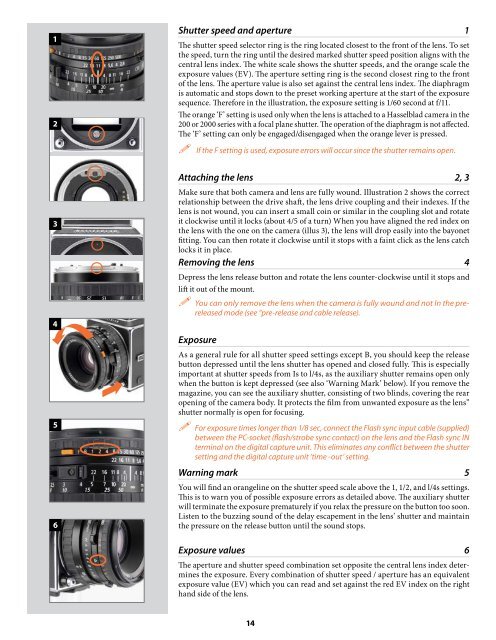
Shutter speed and aperture 1<br />
The shutter speed selector ring is the ring located closest to the front of the lens. To set<br />
the speed, turn the ring until the desired marked shutter speed position aligns with the<br />
central lens index. The white scale shows the shutter speeds, and the orange scale the<br />
exposure values (EV). The aperture setting ring is the second closest ring to the front<br />
of the lens. The aperture value is also set against the central lens index. The diaphragm<br />
is automatic and stops down to the preset working aperture at the start of the exposure<br />
sequence. Therefore in the illustration, the exposure setting is 1/60 second at f/11.<br />
The orange ‘F’ setting is used only when the lens is attached to a <strong>Hasselblad</strong> camera in the<br />
200 or 2000 series with a focal plane shutter. The operation of the diaphragm is not affected.<br />
The ‘F’ setting can only be engaged/disengaged when the orange lever is pressed.<br />
If the F setting is used, exposure errors will occur since the shutter remains open.<br />
3<br />
4<br />
5<br />
6<br />
Attaching the lens 2, 3<br />
Make sure that both camera and lens are fully wound. Illustration 2 shows the correct<br />
relationship between the drive shaft, the lens drive coupling and their indexes. If the<br />
lens is not wound, you can insert a small coin or similar in the coupling slot and rotate<br />
it clockwise until it locks (about 4/5 of a turn) When you have aligned the red index on<br />
the lens with the one on the camera (illus 3), the lens will drop easily into the bayonet<br />
fitting. You can then rotate it clockwise until it stops with a faint click as the lens catch<br />
locks it in place.<br />
Removing the lens 4<br />
Depress the lens release button and rotate the lens counter-clockwise until it stops and<br />
lift it out of the mount.<br />
You can only remove the lens when the camera is fully wound and not In the prereleased<br />
mode (see “pre-release and cable release).<br />
Exposure<br />
As a general rule for all shutter speed settings except B, you should keep the release<br />
button depressed until the lens shutter has opened and closed fully. This is especially<br />
important at shutter speeds from Is to l/4s, as the auxiliary shutter remains open only<br />
when the button is kept depressed (see also ‘Warning Mark’ below). If you remove the<br />
magazine, you can see the auxiliary shutter, consisting of two blinds, covering the rear<br />
opening of the camera body. It protects the film from unwanted exposure as the lens”<br />
shutter normally is open for focusing.<br />
For exposure times longer than 1/8 sec, connect the Flash sync input cable (supplied)<br />
between the PC-socket (flash/strobe sync contact) on the lens and the Flash sync IN<br />
terminal on the digital capture unit. This eliminates any conflict between the shutter<br />
setting and the digital capture unit ‘time -out‘ setting.<br />
Warning mark 5<br />
You will find an orangeline on the shutter speed scale above the 1, 1/2, and l/4s settings.<br />
This is to warn you of possible exposure errors as detailed above. The auxiliary shutter<br />
will terminate the exposure prematurely if you relax the pressure on the button too soon.<br />
Listen to the buzzing sound of the delay escapement in the lens’ shutter and maintain<br />
the pressure on the release button until the sound stops.<br />
Exposure values 6<br />
The aperture and shutter speed combination set opposite the central lens index determines<br />
the exposure. Every combination of shutter speed / aperture has an equivalent<br />
exposure value (EV) which you can read and set against the red EV index on the right<br />
hand side of the lens.<br />
14