User Manual - Hasselblad.jp
User Manual - Hasselblad.jp
User Manual - Hasselblad.jp

You also want an ePaper? Increase the reach of your titles
YUMPU automatically turns print PDFs into web optimized ePapers that Google loves.
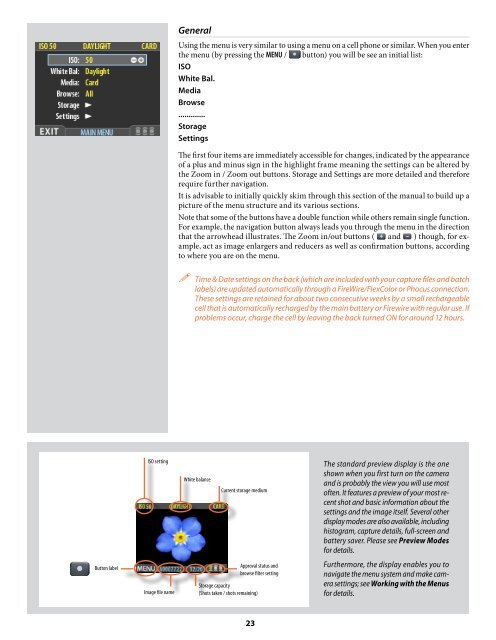
General<br />
Using the menu is very similar to using a menu on a cell phone or similar. When you enter<br />
the menu (by pressing the MENU / button) you will be see an initial list:<br />
ISO<br />
White Bal.<br />
Media<br />
Browse<br />
.............<br />
Storage<br />
Settings<br />
The first four items are immediately accessible for changes, indicated by the appearance<br />
of a plus and minus sign in the highlight frame meaning the settings can be altered by<br />
the Zoom in / Zoom out buttons. Storage and Settings are more detailed and therefore<br />
require further navigation.<br />
It is advisable to initially quickly skim through this section of the manual to build up a<br />
picture of the menu structure and its various sections.<br />
Note that some of the buttons have a double function while others remain single function.<br />
For example, the navigation button always leads you through the menu in the direction<br />
that the arrowhead illustrates. The Zoom in/out buttons ( and ) though, for example,<br />
act as image enlargers and reducers as well as confirmation buttons, according<br />
to where you are on the menu.<br />
Time & Date settings on the back (which are included with your capture files and batch<br />
labels) are updated automatically through a FireWire/FlexColor or Phocus connection.<br />
These settings are retained for about two consecutive weeks by a small rechargeable<br />
cell that is automatically recharged by the main battery or Firewire with regular use. If<br />
problems occur, charge the cell by leaving the back turned ON for around 12 hours.<br />
ISO setting<br />
White balance<br />
Current storage medium<br />
The standard preview display is the one<br />
shown when you first turn on the camera<br />
and is probably the view you will use most<br />
often. It features a preview of your most recent<br />
shot and basic information about the<br />
settings and the image itself. Several other<br />
display modes are also available, including<br />
histogram, capture details, full-screen and<br />
battery saver. Please see Preview Modes<br />
for details.<br />
Button label<br />
Image file name<br />
Approval status and<br />
browse filter setting<br />
Storage capacity<br />
(Shots taken / shots remaining)<br />
Furthermore, the display enables you to<br />
navigate the menu system and make camera<br />
settings; see Working with the Menus<br />
for details.<br />
23