User Manual - Hasselblad.jp
User Manual - Hasselblad.jp
User Manual - Hasselblad.jp

You also want an ePaper? Increase the reach of your titles
YUMPU automatically turns print PDFs into web optimized ePapers that Google loves.
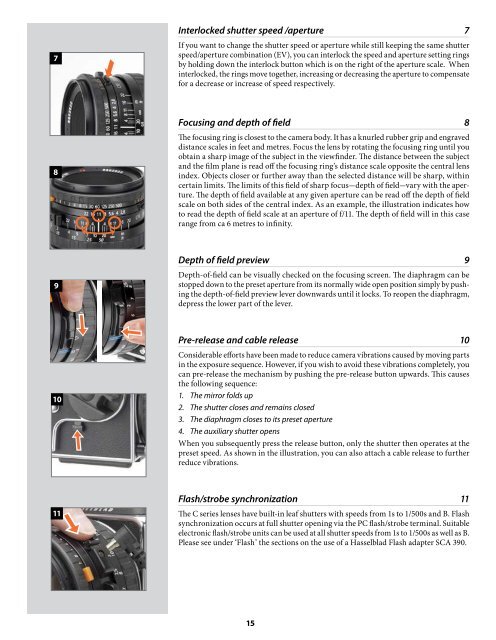
7<br />
Interlocked shutter speed /aperture 7<br />
If you want to change the shutter speed or aperture while still keeping the same shutter<br />
speed/aperture combination (EV), you can interlock the speed and aperture setting rings<br />
by holding down the interlock button which is on the right of the aperture scale. When<br />
interlocked, the rings move together, increasing or decreasing the aperture to compensate<br />
for a decrease or increase of speed respectively.<br />
8<br />
Focusing and depth of field 8<br />
The focusing ring is closest to the camera body. It has a knurled rubber grip and engraved<br />
distance scales in feet and metres. Focus the lens by rotating the focusing ring until you<br />
obtain a sharp image of the subject in the viewfinder. The distance between the subject<br />
and the film plane is read off the focusing ring’s distance scale opposite the central lens<br />
index. Objects closer or further away than the selected distance will be sharp, within<br />
certain limits. The limits of this field of sharp focus-depth of field-vary with the aperture.<br />
The depth of field available at any given aperture can be read off the depth of field<br />
scale on both sides of the central index. As an example, the illustration indicates how<br />
to read the depth of field scale at an aperture of f/11. The depth of field will in this case<br />
range from ca 6 metres to infinity.<br />
9<br />
Depth of field preview 9<br />
Depth-of-field can be visually checked on the focusing screen. The diaphragm can be<br />
stopped down to the preset aperture from its normally wide open position simply by pushing<br />
the depth-of-field preview lever downwards until it locks. To reopen the diaphragm,<br />
depress the lower part of the lever.<br />
10<br />
Pre-release and cable release 10<br />
Considerable efforts have been made to reduce camera vibrations caused by moving parts<br />
in the exposure sequence. However, if you wish to avoid these vibrations completely, you<br />
can pre-release the mechanism by pushing the pre-release button upwards. This causes<br />
the following sequence:<br />
1. The mirror folds up<br />
2. The shutter closes and remains closed<br />
3. The diaphragm closes to its preset aperture<br />
4. The auxiliary shutter opens<br />
When you subsequently press the release button, only the shutter then operates at the<br />
preset speed. As shown in the illustration, you can also attach a cable release to further<br />
reduce vibrations.<br />
11<br />
Flash/strobe synchronization 11<br />
The C series lenses have built-in leaf shutters with speeds from 1s to 1/500s and B. Flash<br />
synchronization occurs at full shutter opening via the PC flash/strobe terminal. Suitable<br />
electronic flash/strobe units can be used at all shutter speeds from 1s to 1/500s as well as B.<br />
Please see under ‘Flash’ the sections on the use of a <strong>Hasselblad</strong> Flash adapter SCA 390.<br />
15