User Manual - Hasselblad.jp
User Manual - Hasselblad.jp
User Manual - Hasselblad.jp

You also want an ePaper? Increase the reach of your titles
YUMPU automatically turns print PDFs into web optimized ePapers that Google loves.
1<br />
2<br />
3<br />
<br />
<br />
<br />
4 5<br />
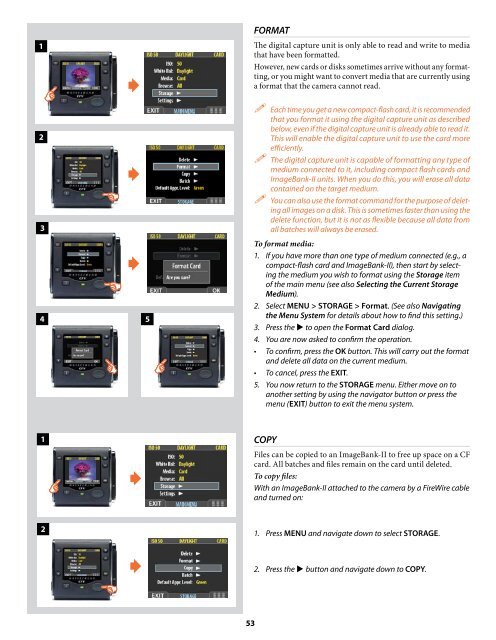
FORMAT<br />
The digital capture unit is only able to read and write to media<br />
that have been formatted.<br />
However, new cards or disks sometimes arrive without any formatting,<br />
or you might want to convert media that are currently using<br />
a format that the camera cannot read.<br />
Each time you get a new compact-flash card, it is recommended<br />
that you format it using the digital capture unit as described<br />
below, even if the digital capture unit is already able to read it.<br />
This will enable the digital capture unit to use the card more<br />
efficiently.<br />
The digital capture unit is capable of formatting any type of<br />
medium connected to it, including compact flash cards and<br />
ImageBank-II units. When you do this, you will erase all data<br />
contained on the target medium.<br />
You can also use the format command for the purpose of deleting<br />
all images on a disk. This is sometimes faster than using the<br />
delete function, but it is not as flexible because all data from<br />
all batches will always be erased.<br />
To format media:<br />
1. If you have more than one type of medium connected (e.g., a<br />
compact-flash card and ImageBank-II), then start by selecting<br />
the medium you wish to format using the Storage item<br />
of the main menu (see also Selecting the Current Storage<br />
Medium).<br />
2. Select MENU > STORAGE > Format. (See also Navigating<br />
the Menu System for details about how to find this setting.)<br />
3. Press the to open the Format Card dialog.<br />
4. You are now asked to confirm the operation.<br />
• To confirm, press the OK button. This will carry out the format<br />
and delete all data on the current medium.<br />
• To cancel, press the EXIT.<br />
5. You now return to the STORAGE menu. Either move on to<br />
another setting by using the navigator button or press the<br />
menu (EXIT) button to exit the menu system.<br />
1<br />
<br />
COPY<br />
Files can be copied to an ImageBank-II to free up space on a CF<br />
card. All batches and files remain on the card until deleted.<br />
To copy files:<br />
With an ImageBank-II attached to the camera by a FireWire cable<br />
and turned on:<br />
2<br />
<br />
1. Press MENU and navigate down to select STORAGE.<br />
2. Press the button and navigate down to COPY.<br />
53