User Manual - Hasselblad.jp
User Manual - Hasselblad.jp
User Manual - Hasselblad.jp

You also want an ePaper? Increase the reach of your titles
YUMPU automatically turns print PDFs into web optimized ePapers that Google loves.
Battery-saver mode<br />
In this mode, the digital capture unit is fully responsive, so you can take pictures but the<br />
screen is not lit up, thereby saving battery power.<br />
You can enter the menu system while shooting in this mode (which activates the screen<br />
until you exit the menu system again) but the approval, zoom and navigator buttons<br />
have no effect.<br />
You can also save battery power by turning down the brightness and/or contrast of<br />
the display using the Items on the MENU > SETTINGS > USER INTERFACE > DISPLAY<br />
menu. See Making Display Settings for details.<br />
1<br />
Other ways to save battery power include setting a display time-out and/or a powerdown<br />
time-out (each of these is disabled by default). Use MENU > SETTINGS > USER<br />
INTERFACE > Power Down to set a power-down time out. Use MENU > SETTINGS<br />
> USER INTERFACE > DISPLAY > Timeout to set a display time-out. See also Items<br />
on the USER INTERFACE Menu and Making Display Settings for details about these<br />
settings.<br />
2<br />
Full-screen mode 1<br />
In full-screen mode, you can browse your images at standard preview resolution without<br />
any distracting data surrounding them.<br />
Because the current approval setting is not shown in full-screen mode, the approval<br />
button has no effect. This will prevent you from accidentally assigning the wrong status<br />
without knowing it.<br />
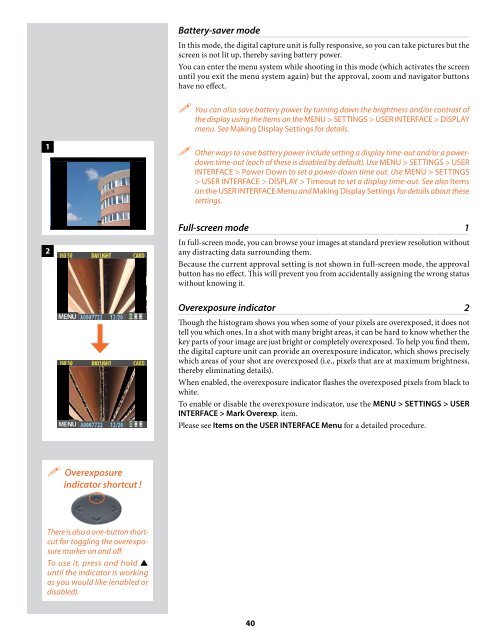
Overexposure indicator 2<br />
Though the histogram shows you when some of your pixels are overexposed, it does not<br />
tell you which ones. In a shot with many bright areas, it can be hard to know whether the<br />
key parts of your image are just bright or completely overexposed. To help you find them,<br />
the digital capture unit can provide an overexposure indicator, which shows precisely<br />
which areas of your shot are overexposed (i.e., pixels that are at maximum brightness,<br />
thereby eliminating details).<br />
When enabled, the overexposure indicator flashes the overexposed pixels from black to<br />
white.<br />
To enable or disable the overexposure indicator, use the MENU > SETTINGS > USER<br />
INTERFACE > Mark Overexp. item.<br />
Please see Items on the USER INTERFACE Menu for a detailed procedure.<br />
Overexposure<br />
indicator shortcut !<br />
There is also a one-button shortcut<br />
for toggling the overexposure<br />
marker on and off.<br />
To use it, press and hold <br />
until the indicator is working<br />
as you would like (enabled or<br />
disabled).<br />
40