User Manual - Hasselblad.jp
User Manual - Hasselblad.jp
User Manual - Hasselblad.jp

You also want an ePaper? Increase the reach of your titles
YUMPU automatically turns print PDFs into web optimized ePapers that Google loves.
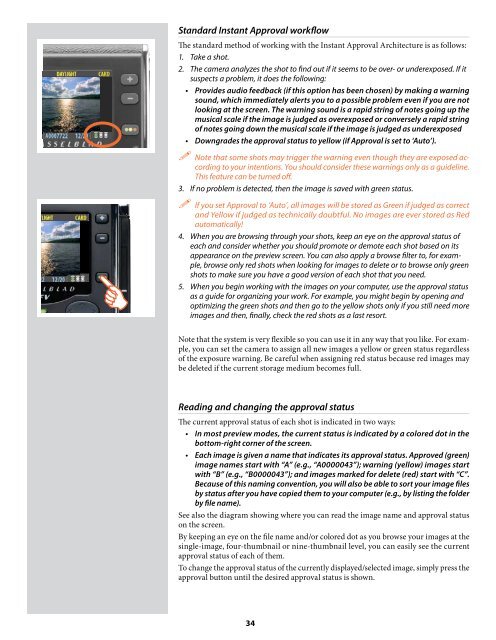
Standard Instant Approval workflow<br />
The standard method of working with the Instant Approval Architecture is as follows:<br />
1. Take a shot.<br />
2. The camera analyzes the shot to find out if it seems to be over- or underexposed. If it<br />
suspects a problem, it does the following:<br />
• Provides audio feedback (if this option has been chosen) by making a warning<br />
sound, which immediately alerts you to a possible problem even if you are not<br />
looking at the screen. The warning sound is a rapid string of notes going up the<br />
musical scale if the image is judged as overexposed or conversely a rapid string<br />
of notes going down the musical scale if the image is judged as underexposed<br />
• Downgrades the approval status to yellow (if Approval is set to ‘Auto’).<br />
Note that some shots may trigger the warning even though they are exposed according<br />
to your intentions. You should consider these warnings only as a guideline.<br />
This feature can be turned off.<br />
3. If no problem is detected, then the image is saved with green status.<br />
If you set Approval to ‘Auto’, all images will be stored as Green if judged as correct<br />
and Yellow if judged as technically doubtful. No images are ever stored as Red<br />
automatically!<br />
4. When you are browsing through your shots, keep an eye on the approval status of<br />
each and consider whether you should promote or demote each shot based on its<br />
appearance on the preview screen. You can also apply a browse filter to, for example,<br />
browse only red shots when looking for images to delete or to browse only green<br />
shots to make sure you have a good version of each shot that you need.<br />
5. When you begin working with the images on your computer, use the approval status<br />
as a guide for organizing your work. For example, you might begin by opening and<br />
optimizing the green shots and then go to the yellow shots only if you still need more<br />
images and then, finally, check the red shots as a last resort.<br />
Note that the system is very flexible so you can use it in any way that you like. For example,<br />
you can set the camera to assign all new images a yellow or green status regardless<br />
of the exposure warning. Be careful when assigning red status because red images may<br />
be deleted if the current storage medium becomes full.<br />
Reading and changing the approval status<br />
The current approval status of each shot is indicated in two ways:<br />
• In most preview modes, the current status is indicated by a colored dot in the<br />
bottom-right corner of the screen.<br />
• Each image is given a name that indicates its approval status. Approved (green)<br />
image names start with “A” (e.g., “A0000043”); warning (yellow) images start<br />
with “B” (e.g., “B0000043”); and images marked for delete (red) start with “C”.<br />
Because of this naming convention, you will also be able to sort your image files<br />
by status after you have copied them to your computer (e.g., by listing the folder<br />
by file name).<br />
See also the diagram showing where you can read the image name and approval status<br />
on the screen.<br />
By keeping an eye on the file name and/or colored dot as you browse your images at the<br />
single-image, four-thumbnail or nine-thumbnail level, you can easily see the current<br />
approval status of each of them.<br />
To change the approval status of the currently displayed/selected image, simply press the<br />
approval button until the desired approval status is shown.<br />
34