User Manual - Hasselblad.jp
User Manual - Hasselblad.jp
User Manual - Hasselblad.jp

You also want an ePaper? Increase the reach of your titles
YUMPU automatically turns print PDFs into web optimized ePapers that Google loves.
11a<br />
2a<br />
White balance / Grey Balance<br />
There are several ways to make a white/grey balance adjustment.<br />
When untethered on location you might prefer to make a quick<br />
preset adjustment setting at the same time that you check the ISO<br />
and Media settings. Tethered in the studio you might prefer to take<br />
the first shot of a grey scale and make the adjustment in FlexColor<br />
or Phocus for that session.<br />
Please note that white balance settings are for your viewing<br />
convenince only. They in no way affect the raw file which<br />
remains ‘neutral’ awaiting further processing.<br />
3a<br />
14a<br />
To select a preset white balance:<br />
1a. Press the MENU button on the digital capture unit.<br />
2a. Use and to select the White Bal: sub-menu.<br />
3a. Use the or button to step through the available<br />
choices until the one you want is shown.<br />
4a. Either move on to another setting by using the navigator button<br />
or press the MENU button to exit the menu system and<br />
keep your setting.<br />
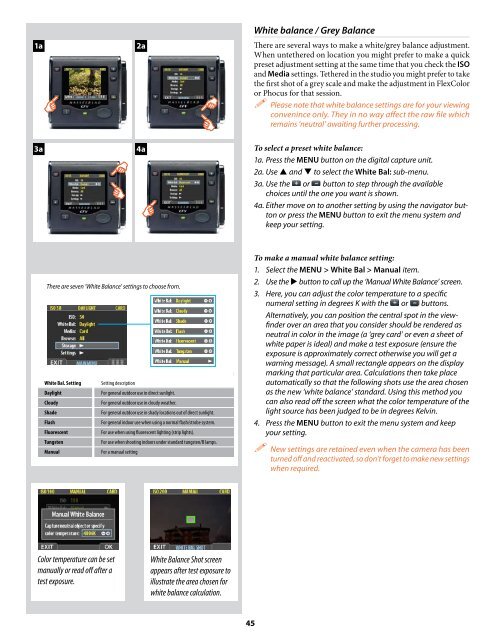
There are seven ‘White Balance’ settings to choose from.<br />
White Bal. Setting<br />
Setting description<br />
Daylight<br />
For general outdoor use in direct sunlight.<br />
Cloudy<br />
For general outdoor use in cloudy weather.<br />
Shade<br />
For general outdoor use in shady locations out of direct sunlight.<br />
Flash<br />
For general indoor use when using a normal flash/strobe system.<br />
Fluorescent<br />
For use when using fluorescent lighting (strip lights).<br />
Tungsten<br />
For use when shooting indoors under standard tungsten/B lamps.<br />
<strong>Manual</strong><br />
For a manual setting<br />
To make a manual white balance setting:<br />
1. Select the MENU > White Bal > <strong>Manual</strong> item.<br />
2. Use the button to call up the ‘<strong>Manual</strong> White Balance’ screen.<br />
3. Here, you can adjust the color temperature to a specific<br />
numeral setting in degrees K with the or buttons.<br />
Alternatively, you can position the central spot in the viewfinder<br />
over an area that you consider should be rendered as<br />
neutral in color in the image (a ‘grey card’ or even a sheet of<br />
white paper is ideal) and make a test exposure (ensure the<br />
exposure is approximately correct otherwise you will get a<br />
warning message). A small rectangle appears on the display<br />
marking that particular area. Calculations then take place<br />
automatically so that the following shots use the area chosen<br />
as the new ‘white balance’ standard. Using this method you<br />
can also read off the screen what the color temperature of the<br />
light source has been judged to be in degrees Kelvin.<br />
4. Press the MENU button to exit the menu system and keep<br />
your setting.<br />
New settings are retained even when the camera has been<br />
turned off and reactivated, so don’t forget to make new settings<br />
when required.<br />
Color temperature can be set<br />
manually or read off after a<br />
test exposure.<br />
White Balance Shot screen<br />
appears after test exposure to<br />
illustrate the area chosen for<br />
white balance calculation.<br />
45