Art and Design A comprehensive guide for creative artists - Aaltodoc
Art and Design A comprehensive guide for creative artists - Aaltodoc
Art and Design A comprehensive guide for creative artists - Aaltodoc

Create successful ePaper yourself
Turn your PDF publications into a flip-book with our unique Google optimized e-Paper software.
As an example, a roulette made by twisting cords or knots<br />
from small strings of a papyrus, or a well-shaped piece of<br />
stick. All these can be shaped accordingly to decorate clay<br />
artworks.<br />
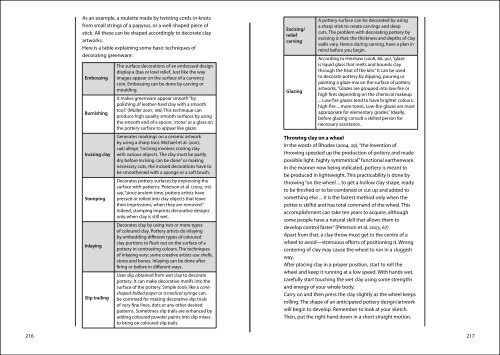
Here is a table explaining some basic techniques of<br />
decorating greenware:<br />
Embossing<br />
Burnishing<br />
Incising clay<br />
Stamping<br />
Inlaying<br />
Slip trailing<br />
The surface decorations of an embossed design<br />
display a (bas or low) relief. Just like the way<br />
images appear on the surface of a currency<br />
coin. Embossing can be done by carving or<br />
moulding.<br />
It makes greenware appear smooth “by<br />
polishing of leather-hard clay with a smooth<br />
tool.” (Müller 2007, 186) This technique can<br />
produce high quality smooth surfaces by using<br />
the smooth end of a spoon, 'stone' or a glass on<br />
the pottery surface to appear like glaze.<br />
Generates markings on a ceramic artwork<br />
by using a sharp tool. Michael et al. (2007,<br />
146) allege, “incising involves scoring clay<br />
with various objects. The clay must be partly<br />
dry be<strong>for</strong>e incising can be done” or making<br />
necessary cuts, the incised decorations have to<br />
be smoothened with a sponge or a soft brush.<br />
Decorates pottery surfaces by impressing the<br />
surface with patterns. Peterson et al. (2003, 110)<br />
say, “since ancient time, pottery <strong>artists</strong> have<br />
pressed or rolled into clay objects that leave<br />
their impressions, when they are removed.”<br />
Indeed, stamping imprints decorative designs<br />
only when clay is still wet.<br />
Decorates clay by using two or more types<br />
of coloured clay. Pottery <strong>artists</strong> do inlaying<br />
by embedding different types of coloured<br />
clay portions to flush out on the surface of a<br />
pottery in contrasting colours. The techniques<br />
of inlaying vary; some <strong>creative</strong> <strong>artists</strong> use shells,<br />
stone <strong>and</strong> bones. Inlaying can be done after<br />
firing or be<strong>for</strong>e in different ways.<br />
Uses slip obtained from wet clay to decorate<br />
pottery. It can make decorative motifs into the<br />
surface of the pottery. Simple tools like a coneshaped-folded<br />
paper or a medical syringe can<br />
be contrived <strong>for</strong> making decorative slip trials<br />
of very fine lines, dots or any other desired<br />
patterns. Sometimes slip trails are enhanced by<br />
adding coloured powder paints into slip mixes<br />
to bring on coloured slip trails.<br />
216 217<br />
Excising/<br />
relief<br />
carving<br />
Glazing<br />
A pottery surface can be decorated by using<br />
a sharp stick to create carvings <strong>and</strong> deep<br />
cuts. The problem with decorating pottery by<br />
excising is that; the thickness <strong>and</strong> depths of clay<br />
walls vary. Hence during carving, have a plan in<br />
mind be<strong>for</strong>e you begin.<br />
According to Hinshaw (2008, 86, 90), “glaze<br />
is liquid glass that melts <strong>and</strong> bounds clay<br />
through the heat of the kiln.” It can be used<br />
to decorate pottery by dipping, pouring or<br />
painting a glaze mix on the surface of pottery<br />
artworks. “Glazes are grouped into low-fire or<br />
high fires depending on the chemical makeup<br />
... Low-fire glazes tend to have brighter colours;<br />
high-fire ... more tones. Low-fire glazes are most<br />
appropriate <strong>for</strong> elementary grades.” Ideally,<br />
be<strong>for</strong>e glazing consult a skilled person <strong>for</strong><br />
necessary assistance.<br />
Throwing clay on a wheel<br />
In the words of Rhodes (2004, 29), “the invention of<br />
throwing speeded up the production of pottery <strong>and</strong> made<br />
possible light, highly symmetrical” functional earthenware.<br />
In the manner now being indicated, pottery is meant to<br />
be produced in lightweight. This practicability is done by<br />
throwing “on the wheel ... to get a hollow clay shape, ready<br />
to be finished or to be combined or cut up <strong>and</strong> added to<br />
something else ... it is the fastest method only when the<br />
potter is skilful <strong>and</strong> has total comm<strong>and</strong> of the wheel. This<br />
accomplishment can take ten years to acquire, although<br />
some people have a natural skill that allows them to<br />
develop control faster” (Peterson et al. 2003, 67)<br />
Apart from that, a clay throw must get to the centre of a<br />
wheel to avoid—strenuous ef<strong>for</strong>ts of positioning it. Wrong<br />
centering of clay may cause the wheel to run in a sluggish<br />
way.<br />
After placing clay in a proper position, start to roll the<br />
wheel <strong>and</strong> keep it running at a low speed. With h<strong>and</strong>s wet,<br />
carefully start touching the wet clay using some strengths<br />
<strong>and</strong> energy of your whole body.<br />
Carry on <strong>and</strong> then press the clay slightly as the wheel keeps<br />
rolling. The shape of an anticipated pottery design/artwork<br />
will begin to develop. Remember to look at your sketch.<br />
Then, put the right h<strong>and</strong> down in a short straight motion.