Art and Design A comprehensive guide for creative artists - Aaltodoc
Art and Design A comprehensive guide for creative artists - Aaltodoc
Art and Design A comprehensive guide for creative artists - Aaltodoc

Create successful ePaper yourself
Turn your PDF publications into a flip-book with our unique Google optimized e-Paper software.
Start by preparing a separate screen or stencil paper <strong>for</strong><br />
each colour using one of the methods—indicated in the<br />
section associated with screen printing.<br />
Assuming that the task undertaken is on a low cost budget,<br />
a paper stencil, a soft sponge, fabric or a cloth material <strong>and</strong><br />
printing ink (paste) or colouring dyes from plants can be<br />
enough <strong>for</strong> a start.<br />
Almost always, colours chosen—are expected to be few,<br />
at least not more than three. Reason being that the more<br />
colours you use, the higher the costs of printing <strong>and</strong><br />
production.<br />
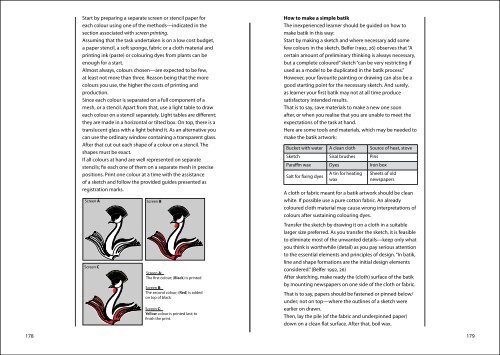
Since each colour is separated on a full component of a<br />
mesh, or a stencil. Apart from that, use a light table to draw<br />
each colour on a stencil separately. Light tables are different;<br />
they are made in a horizontal or tilted box. On top, there is a<br />
translucent glass with a light behind it. As an alternative you<br />
can use the ordinary window containing a transparent glass.<br />
After that cut out each shape of a colour on a stencil. The<br />
shapes must be exact.<br />
If all colours at h<strong>and</strong> are well represented on separate<br />
stencils; fix each one of them on a separate mesh in precise<br />
positions. Print one colour at a time with the assistance<br />
of a sketch <strong>and</strong> follow the provided <strong>guide</strong>s presented as<br />
registration marks.<br />
Screen A<br />
Screen C<br />
Screen B<br />
Screen A:<br />
The �rst colour; (Black) is printed<br />
Screen B:<br />
The second colour; (Red) is added<br />
on top of black<br />
Screen C:<br />
Yellow colour is printed last; to<br />
�nish the print.<br />
How to make a simple batik<br />
The inexperienced learner should be <strong>guide</strong>d on how to<br />
make batik in this way:<br />
Start by making a sketch <strong>and</strong> where necessary add some<br />
few colours in the sketch. Belfer (1992, 26) observes that “A<br />
certain amount of preliminary thinking is always necessary,<br />
but a complete coloured” sketch “can be very restricting if<br />
used as a model to be duplicated in the batik process.”<br />
However, your favourite painting or drawing can also be a<br />
good starting point <strong>for</strong> the necessary sketch. And surely,<br />
as learner your first batik may not at all time produce<br />
satisfactory intended results.<br />
That is to say, save materials to make a new one soon<br />
after, or when you realise that you are unable to meet the<br />
expectations of the task at h<strong>and</strong>.<br />
Here are some tools <strong>and</strong> materials, which may be needed to<br />
make the batik artwork:<br />
Bucket with water A clean cloth Source of heat, stove<br />
Sketch Sisal brushes Pins<br />
Paraffin wax Dyes Iron box<br />
Salt <strong>for</strong> fixing dyes<br />
A tin <strong>for</strong> heating<br />
wax<br />
Sheets of old<br />
newspapers<br />
A cloth or fabric meant <strong>for</strong> a batik artwork should be clean<br />
white. If possible use a pure cotton fabric. An already<br />
coloured cloth material may cause wrong interpretations of<br />
colours after sustaining colouring dyes.<br />
Transfer the sketch by drawing it on a cloth in a suitable<br />
larger size preferred. As you transfer the sketch, it is feasible<br />
to eliminate most of the unwanted details—keep only what<br />
you think is worthwhile (detail) as you pay serious attention<br />
to the essential elements <strong>and</strong> principles of design. “In batik,<br />
line <strong>and</strong> shape <strong>for</strong>mations are the initial design elements<br />
considered.” (Belfer 1992, 26)<br />
After sketching, make ready the (cloth) surface of the batik<br />
by mounting newspapers on one side of the cloth or fabric.<br />
That is to say, papers should be fastened or pinned below/<br />
under; not on top—where the outlines of a sketch were<br />
earlier on drawn.<br />
Then, lay the pile (of the fabric <strong>and</strong> underpinned paper)<br />
down on a clean flat surface. After that, boil wax.<br />
178 179