Art and Design A comprehensive guide for creative artists - Aaltodoc
Art and Design A comprehensive guide for creative artists - Aaltodoc
Art and Design A comprehensive guide for creative artists - Aaltodoc
Create successful ePaper yourself
Turn your PDF publications into a flip-book with our unique Google optimized e-Paper software.
Twining<br />
Ghiordes<br />
knots<br />
Crochet<br />
Can construct a weave with two or more str<strong>and</strong>s<br />
of strong strings of yarn twisted together.<br />
It can be used to construct trimmings <strong>for</strong> bags,<br />
hats <strong>and</strong> mainly shoe laces. Twining can also be<br />
used to produce artistic door rugs <strong>and</strong> baskets.<br />
Are commonly used by carpet weavers. They are<br />
made on a pile of warp yarn; usually with the<br />
help of a wooden frame. Ghiordes knots are in<br />
general cut in small sizes from coloured yarn or<br />
any other material to be carefully fixed between<br />
two adjacent warps.<br />
“Crochet” comes from a French word hook. This<br />
technique can be used to produce fabrics <strong>and</strong><br />
other functional h<strong>and</strong>icraft items using yarn or<br />
thread with a hooked needle. The technique is<br />
based on the principle of using a developing<br />
thread <strong>and</strong> following one another chain stitches.<br />
How to produce a simple weave<br />
using a cardboard box<br />
Weaving with a cardboard box can arouse curiosities of<br />
inquisitive weavers—interested in carrying out small<br />
projects. The basic materials are thread or strings of natural<br />
fiber such as sisal, a pencil, a cardboard paper <strong>and</strong> a cutter or<br />
a pair of scissors.<br />
Start by creating equally spaced markings of 1cm at the top<br />
<strong>and</strong> bottom sides of a cardboard box. Step by step, in equal<br />
dimensions or sizes.<br />
Cut open each marked area <strong>and</strong> create gaps in which weft<br />
yarn shall be fitted during weaving. The attained cuts may<br />
be triangular or just straight from a single cut.<br />
Pick yarn <strong>and</strong> then roll or tie it well on one corner of the first<br />
narrow opening. Go ahead <strong>and</strong> fit it up <strong>and</strong> down in each<br />
cut-slit on both ends of a cardboard. Fill the cardboard with<br />
weft yarn.<br />
After that, use a needle or a similar object to fit in warp yarn.<br />
Carefully, start to weave by rotating warp yarn through the<br />
weft, side by side using a needle in a continuous way.<br />
If the attained weave becomes gradually small during<br />
weaving it is likely that the edges of a weave have been<br />
pulled too tightly by warp. If so, try to loosen up yarn <strong>for</strong> the<br />
weave to get back into a pleasant shape—fit <strong>for</strong> a planned<br />
purpose.<br />
Different sets of coloured yarn can as well be added on the<br />
same card board. Fasten or cut off all loose ends of thread to<br />
finish the weave.<br />
How to make a paper weave<br />
The technique of making a paper weave is simple <strong>and</strong> it is<br />
one of the most outst<strong>and</strong>ing ways in which learners can<br />
be easily inspired into some self-evident aspects of making<br />
other crafts by weaving. “The finished paper weaving can<br />
<strong>for</strong>m the basis of weave patterns.” (Digolo et al. 1990, 83)<br />
To start a paper weave, find any two clean papers with<br />
different colours. They can be those you have already ripped<br />
up from magazines, paper wrappers, or bond white paper.<br />
Where possible, paint the paper to cause change <strong>for</strong> your<br />
desired colours.<br />
Make sure that the obtained types of papers are smooth<br />
<strong>and</strong> straight. Cut one paper <strong>and</strong> break it into equal narrow<br />
paper shreds or slits. These shall be used as weft.<br />
The second paper should also be cut in equal<br />
measurements as it was done <strong>for</strong> the first paper, but do not<br />
break the cuts. These thoroughly cut slits of coloured paper<br />
shall be used as warp.<br />
Start to weave by fitting narrow paper shreds into the weft<br />
sheet of paper.<br />
Weave up <strong>and</strong> down through the warp until when the weft<br />
paper reaches at the edge of the last cut, on the warp paper.<br />
This process of weaving actually involves sliding a paper<br />
through another paper in a reverse inclination. That is to<br />
say, the next warp paper strip should be carefully pushed<br />
smoothly through the slits in contrasting turns. At the<br />
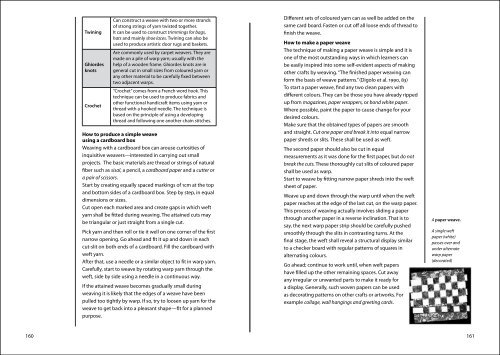
final stage, the weft shall reveal a structural display similar<br />
to a checker board with regular patterns of squares in<br />
alternating colours.<br />
Go ahead; continue to work until, when weft papers<br />
have filled up the other remaining spaces. Cut away<br />
any irregular or unwanted parts to make it ready <strong>for</strong><br />
a display. Generally, such woven papers can be used<br />
as decorating patterns on other crafts or artworks. For<br />
example collage, wall hangings <strong>and</strong> greeting cards.<br />
A paper weave.<br />
A single weft<br />
paper (white)<br />
passes over <strong>and</strong><br />
under alternate<br />
warp paper<br />
(decorated)<br />
160 161


