


Create successful ePaper yourself
Turn your PDF publications into a flip-book with our unique Google optimized e-Paper software.
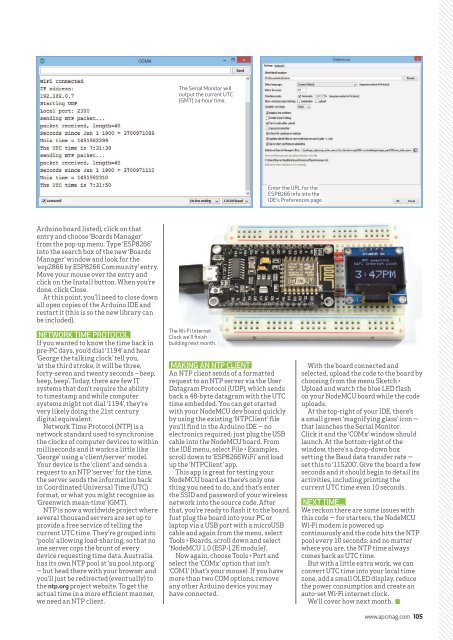
The Serial Monitor will<br />
output the current UTC<br />
(GMT) 24-hour time.<br />
Enter the URL for the<br />
ESP8266 info into the<br />
IDE’s Preferences page.<br />
Arduino board listed), click on that<br />
entry and choose ‘Boards Manager’<br />
from the pop-up menu. Type ‘ESP8266’<br />
into the search box of the new ‘Boards<br />
Manager’ window and look for the<br />
‘esp2866 by ESP8266 Community’ entry.<br />
Move your mouse over the entry and<br />
click on the Install button. When you’re<br />
done, click Close.<br />
At this point, you’ll need to close down<br />
all open copies of the Arduino IDE and<br />
restart it (this is so the new library can<br />
be included).<br />
NETWORK TIME PROTOCOL<br />
If you wanted to know the time back in<br />
pre-PC days, you’d dial ‘1194’ and hear<br />
‘George the talking clock’ tell you,<br />
‘at the third stroke, it will be three,<br />
forty-seven and twenty seconds – beep,<br />
beep, beep’. Today, there are few IT<br />
systems that don’t require the ability<br />
to timestamp and while computer<br />
systems might not dial ‘1194’, they’re<br />
very likely doing the 21st century<br />
digital equivalent.<br />
Network Time Protocol (NTP) is a<br />
network standard used to synchronise<br />
the clocks of computer devices to within<br />
milliseconds and it works a little like<br />
‘George’ using a ‘client/server’ model.<br />
Your device is the ‘client’ and sends a<br />
request to an NTP ‘server’ for the time,<br />
the server sends the information back<br />
in Coordinated Universal Time (UTC)<br />
format, or what you might recognise as<br />
‘Greenwich mean-time’ (GMT).<br />
NTP is now a worldwide project where<br />
several thousand servers are set up to<br />
provide a free service of telling the<br />
current UTC time. They’re grouped into<br />
‘pools’ allowing load-sharing, so that no<br />
one server cops the brunt of every<br />
device requesting time data. <strong>Australia</strong><br />
has its own NTP pool at ‘au.pool.ntp.org’<br />
— but head there with your browser and<br />
you’ll just be redirected (eventually) to<br />
the ntp.org project website. To get the<br />
actual time in a more efficient manner,<br />
we need an NTP client.<br />
The Wi-Fi Internet<br />
Clock we’ll finish<br />
building next month.<br />
MAKING AN NTP CLIENT<br />
An NTP client sends of a formatted<br />
request to an NTP server via the User<br />
Datagram Protocol (UDP), which sends<br />
back a 48-byte datagram with the UTC<br />
time embedded. You can get started<br />
with your NodeMCU dev board quickly<br />
by using the existing ‘NTPClient’ file<br />
you’ll find in the Arduino IDE — no<br />
electronics required: just plug the USB<br />
cable into the NodeMCU board. From<br />
the IDE menu, select File > Examples,<br />
scroll down to ‘ESP8266WiFi’ and load<br />
up the ‘NTPClient’ app.<br />
This app is great for testing your<br />
NodeMCU board as there’s only one<br />
thing you need to do, and that’s enter<br />
the SSID and password of your wireless<br />
network into the source code. After<br />
that, you’re ready to flash it to the board.<br />
Just plug the board into your PC or<br />
laptop via a USB port with a microUSB<br />
cable and again from the menu, select<br />
Tools > Boards, scroll down and select<br />
‘NodeMCU 1.0 (ESP-12E module)’.<br />
Now again, choose Tools > Port and<br />
select the ‘COMx’ option that isn’t<br />
‘COM1’ (that’s your mouse). If you have<br />
more than two COM options, remove<br />
any other Arduino device you may<br />
have connected.<br />
With the board connected and<br />
selected, upload the code to the board by<br />
choosing from the menu Sketch ><br />
Upload and watch the blue LED flash<br />
on your NodeMCU board while the code<br />
uploads.<br />
At the top-right of your IDE, there’s<br />
a small green ‘magnifying glass’ icon —<br />
that launches the Serial Monitor.<br />
Click it and the ‘COMx’ window should<br />
launch. At the bottom-right of the<br />
window, there’s a drop-down box<br />
setting the Baud data transfer rate —<br />
set this to ‘115200’. Give the board a few<br />
seconds and it should begin to detail its<br />
activities, including printing the<br />
current UTC time even 10 seconds.<br />
NEXT TIME...<br />
We reckon there are some issues with<br />
this code — for starters, the NodeMCU<br />
Wi-Fi modem is powered up<br />
continuously and the code hits the NTP<br />
pool every 10 seconds: and no matter<br />
where you are, the NTP time always<br />
comes back as UTC time.<br />
But with a little extra work, we can<br />
convert UTC time into your local time<br />
zone, add a small OLED display, reduce<br />
the power consumption and create an<br />
auto-set Wi-Fi internet clock.<br />
We’ll cover how next month.<br />
www.apcmag.com 105


