


You also want an ePaper? Increase the reach of your titles
YUMPU automatically turns print PDFs into web optimized ePapers that Google loves.
howto » networking<br />
Turn your home PC into<br />
a personal VPN Server<br />
Secure your browsing, even when away from home. Cat Ellis explains how.<br />
If you travel frequently — for work<br />
or fun — you’ve probably found<br />
yourself in a hotel room or a café<br />
with a Wi-Fi password scribbled<br />
on a sheet of notepaper and no idea<br />
how secure the connection is.<br />
Sometimes, you might be able to<br />
tether your laptop to your phone,<br />
but most plans don’t let you make<br />
wireless hotspots unless you pay an<br />
extra fee, and it’s very easy to chew<br />
through a whole month’s data<br />
allowance as Windows decides it’s<br />
a good time to perform some critical<br />
updates.<br />
You can get around this problem by<br />
using a PC at home as a proxy server.<br />
Rather than data traveling directly<br />
from your laptop to the web server,<br />
it’s sent via a secure encrypted<br />
connection to your home PC, which<br />
then forwards it.<br />
This technique is only for avoiding<br />
eavesdropping on potentially<br />
unsecured public networks — it won’t<br />
hide anything from your ISP. It’s also<br />
worth noting that your internet<br />
connection speed will be slower than<br />
it would be at home — particularly<br />
if you’re a long way from home when<br />
you log on.<br />
We’re using a free VPN tool called<br />
Hamachi, which is mainly used by<br />
gamers to create virtual local<br />
networks, and non-caching web proxy<br />
Privoxy. Here’s how to set it up.<br />
PREPARE THE SERVER<br />
1<br />
This guide requires two PCs:<br />
one (a desktop or laptop) to act as the<br />
server, and a laptop, which will be the<br />
client you’re carrying on the road. The<br />
server PC must be powered on at all<br />
times — something to bear in mind if<br />
you’re traveling for several days.<br />
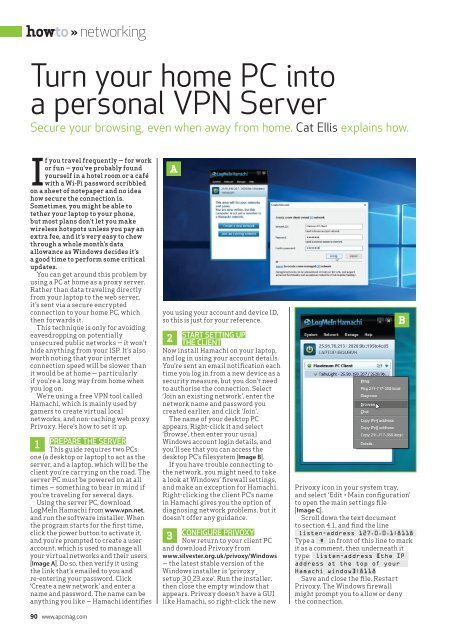
Using the server PC, download<br />
LogMeIn Hamachi from www.vpn.net,<br />
and run the software installer. When<br />
the program starts for the first time,<br />
click the power button to activate it,<br />
and you’re prompted to create a user<br />
account, which is used to manage all<br />
your virtual networks and their users<br />
[Image A]. Do so, then verify it using<br />
the link that’s emailed to you and<br />
re-entering your password. Click<br />
‘Create a new network’ and enter a<br />
name and password. The name can be<br />
anything you like — Hamachi identifies<br />
90 www.apcmag.com<br />
A<br />
you using your account and device ID,<br />
so this is just for your reference.<br />
START SETTING UP<br />
2<br />
THE CLIENT<br />
Now install Hamachi on your laptop,<br />
and log in using your account details.<br />
You’re sent an email notification each<br />
time you log in from a new device as a<br />
security measure, but you don’t need<br />
to authorise the connection. Select<br />
‘Join an existing network’, enter the<br />
network name and password you<br />
created earlier, and click ‘Join’.<br />
The name of your desktop PC<br />
appears. Right-click it and select<br />
‘Browse’, then enter your usual<br />
Windows account login details, and<br />
you’ll see that you can access the<br />
desktop PC’s filesystem [Image B].<br />
If you have trouble connecting to<br />
the network, you might need to take<br />
a look at Windows’ firewall settings,<br />
and make an exception for Hamachi.<br />
Right-clicking the client PC’s name<br />
in Hamachi gives you the option of<br />
diagnosing network problems, but it<br />
doesn’t offer any guidance.<br />
CONFIGURE PRIVOXY<br />
3<br />
Now return to your client PC<br />
and download Privoxy from<br />
www.silvester.org.uk/privoxy/Windows<br />
— the latest stable version of the<br />
Windows installer is ‘privoxy_<br />
setup_3_0_23.exe’. Run the installer,<br />
then close the empty window that<br />
appears. Privoxy doesn’t have a GUI<br />
like Hamachi, so right-click the new<br />
B<br />
Privoxy icon in your system tray,<br />
and select ‘Edit > Main configuration’<br />
to open the main settings file<br />
[Image C].<br />
Scroll down the text document<br />
to section 4.1, and find the line<br />
listen-address 127.0.0.1:8118<br />
Type a # in front of this line to mark<br />
it as a comment, then underneath it<br />
type: listen-address [the IP<br />
address at the top of your<br />
Hamachi window]:8118<br />
Save and close the file. Restart<br />
Privoxy. The Windows firewall<br />
might prompt you to allow or deny<br />
the connection.


