


Create successful ePaper yourself
Turn your PDF publications into a flip-book with our unique Google optimized e-Paper software.
In the beginning...<br />
In the early days of website<br />
development, the emphasis was on<br />
designing the web pages around the<br />
content. The site content was hard<br />
coded in HTML. Supporting the server<br />
required comprehensive webmaster<br />
skills. The development of content<br />
management systems (CMSes) changed<br />
website design by separating the<br />
content from the page code. In a CMS,<br />
the web pages are fed content instead<br />
of being embedded in the code, which<br />
enables the content to be managed<br />
with minimal skills.<br />
An effective method for<br />
understanding a CMS is to divide it<br />
into two subsystems: one is content<br />
management. The components used<br />
in the management subsystem enable<br />
creating, organising, modifying and<br />
deleting website content. The other<br />
subsystem is content gathering that<br />
publishes content to the web and<br />
manages workflow.<br />
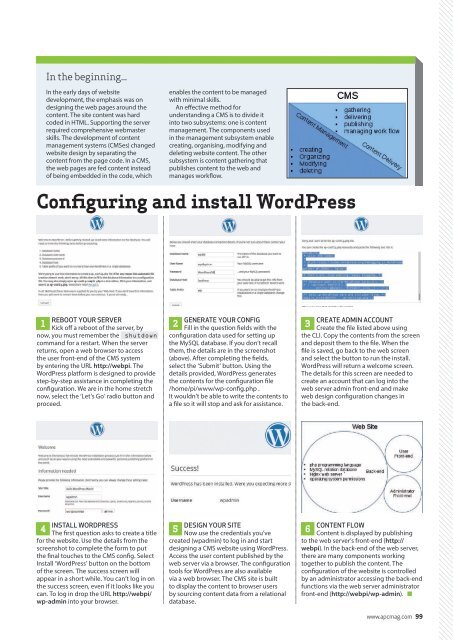
Configuring and install WordPress<br />
REBOOT YOUR SERVER<br />
1<br />
Kick off a reboot of the server, by<br />
now, you must remember the shutdown<br />
command for a restart. When the server<br />
returns, open a web browser to access<br />
the user front-end of the CMS system<br />
by entering the URL http://webpi. The<br />
WordPress platform is designed to provide<br />
step-by-step assistance in completing the<br />
configuration. We are in the home stretch<br />
now, select the ‘Let’s Go’ radio button and<br />
proceed.<br />
GENERATE YOUR CONFIG<br />
2<br />
Fill in the question fields with the<br />
configuration data used for setting up<br />
the MySQL database. If you don’t recall<br />
them, the details are in the screenshot<br />
(above). After completing the fields,<br />
select the ‘Submit’ button. Using the<br />
details provided, WordPress generates<br />
the contents for the configuration file<br />
/home/pi/www/wp-config.php .<br />
It wouldn’t be able to write the contents to<br />
a file so it will stop and ask for assistance.<br />
CREATE ADMIN ACCOUNT<br />
3<br />
Create the file listed above using<br />
the CLI. Copy the contents from the screen<br />
and deposit them to the file. When the<br />
file is saved, go back to the web screen<br />
and select the button to run the install.<br />
WordPress will return a welcome screen.<br />
The details for this screen are needed to<br />
create an account that can log into the<br />
web server admin front-end and make<br />
web design configuration changes in<br />
the back-end.<br />
INSTALL WORDPRESS<br />
4<br />
The first question asks to create a title<br />
for the website. Use the details from the<br />
screenshot to complete the form to put<br />
the final touches to the CMS config. Select<br />
Install ‘WordPress’ button on the bottom<br />
of the screen. The success screen will<br />
appear in a short while. You can’t log in on<br />
the success screen, even if it looks like you<br />
can. To log in drop the URL http://webpi/<br />
wp-admin into your browser.<br />
DESIGN YOUR SITE<br />
5<br />
Now use the credentials you’ve<br />
created (wpadmin) to log in and start<br />
designing a CMS website using WordPress.<br />
Access the user content published by the<br />
web server via a browser. The configuration<br />
tools for WordPress are also available<br />
via a web browser. The CMS site is built<br />
to display the content to browser users<br />
by sourcing content data from a relational<br />
database.<br />
CONTENT FLOW<br />
6<br />
Content is displayed by publishing<br />
to the web server’s front-end (http://<br />
webpi). In the back-end of the web server,<br />
there are many components working<br />
together to publish the content. The<br />
configuration of the website is controlled<br />
by an administrator accessing the back-end<br />
functions via the web server administrator<br />
front-end (http://webpi/wp-admin).<br />
www.apcmag.com 99


